


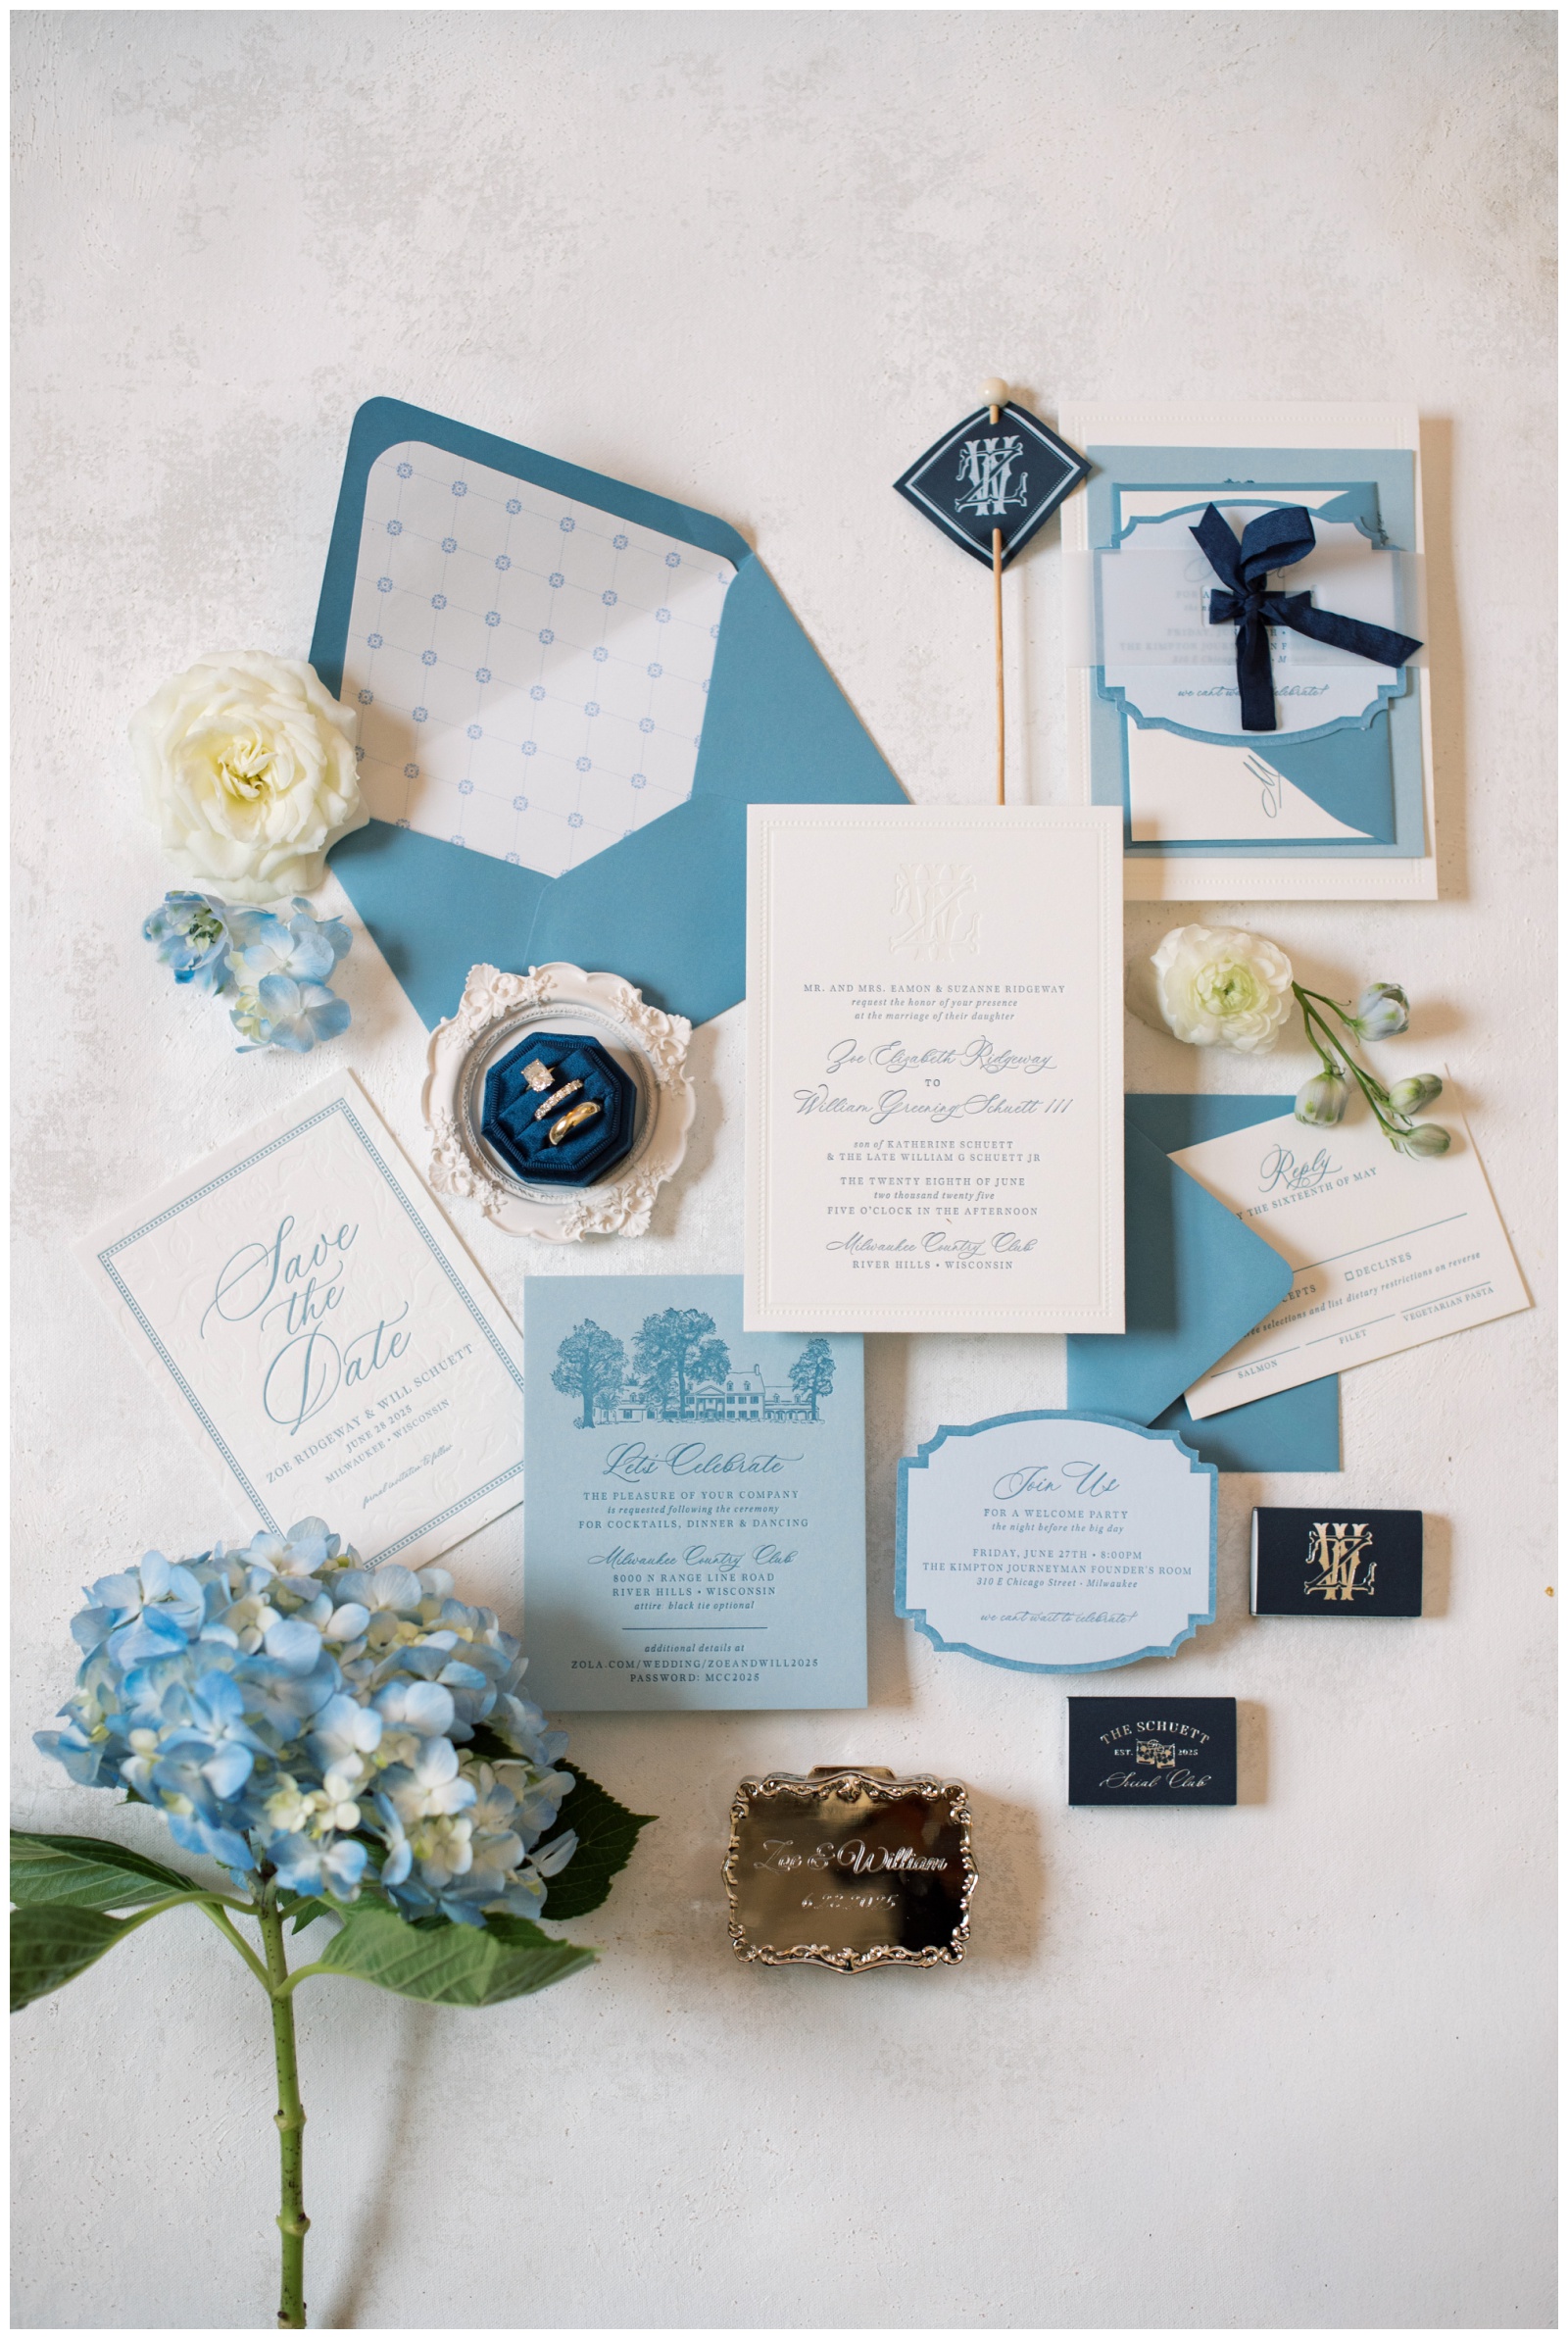
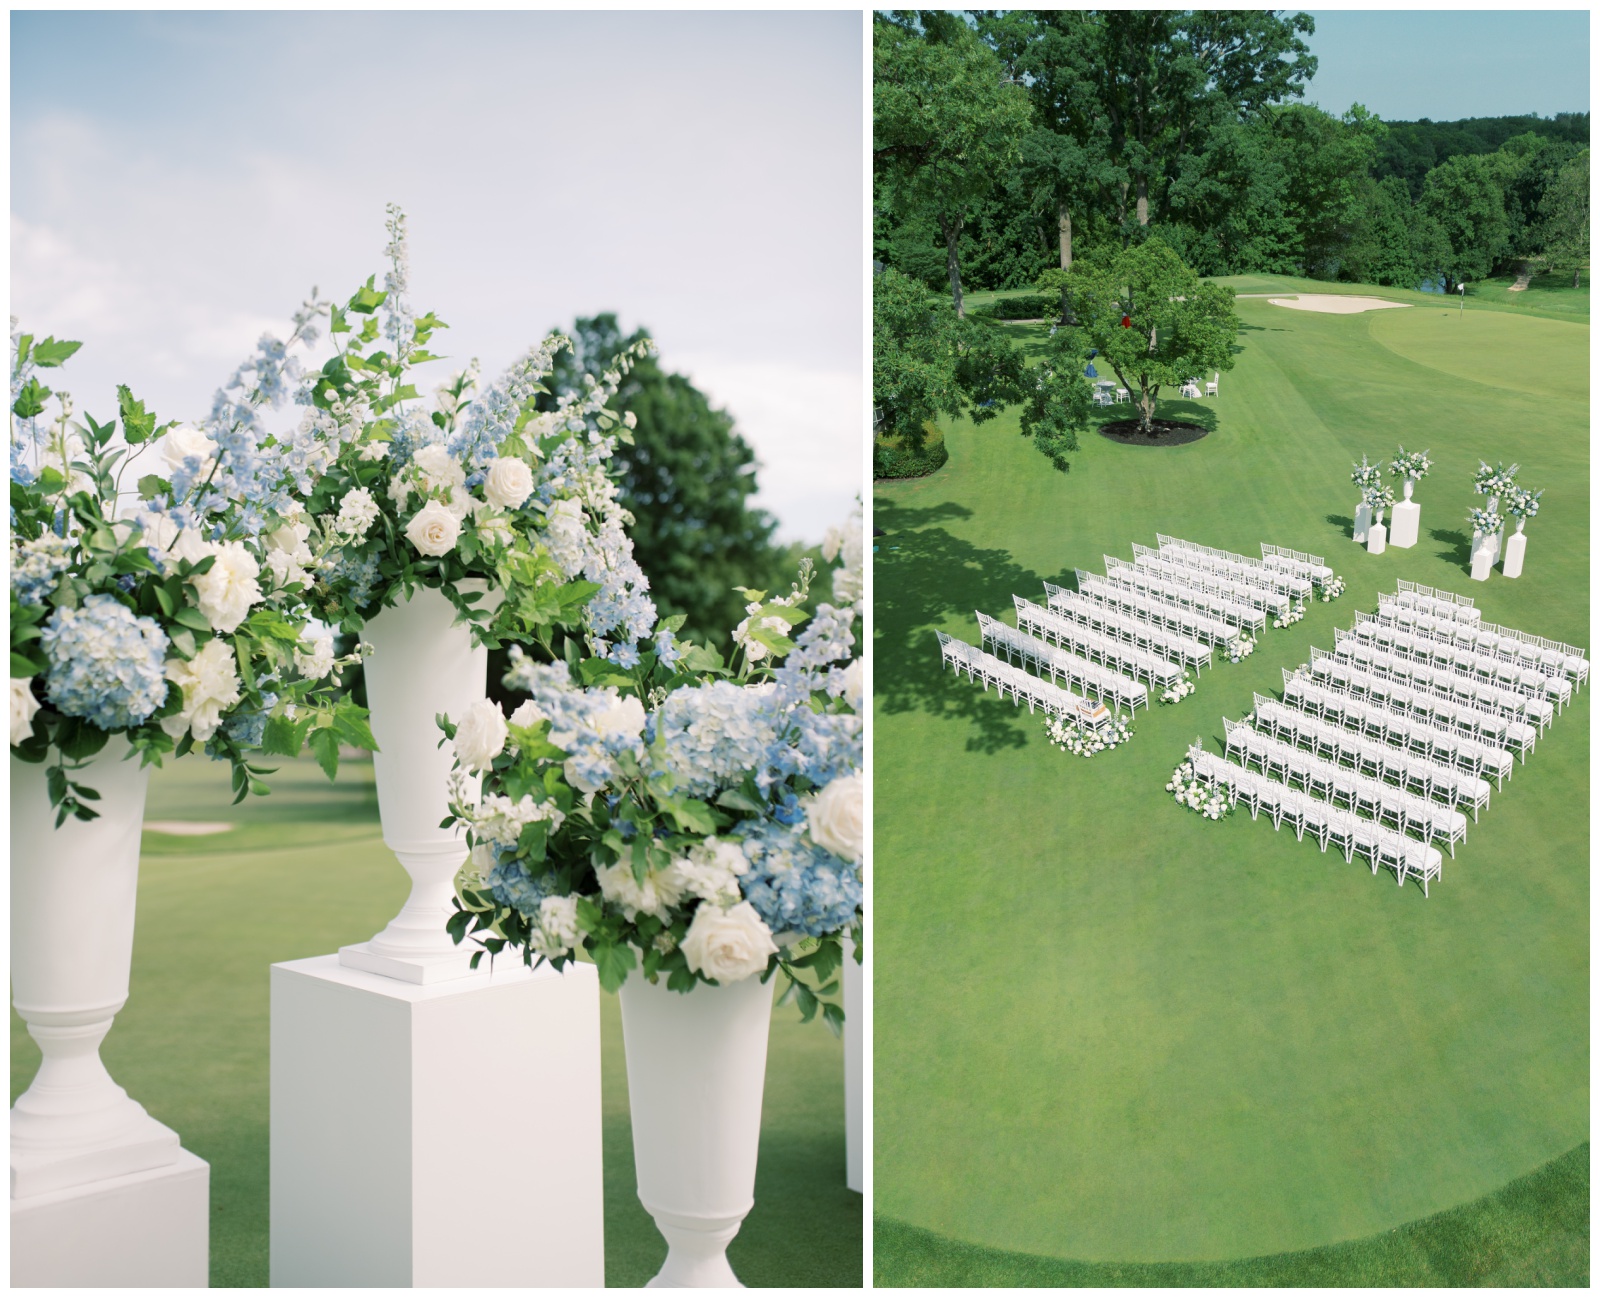
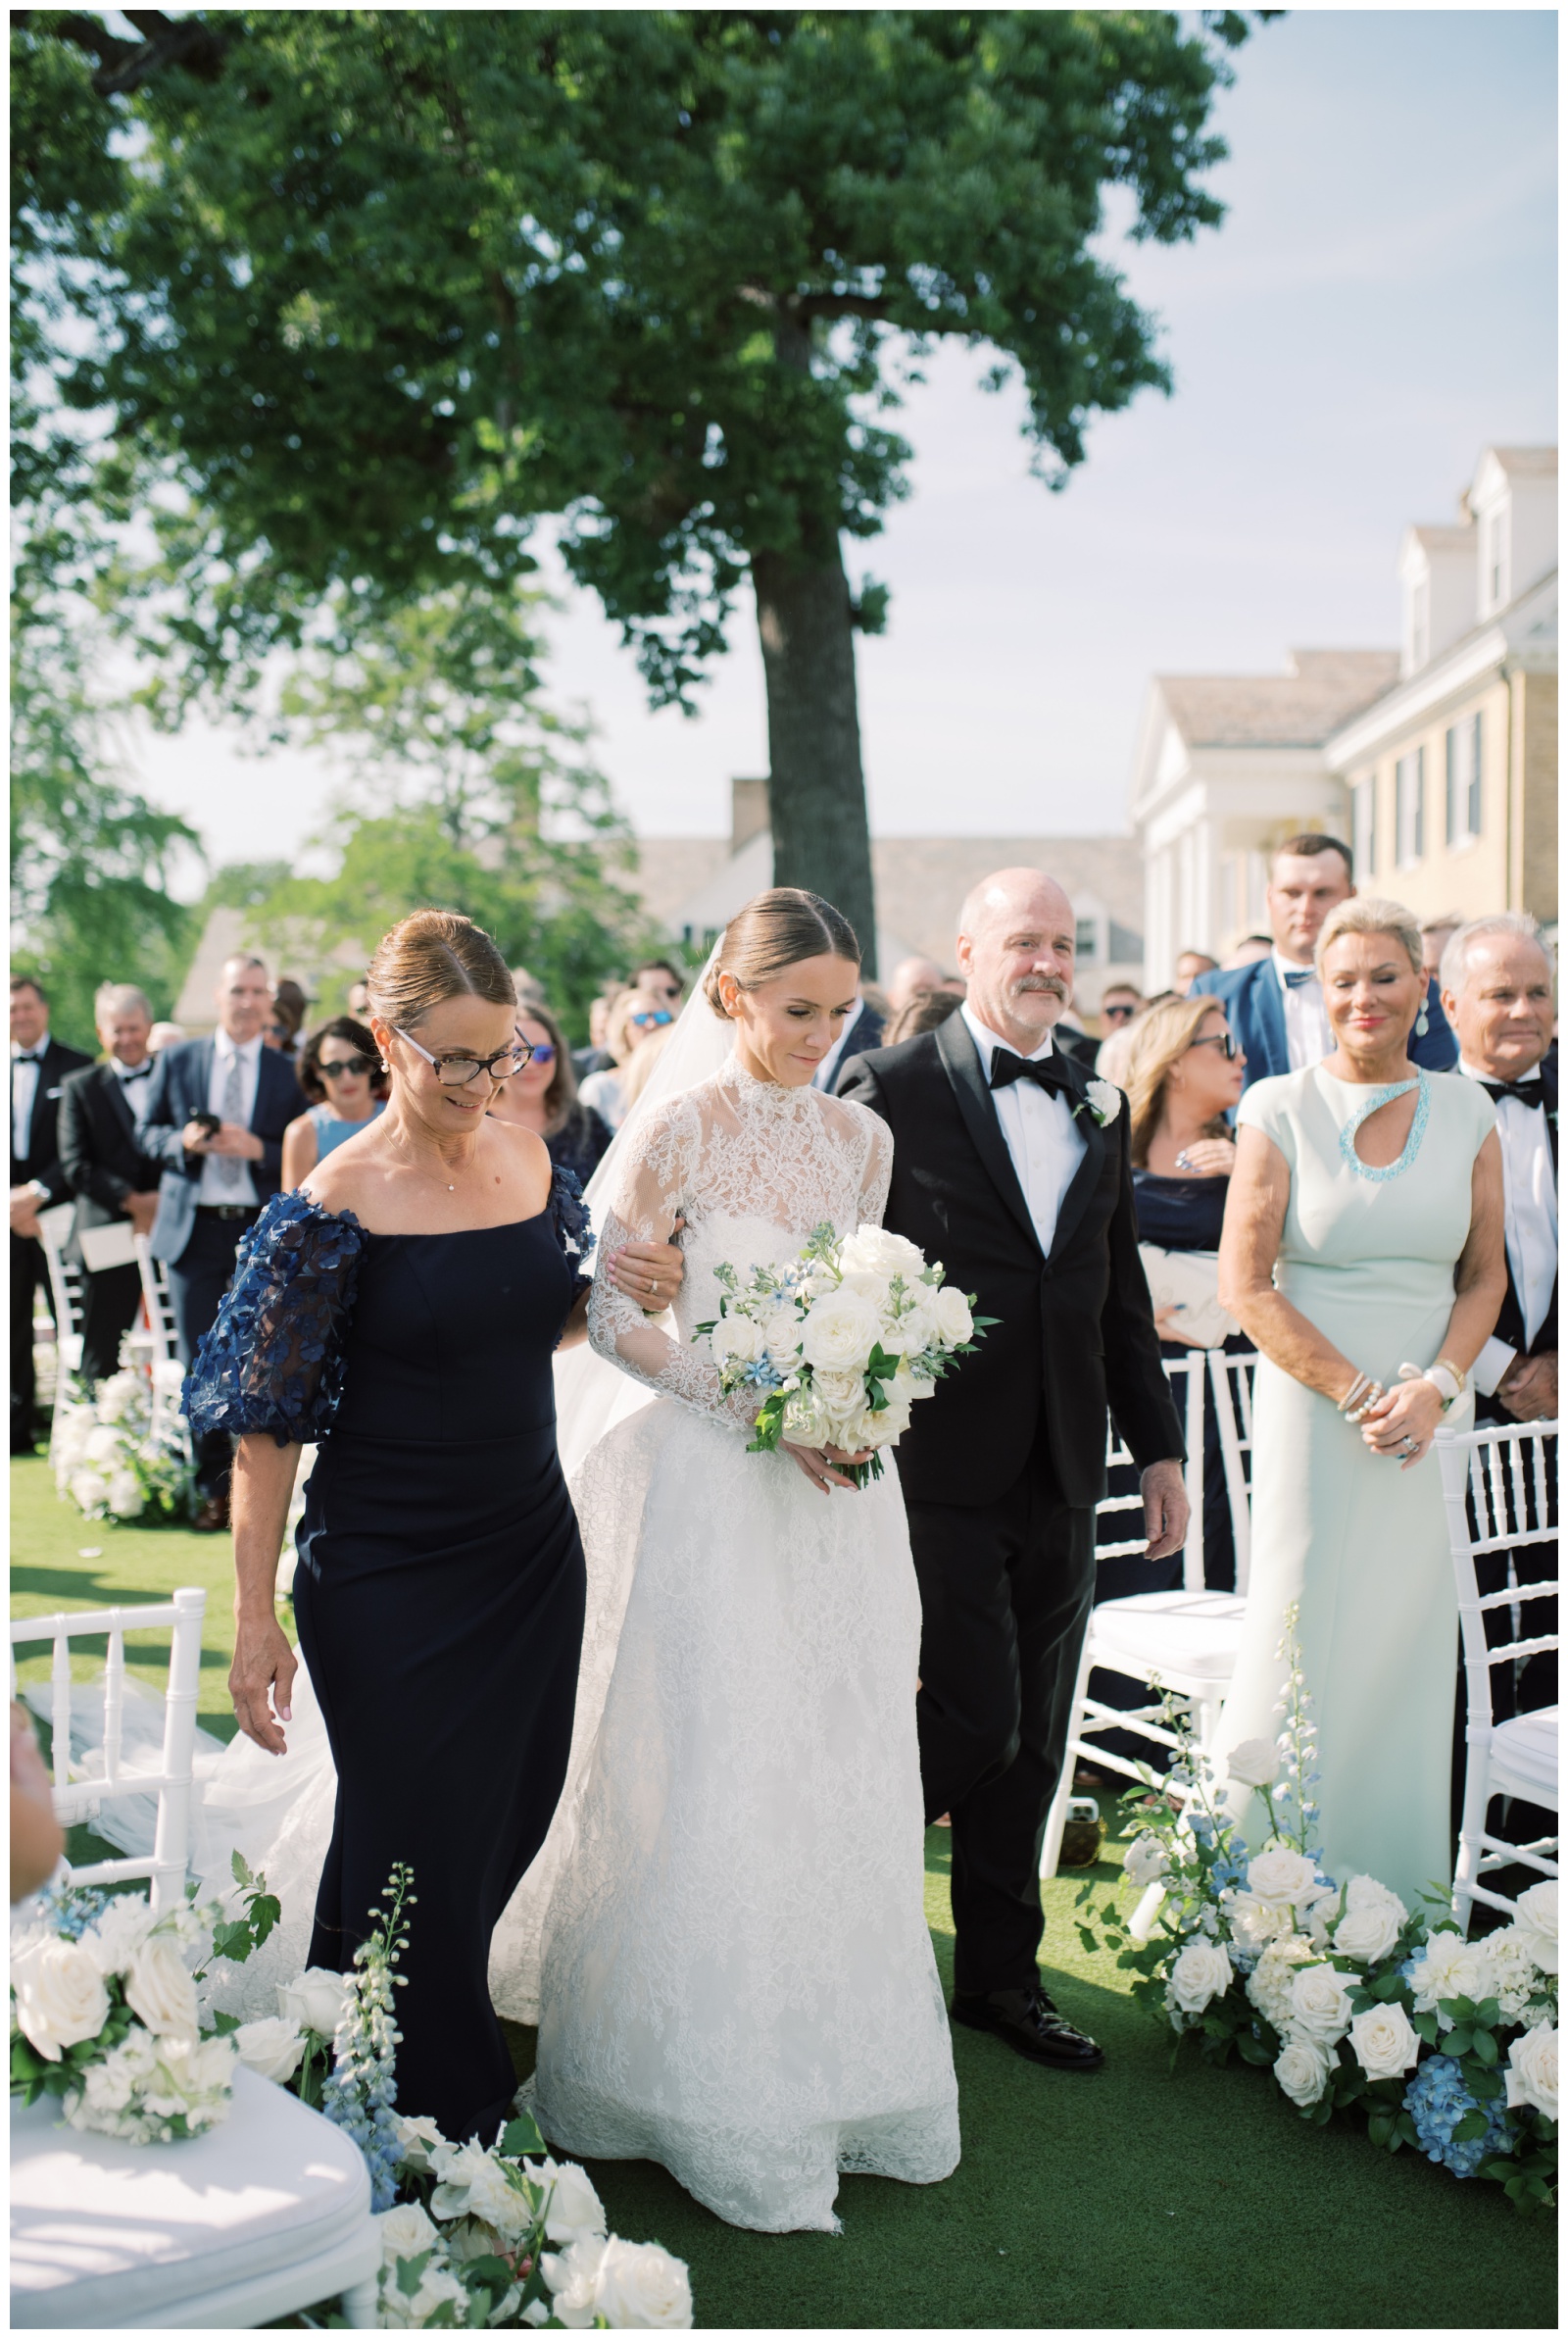
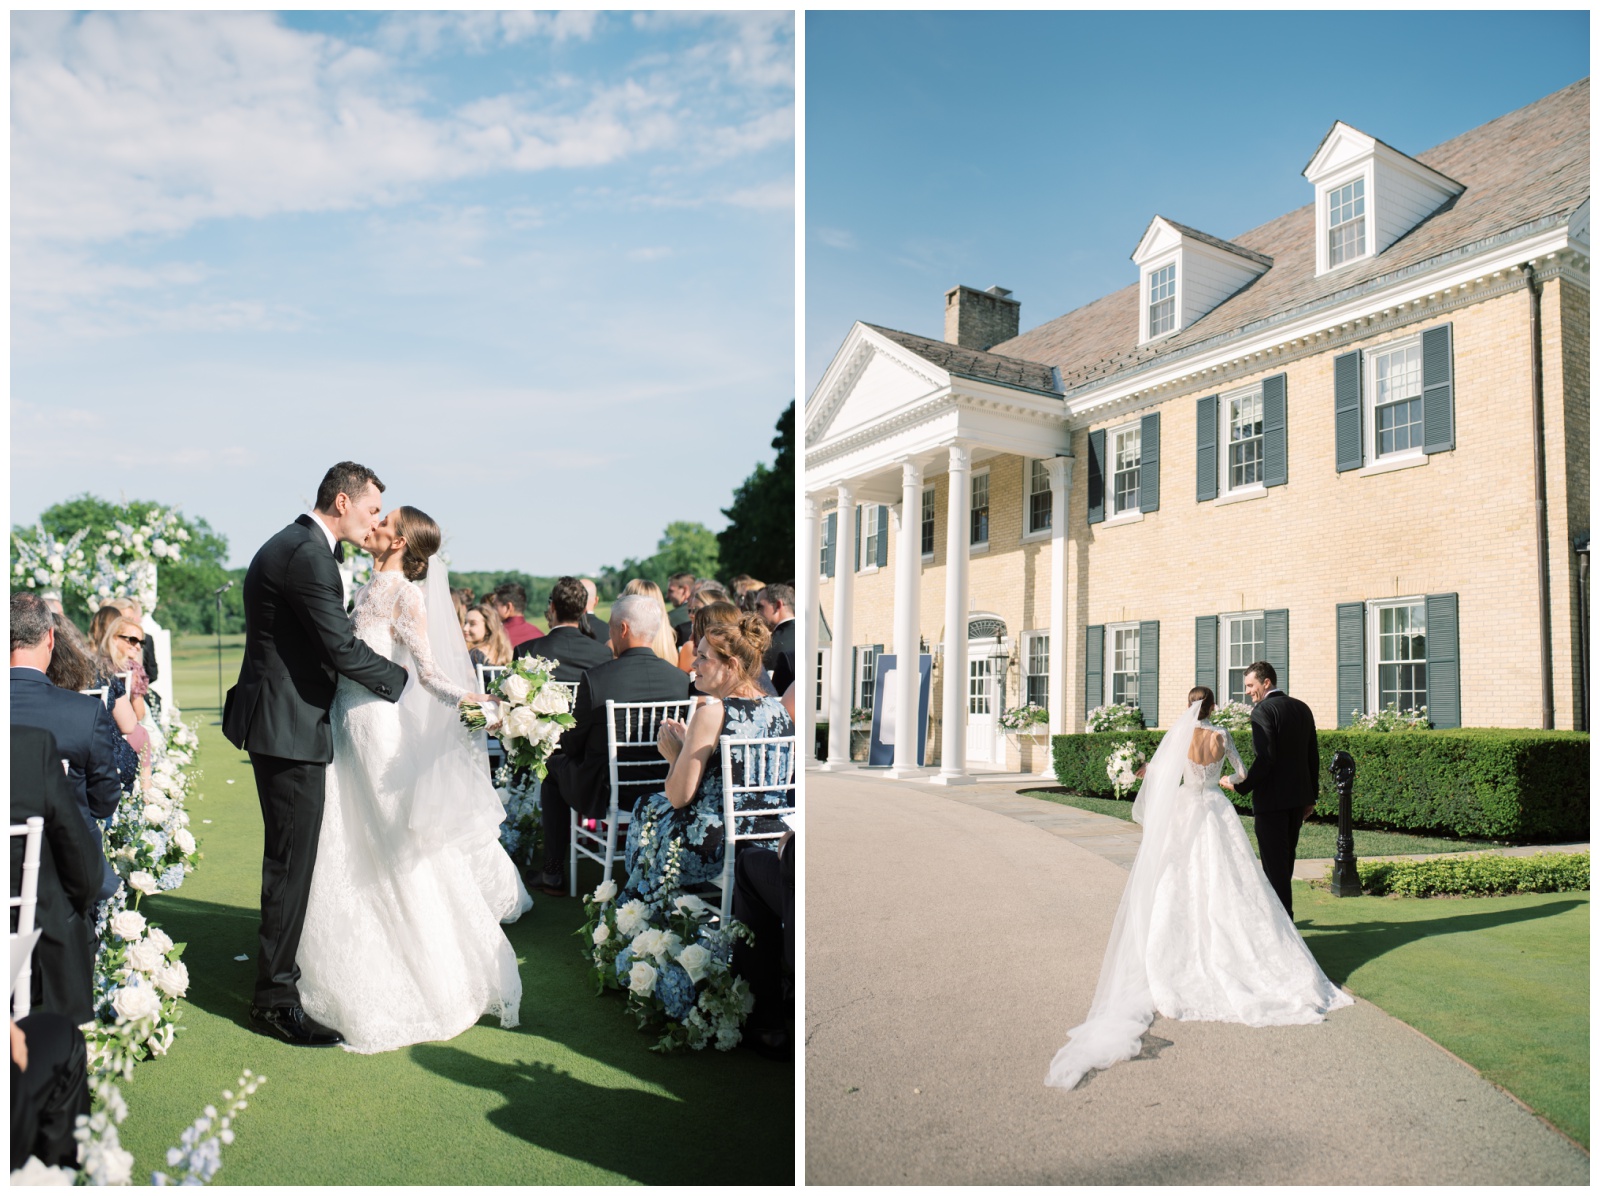
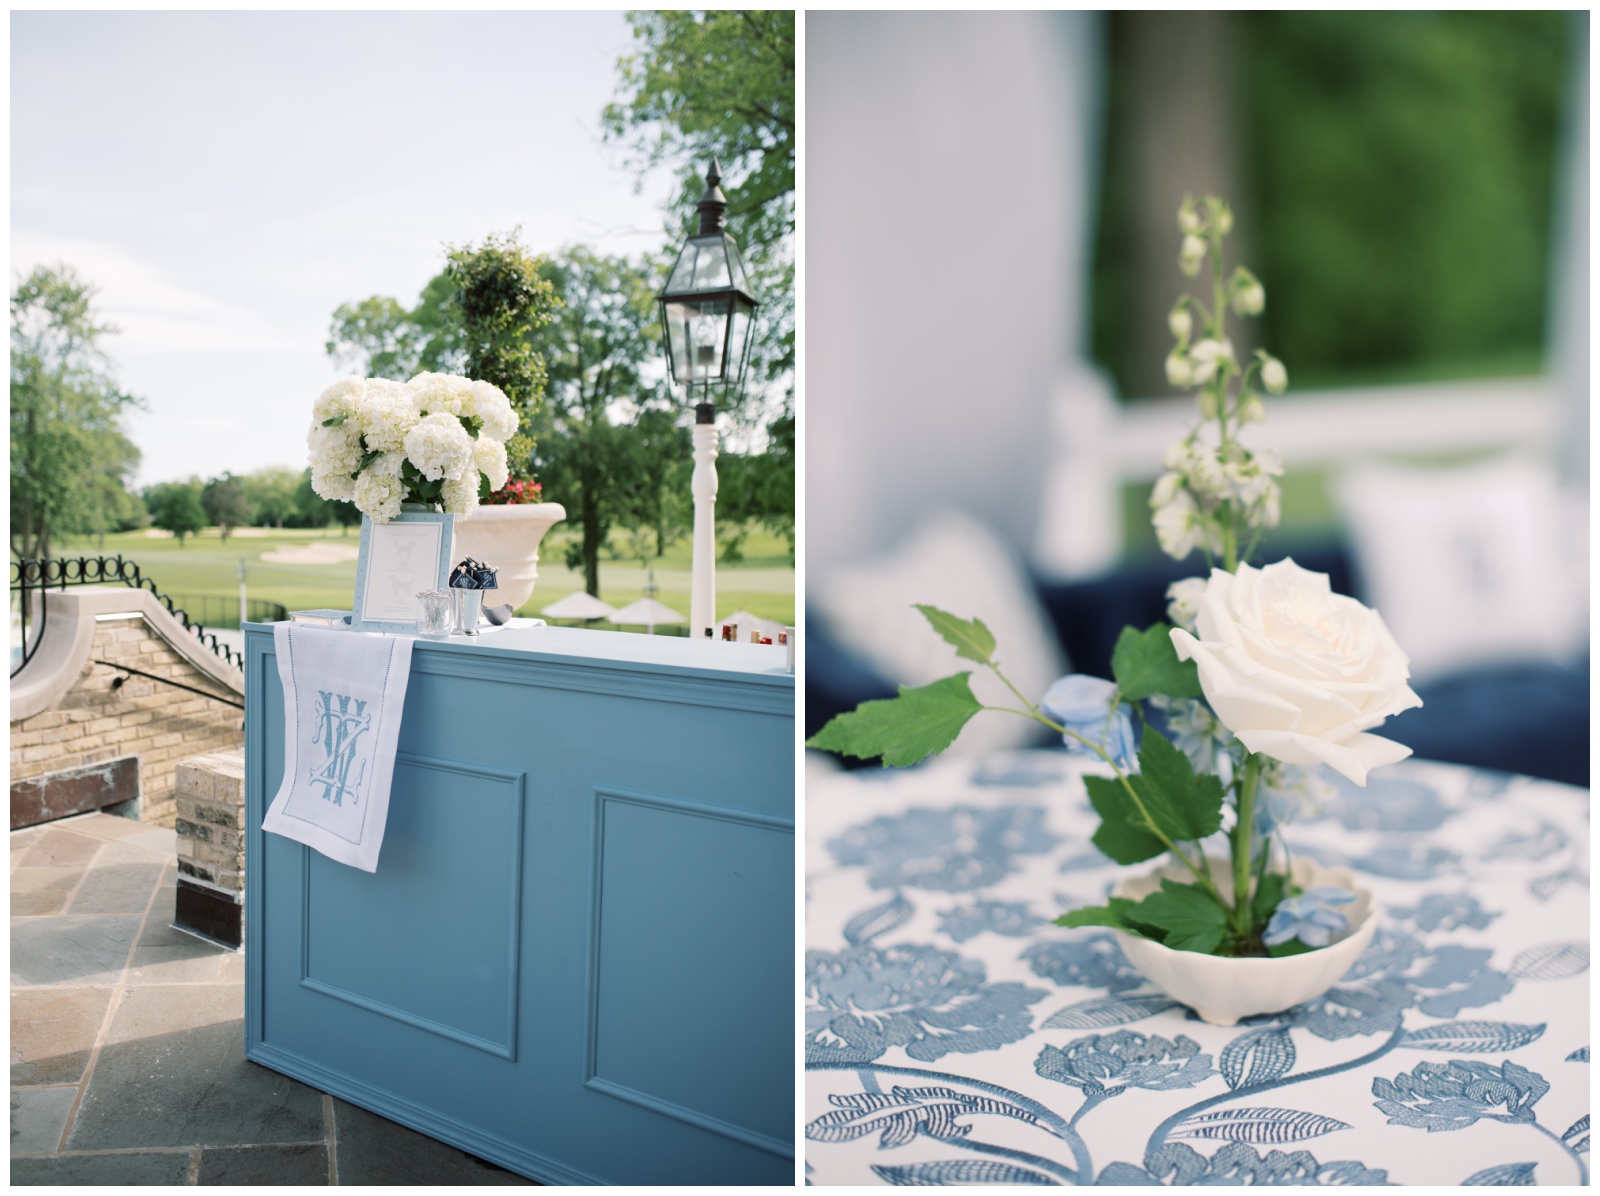
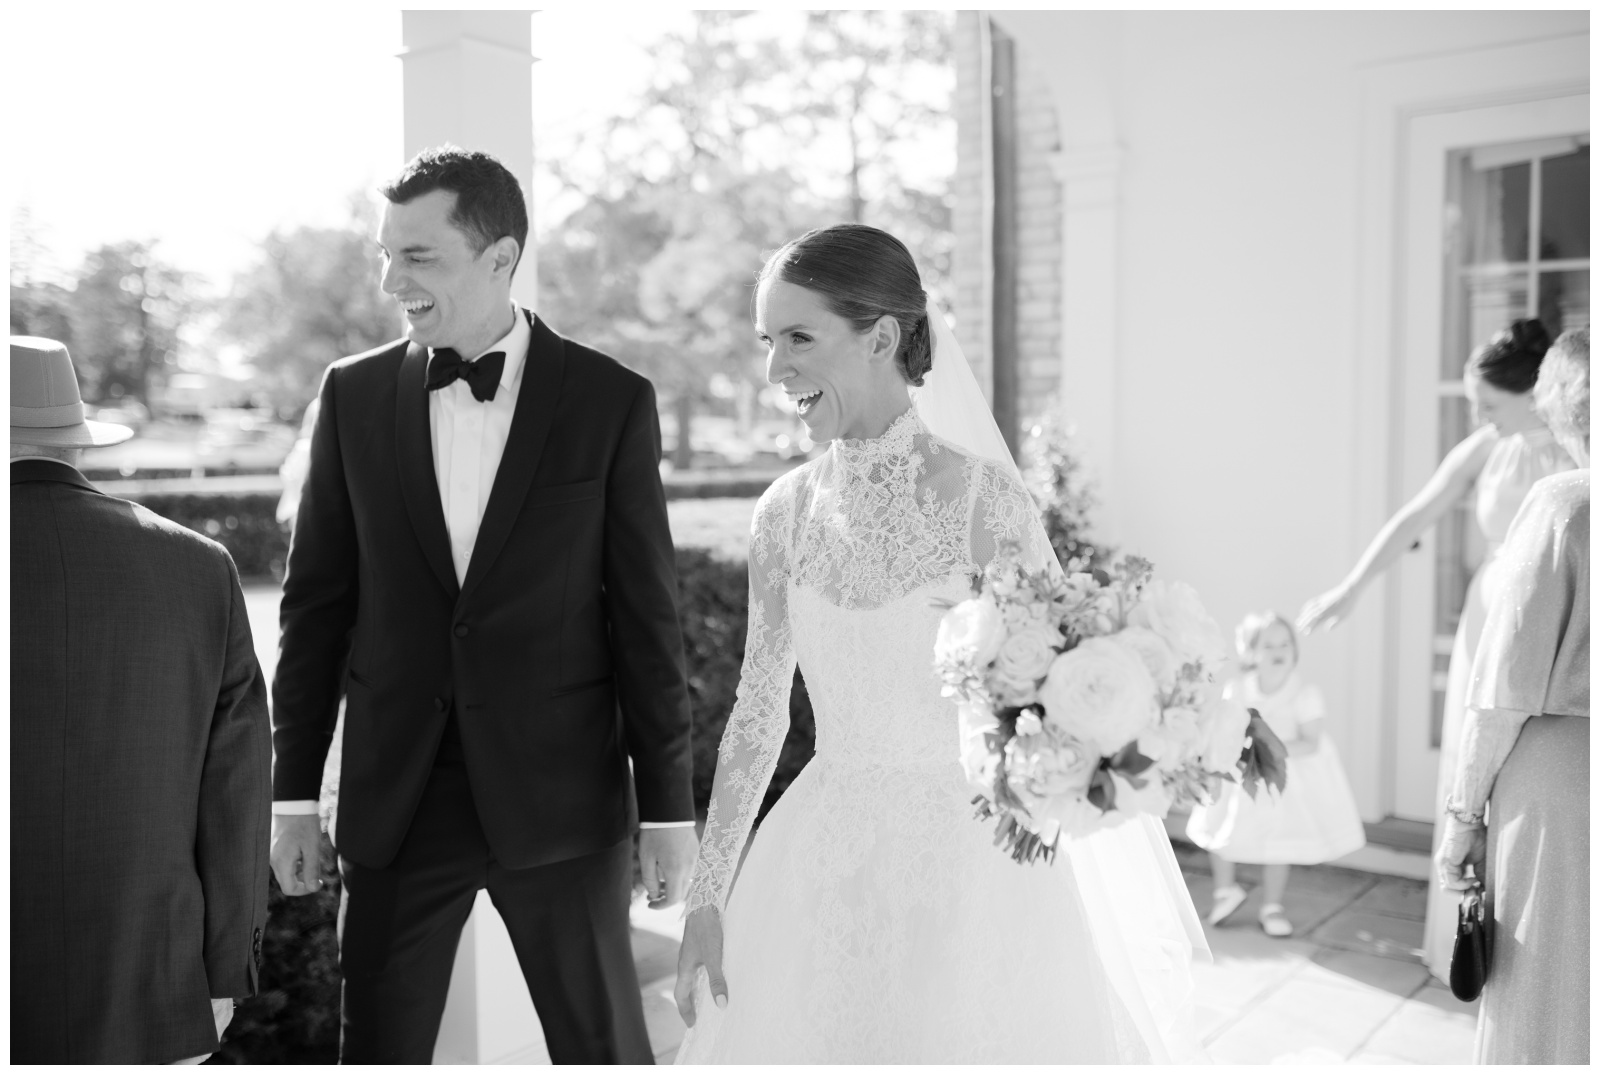
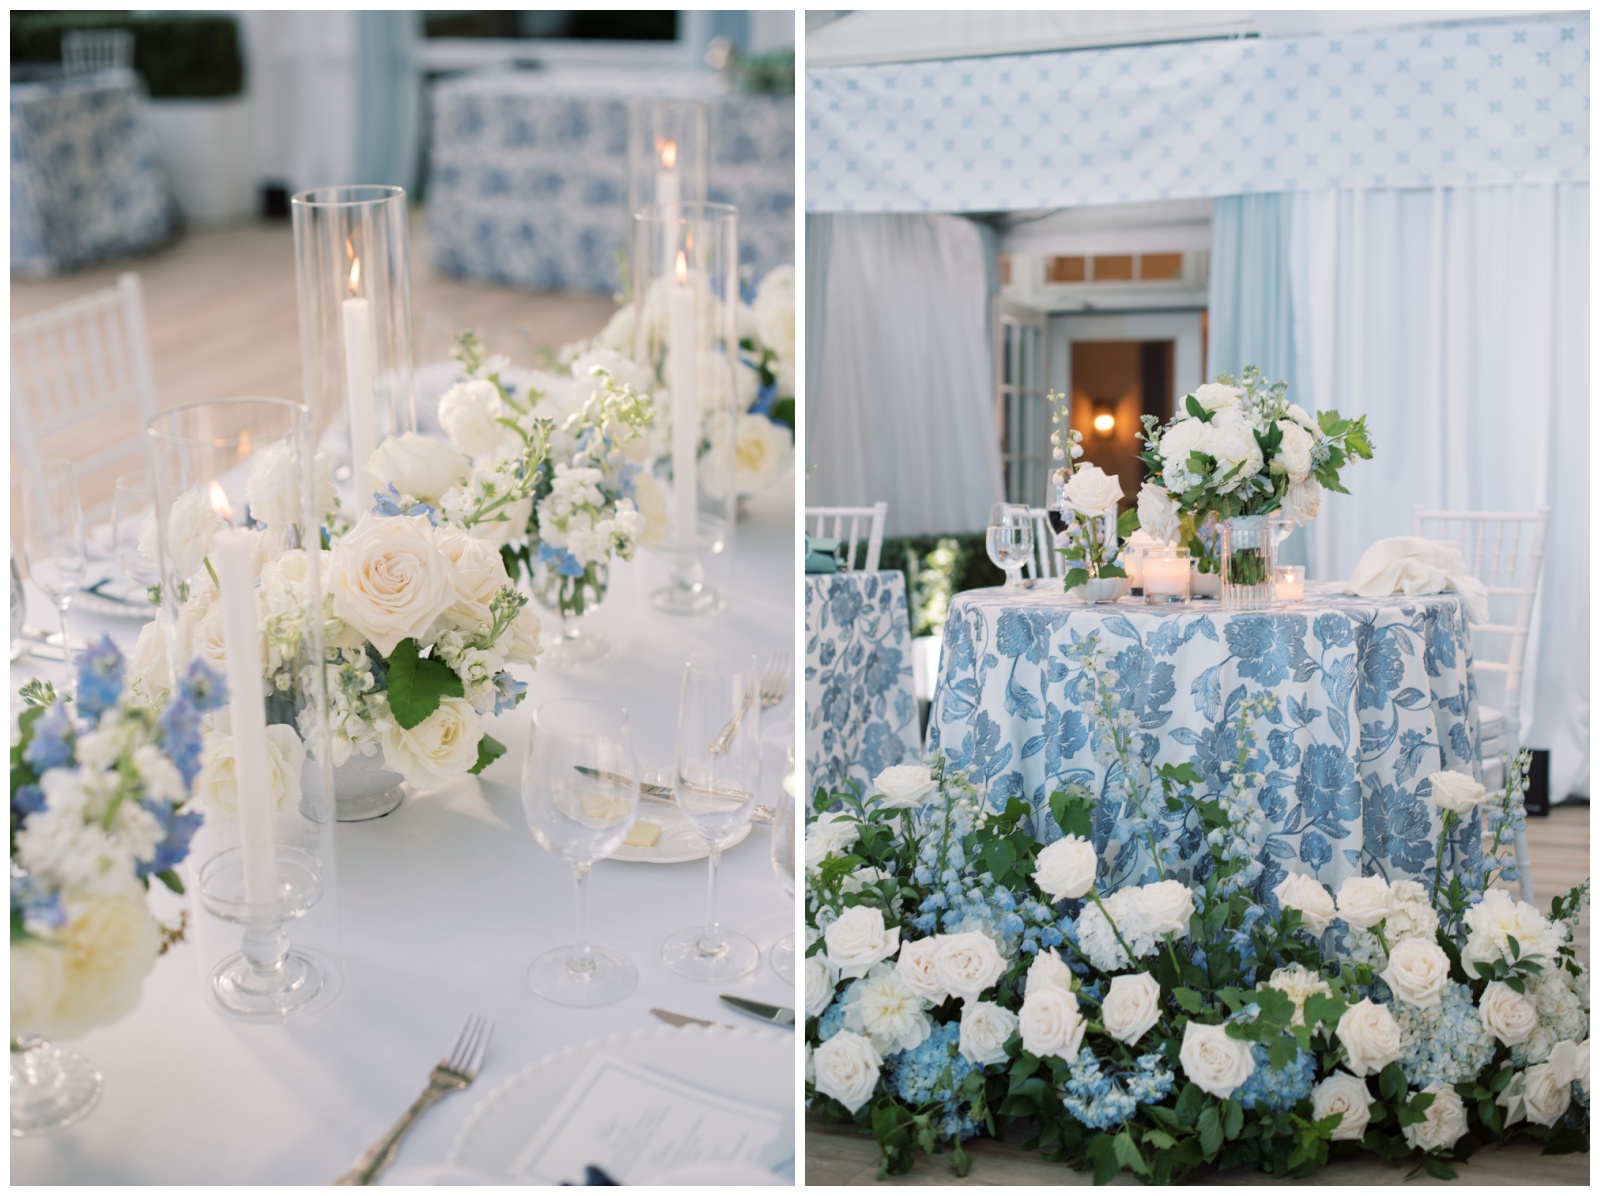
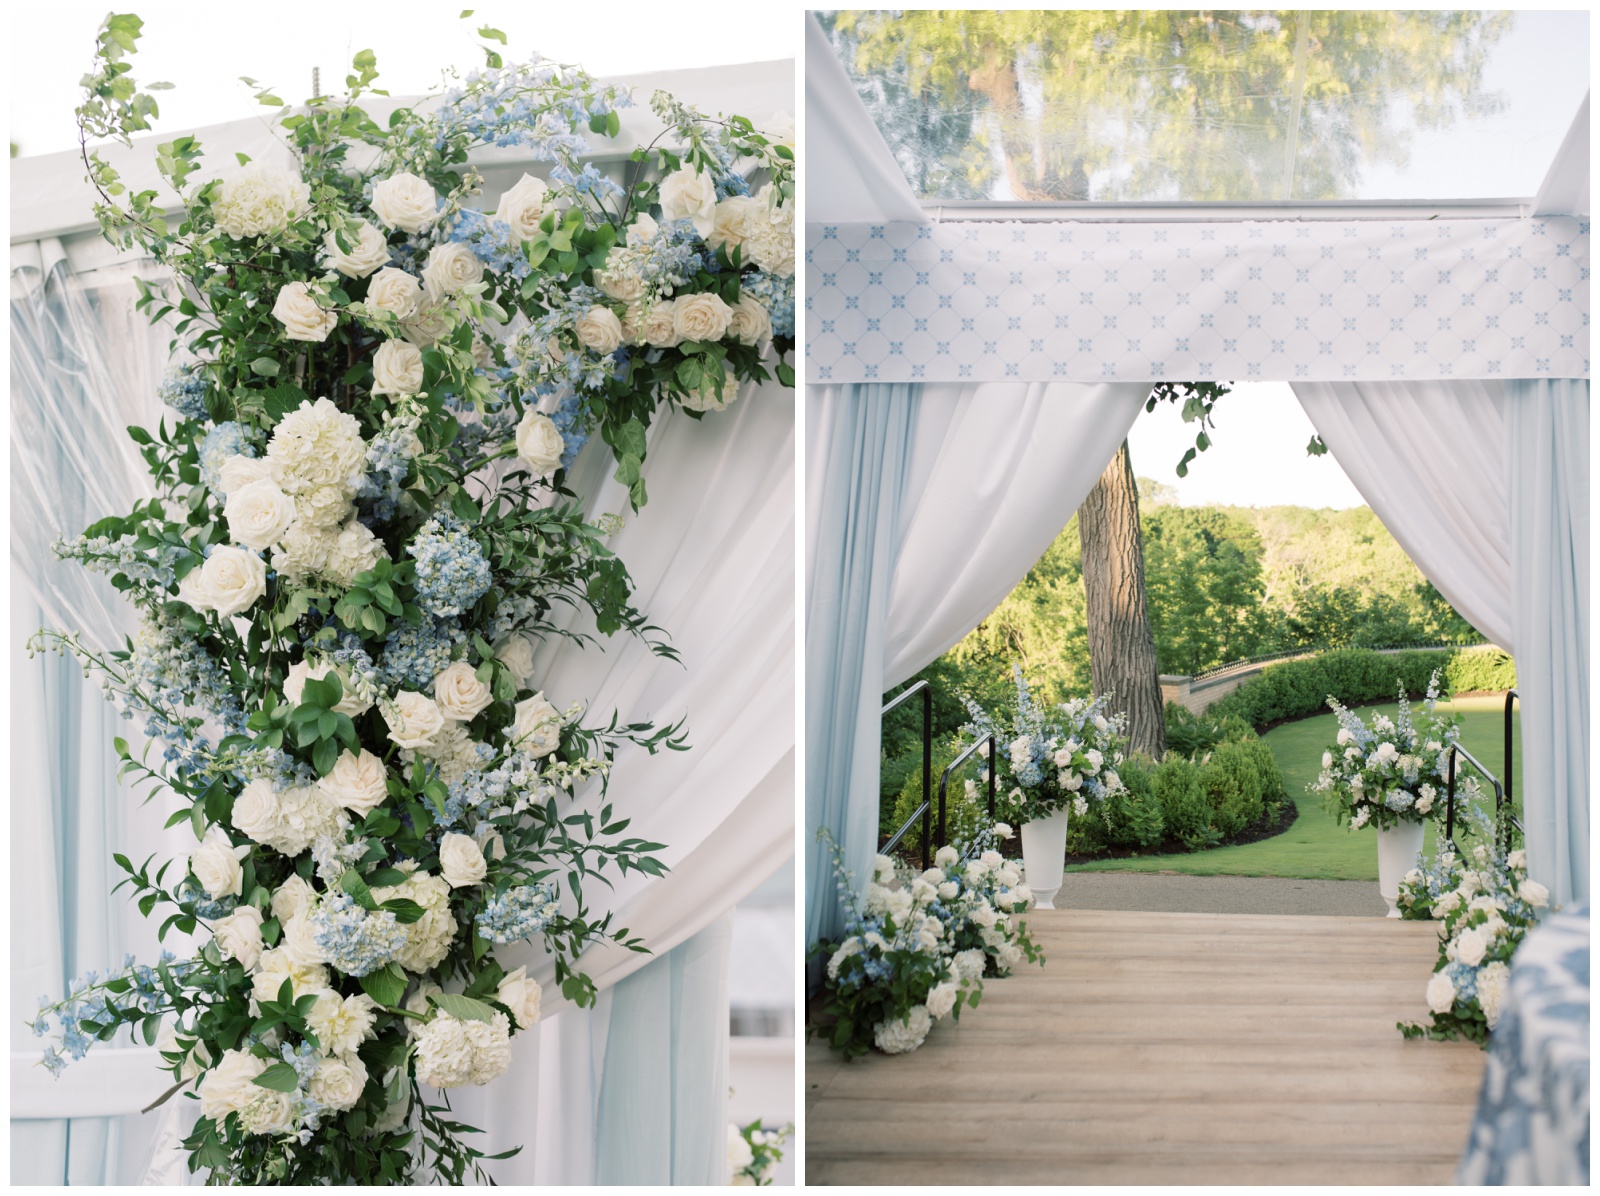
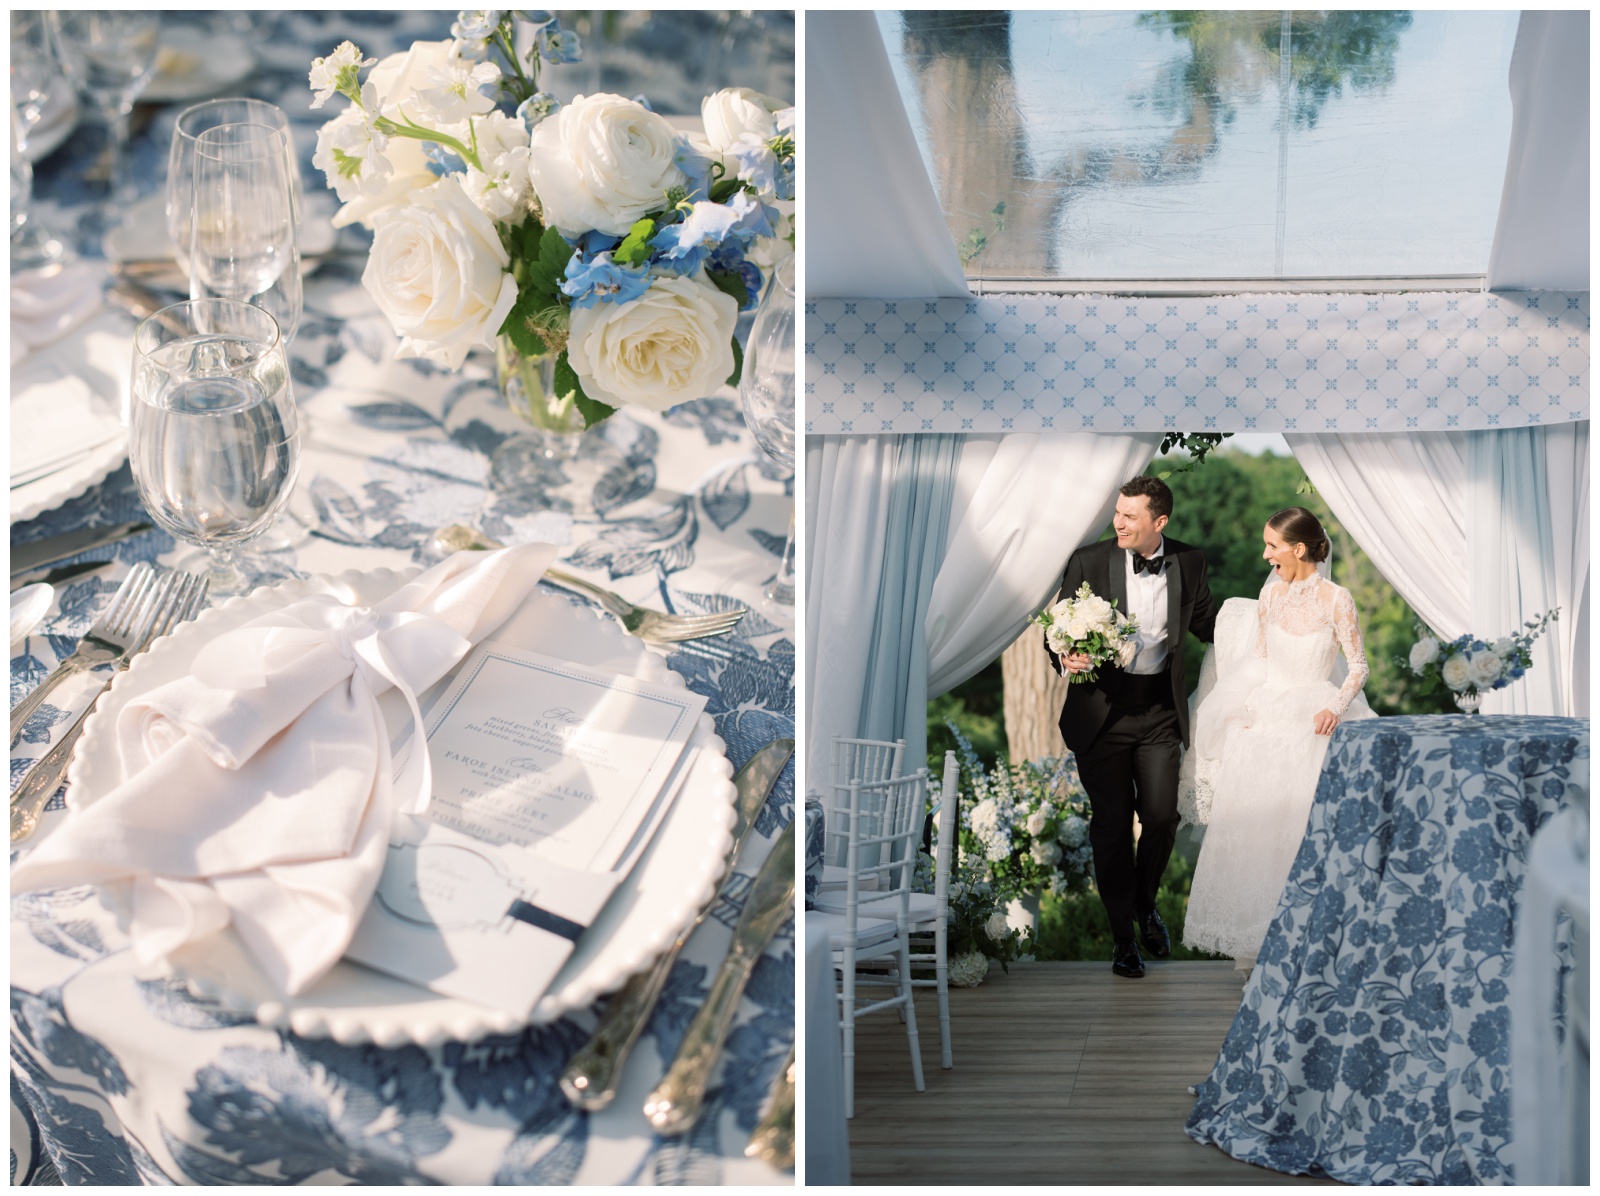
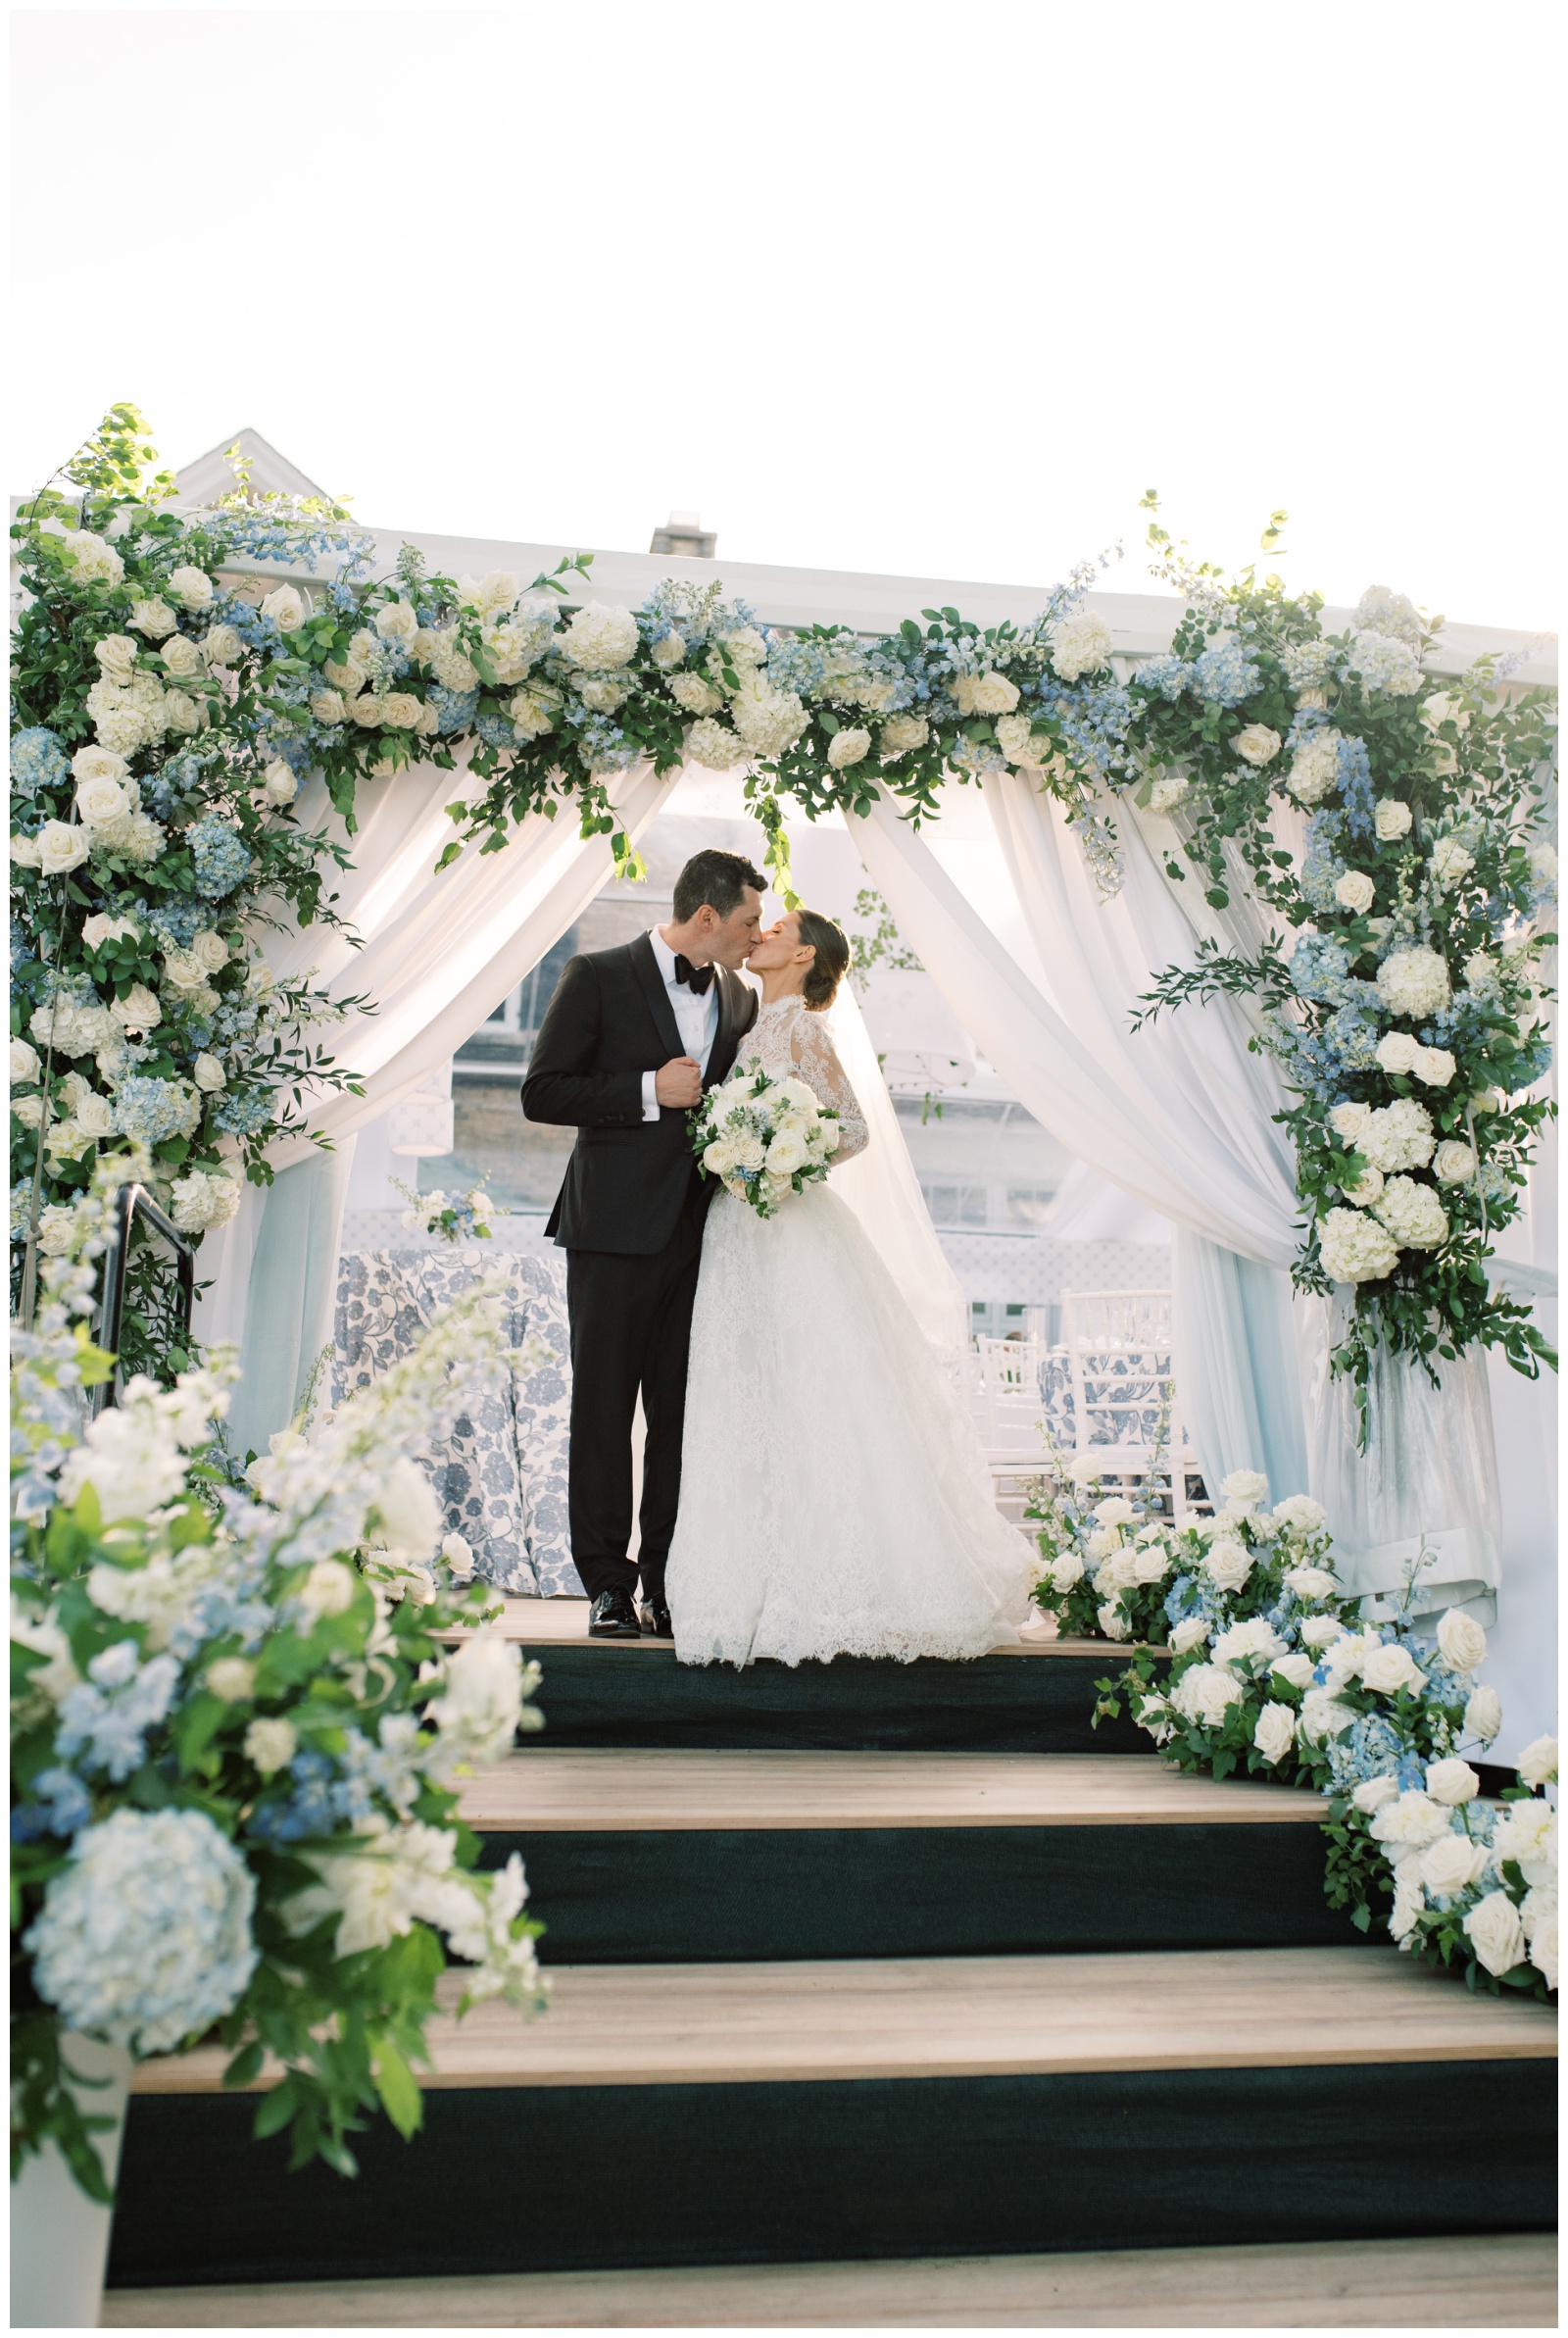
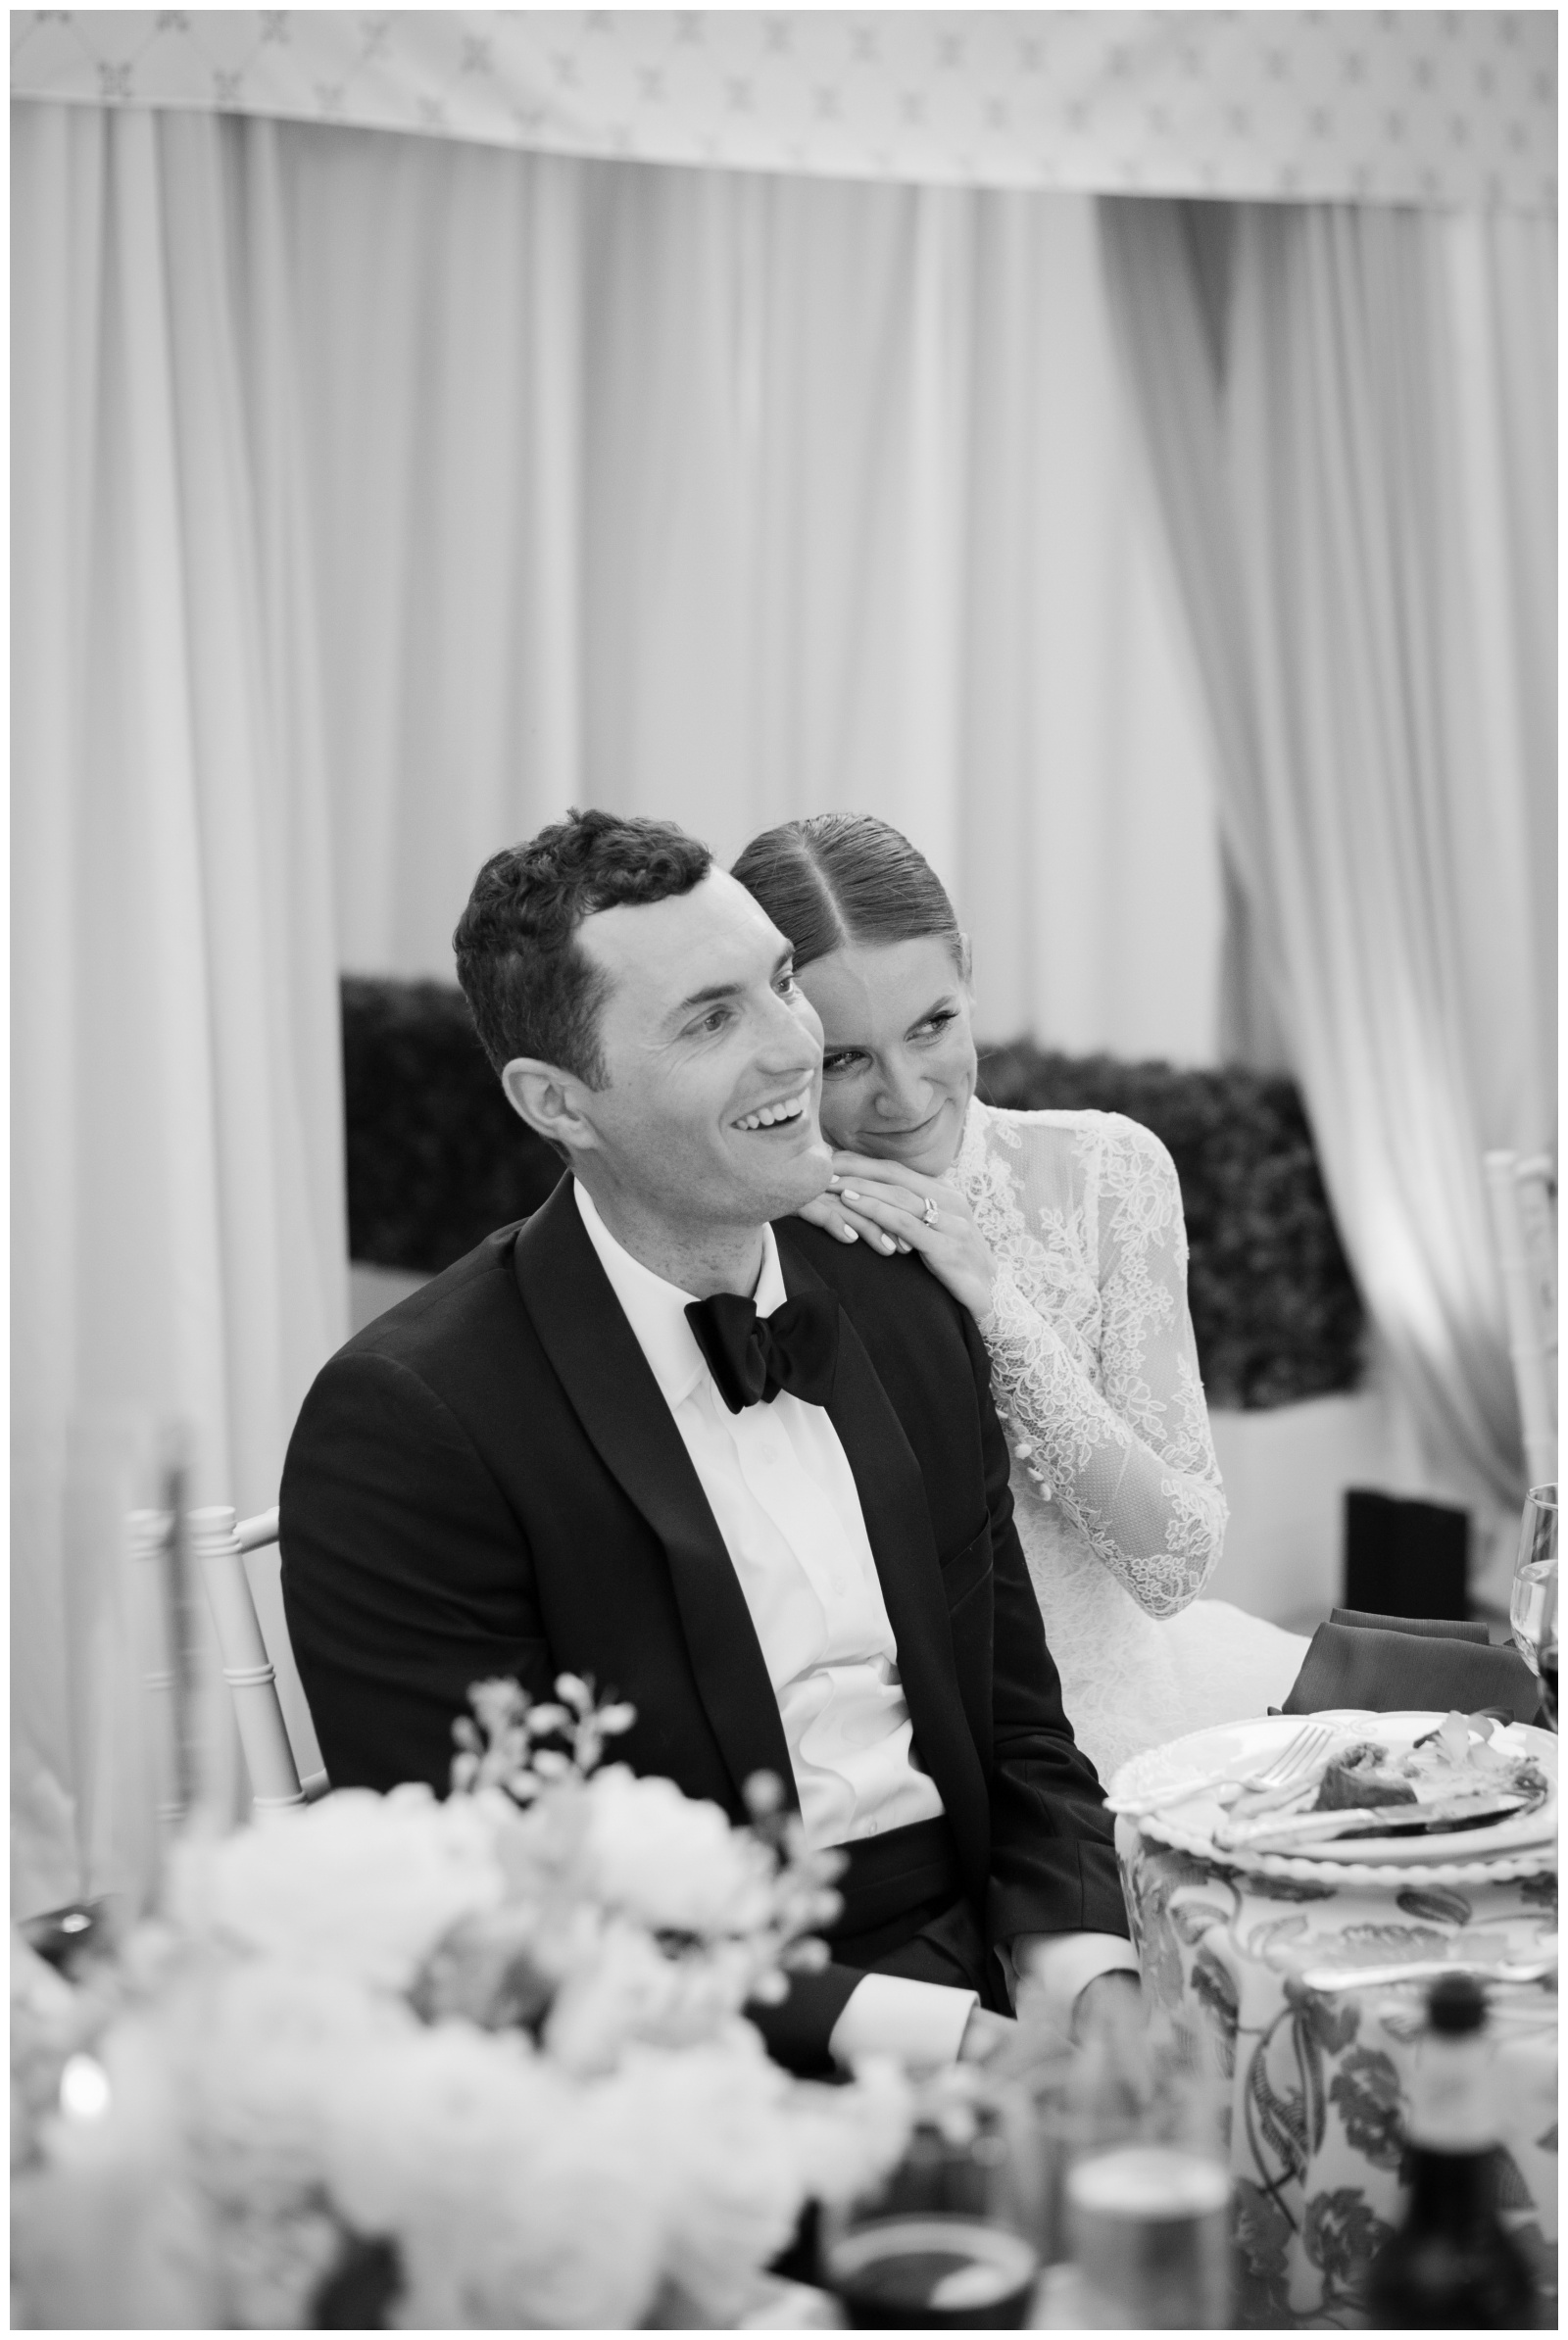
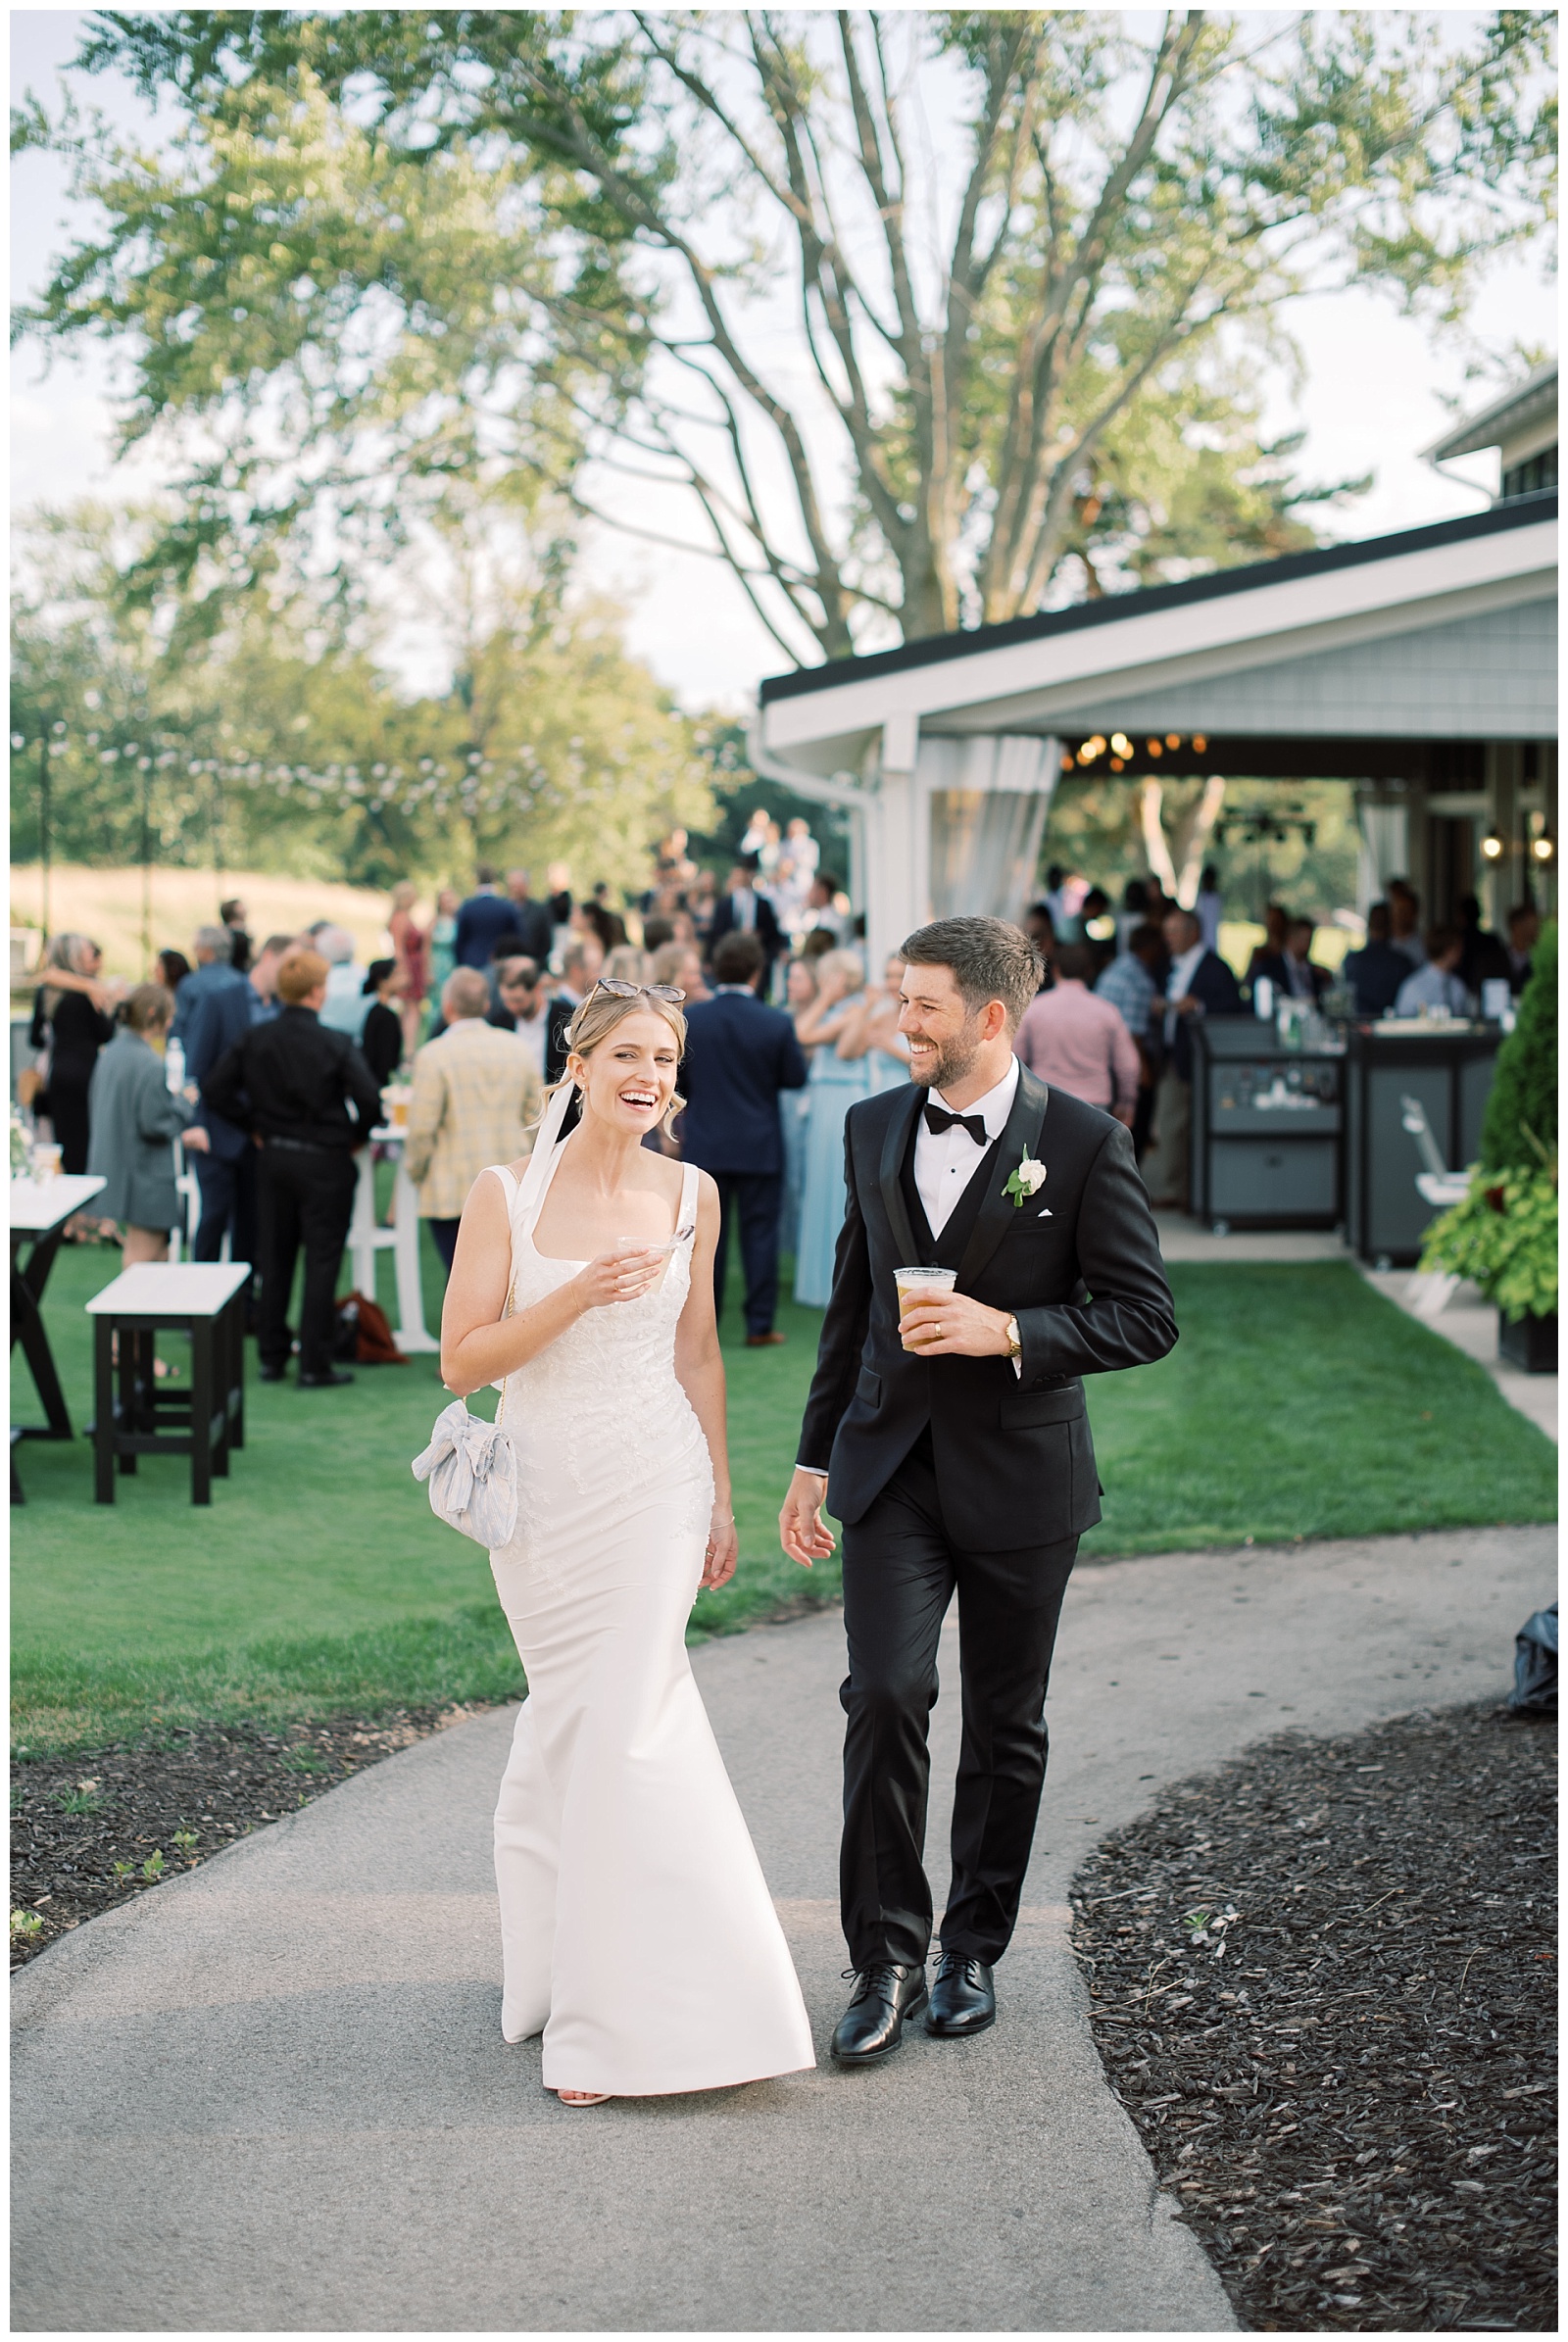
Preppy, timeless, and personal— every detail was thoughtfully chosen for Zoe & Will’s tented Milwaukee Country Club wedding. From their custom “ZW” monogram woven throughout, to their two dogs, Millie and Sunny, making subtle appearances from bar menus and cocktail napkins to their country club themed favors—blue tennis balls signed “Love, Millie & Sunny.”
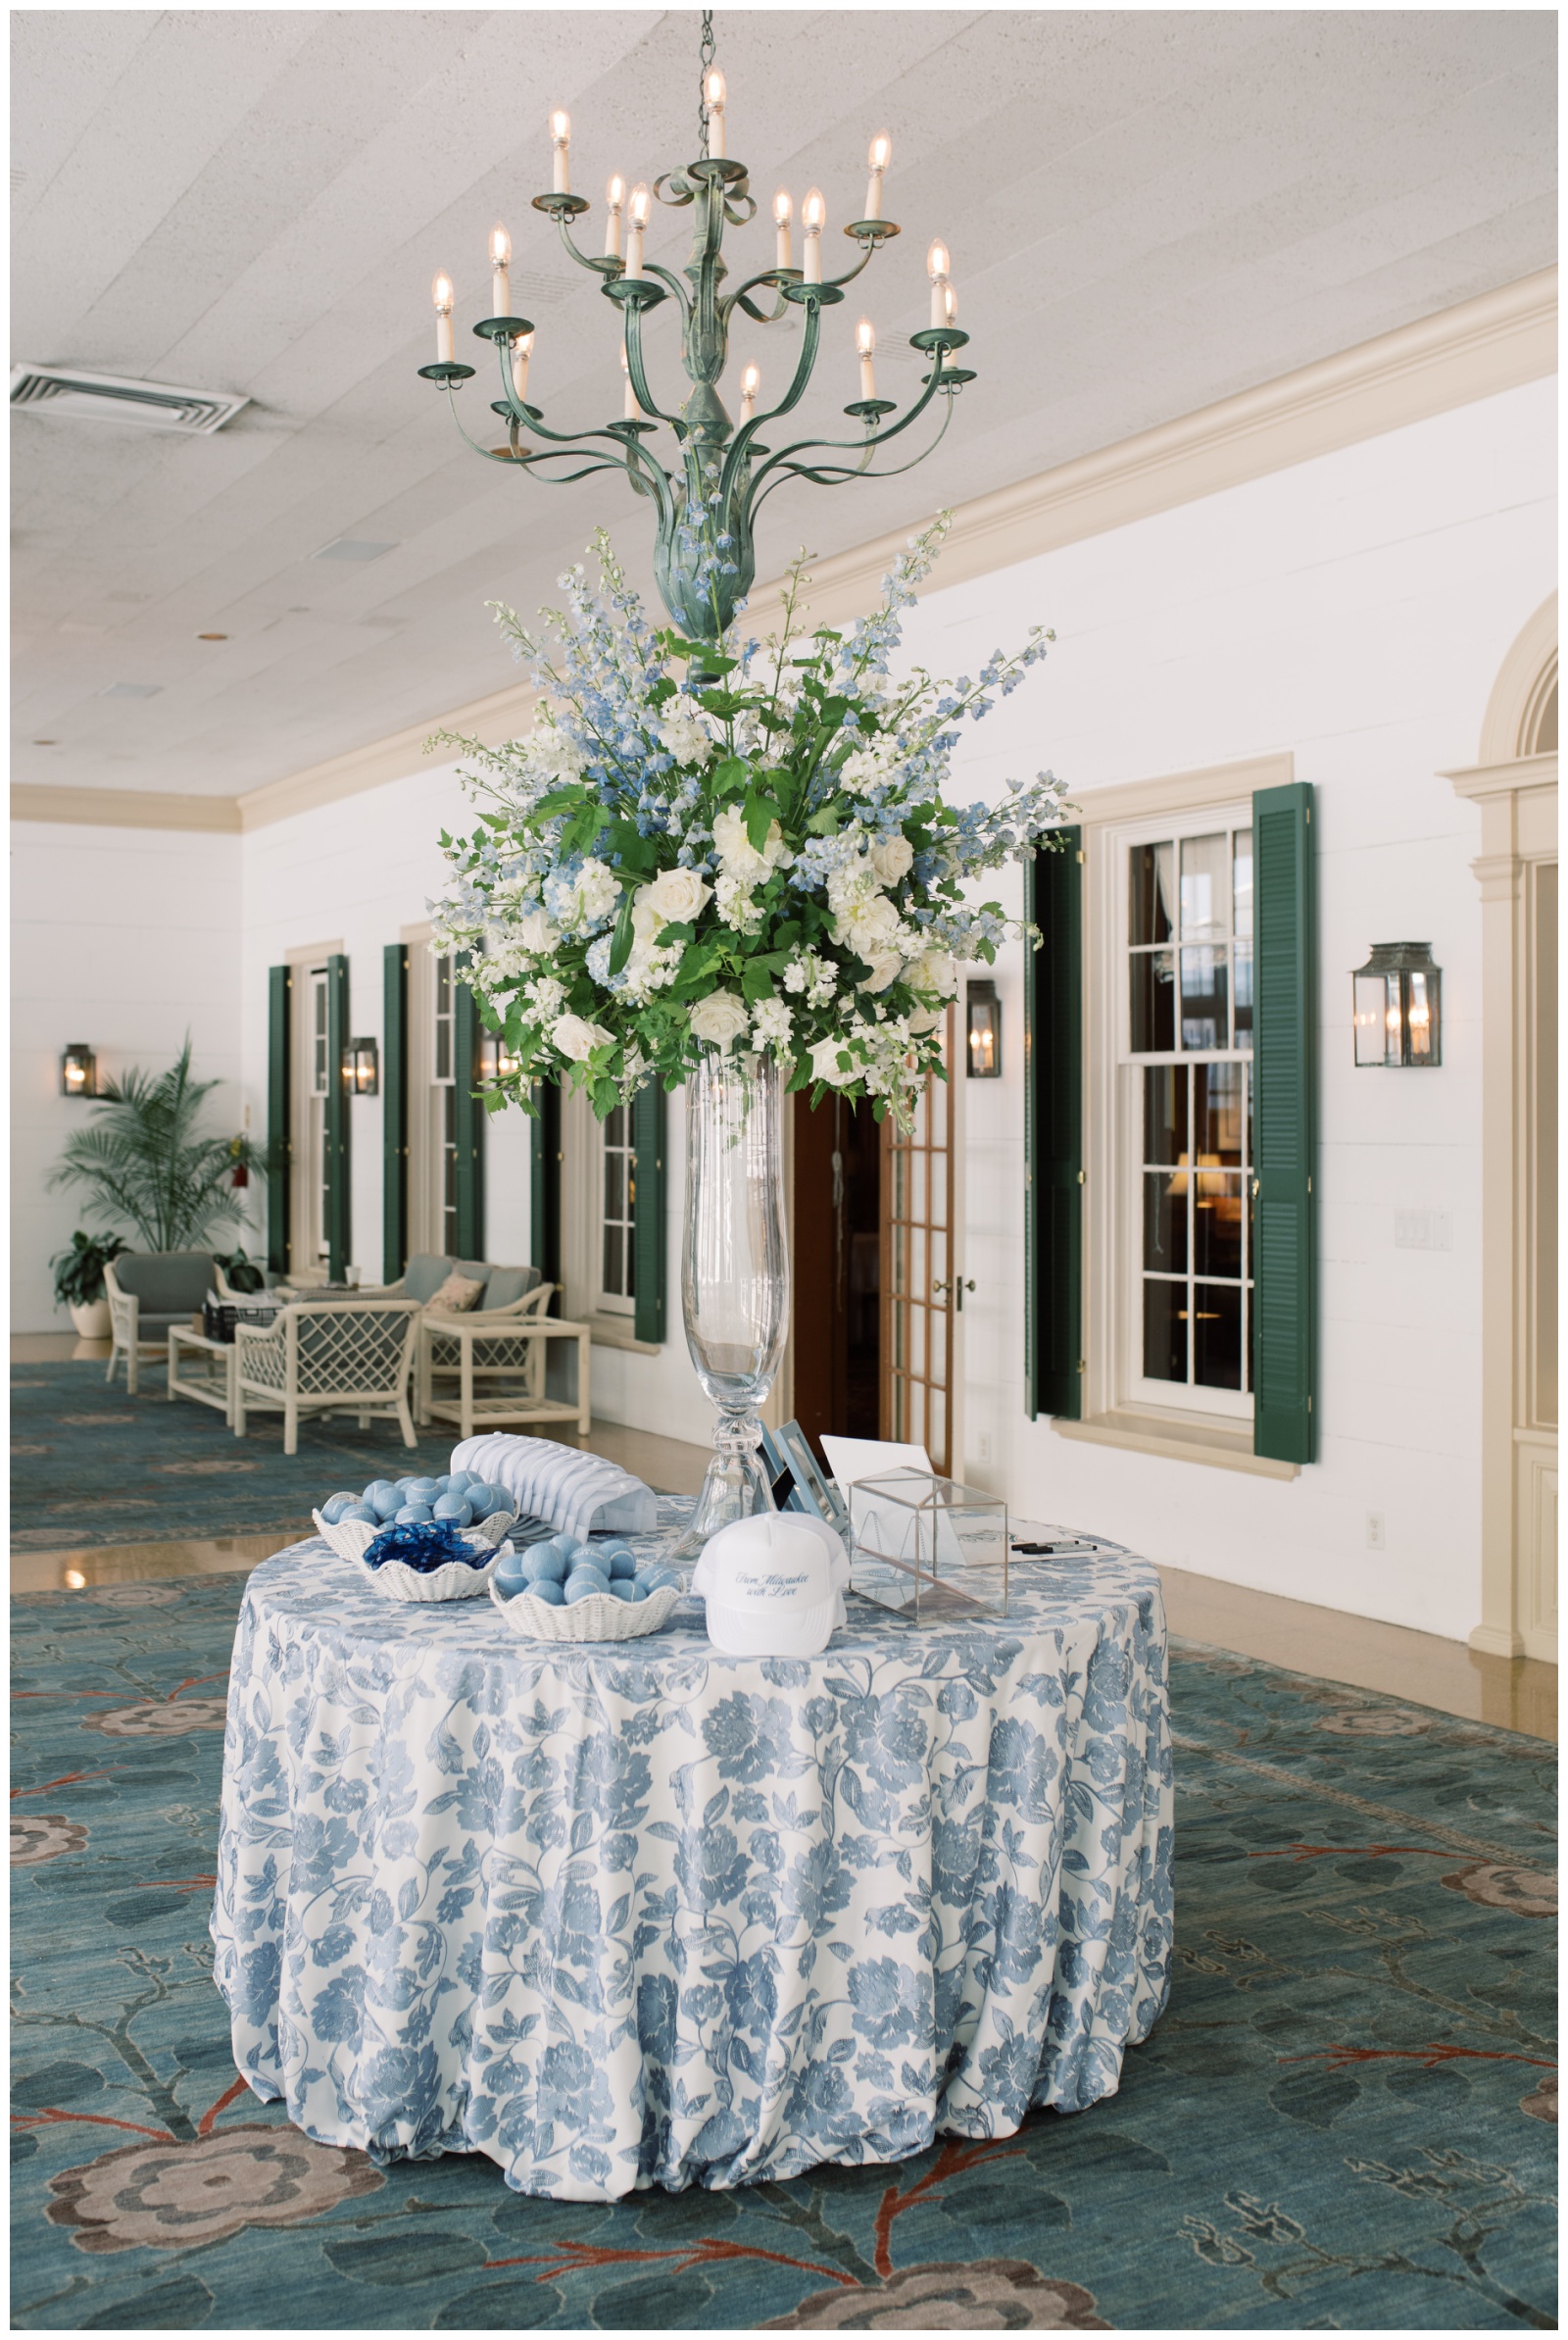
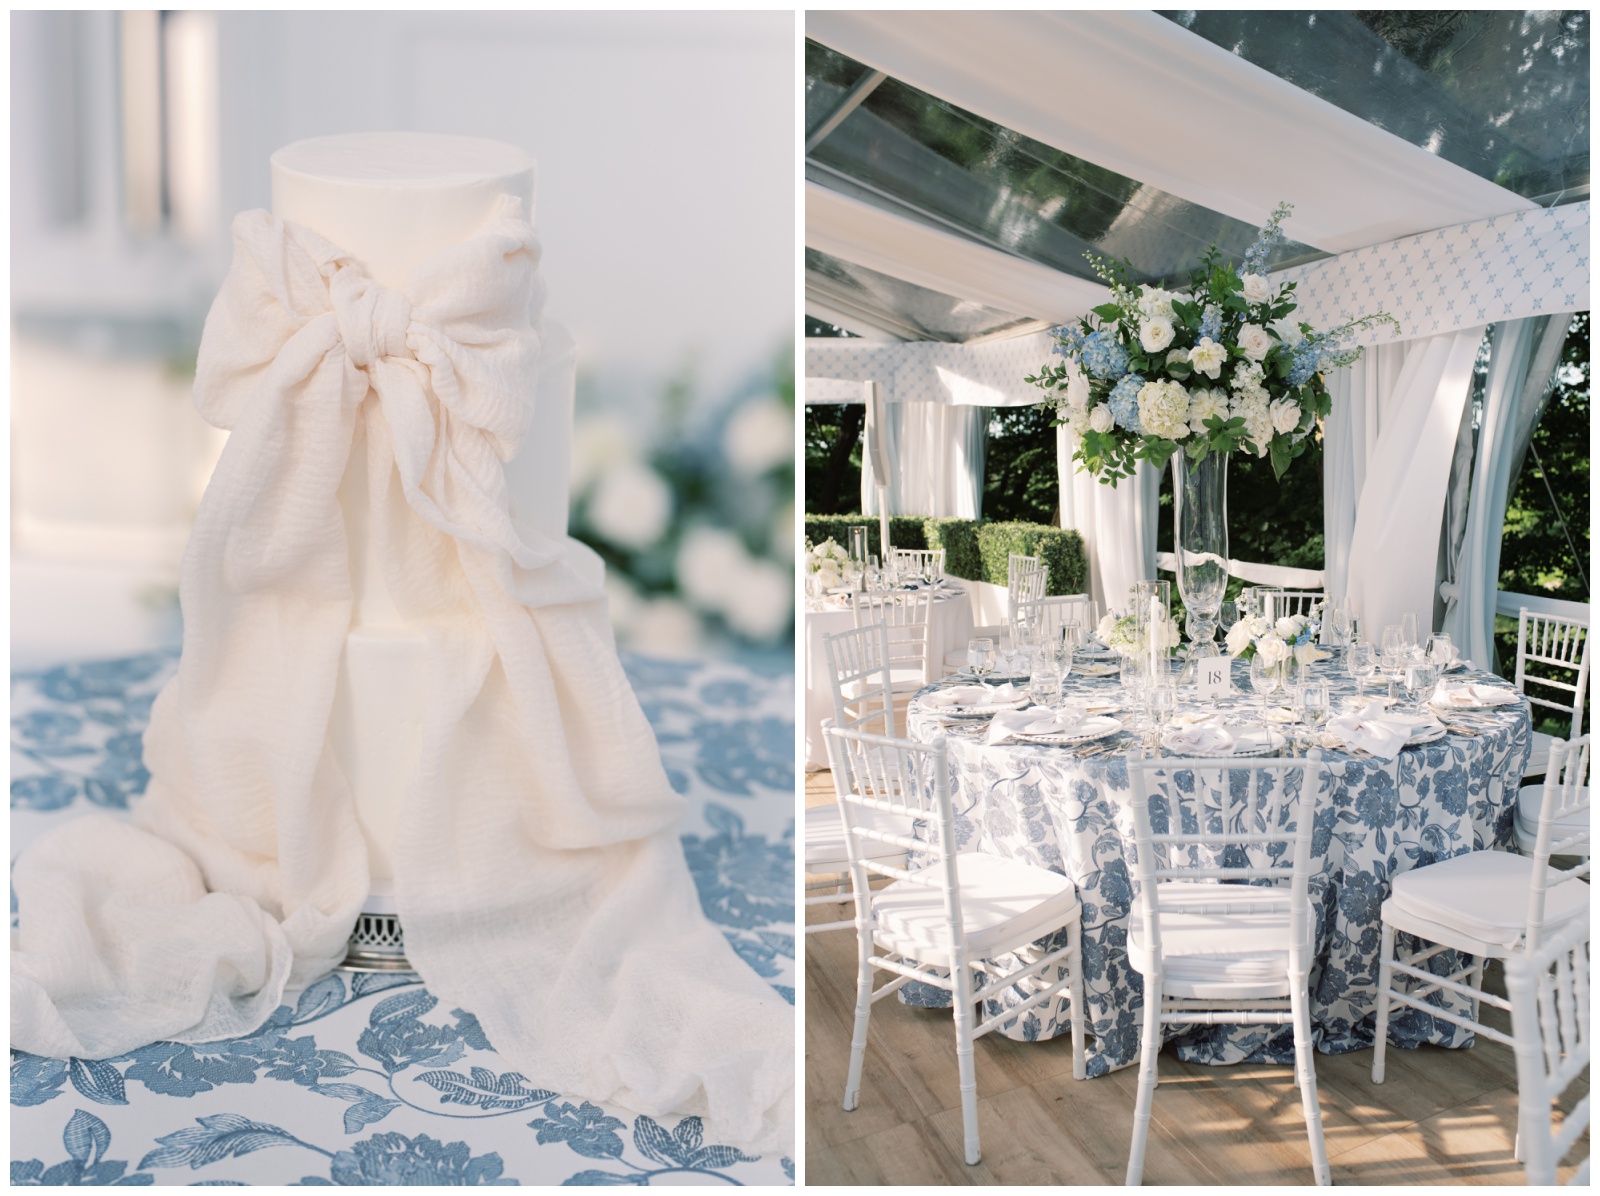
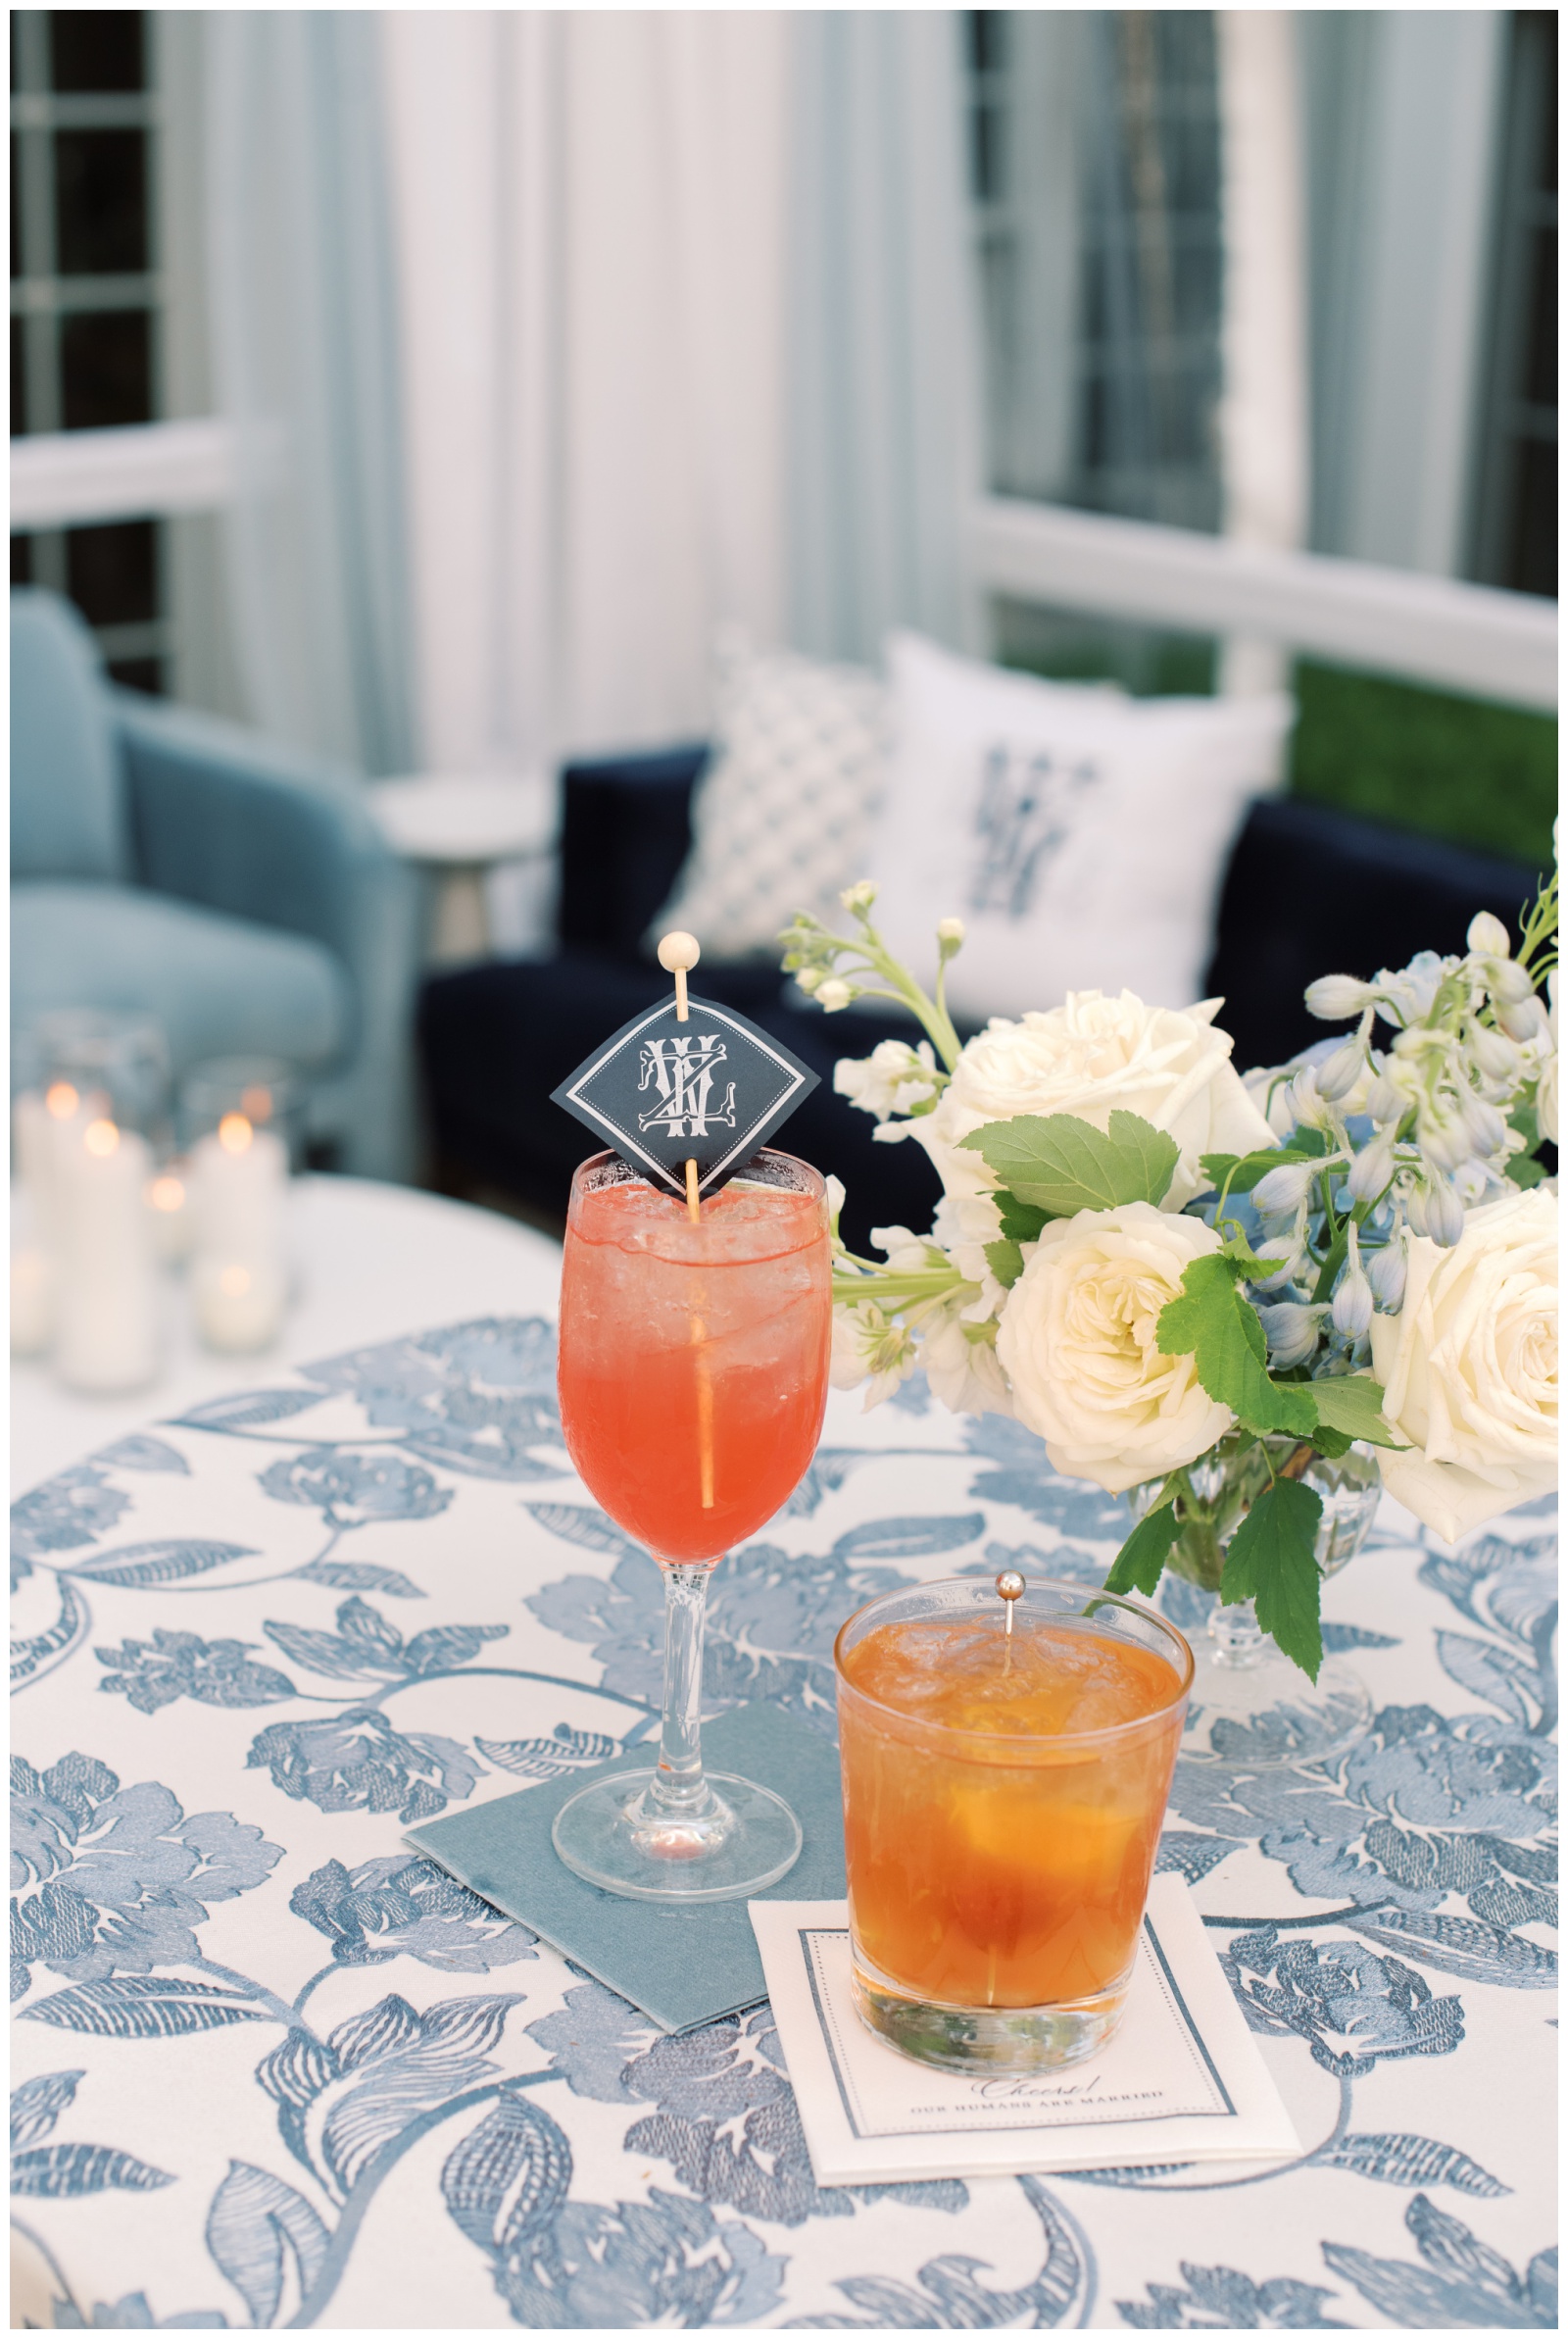
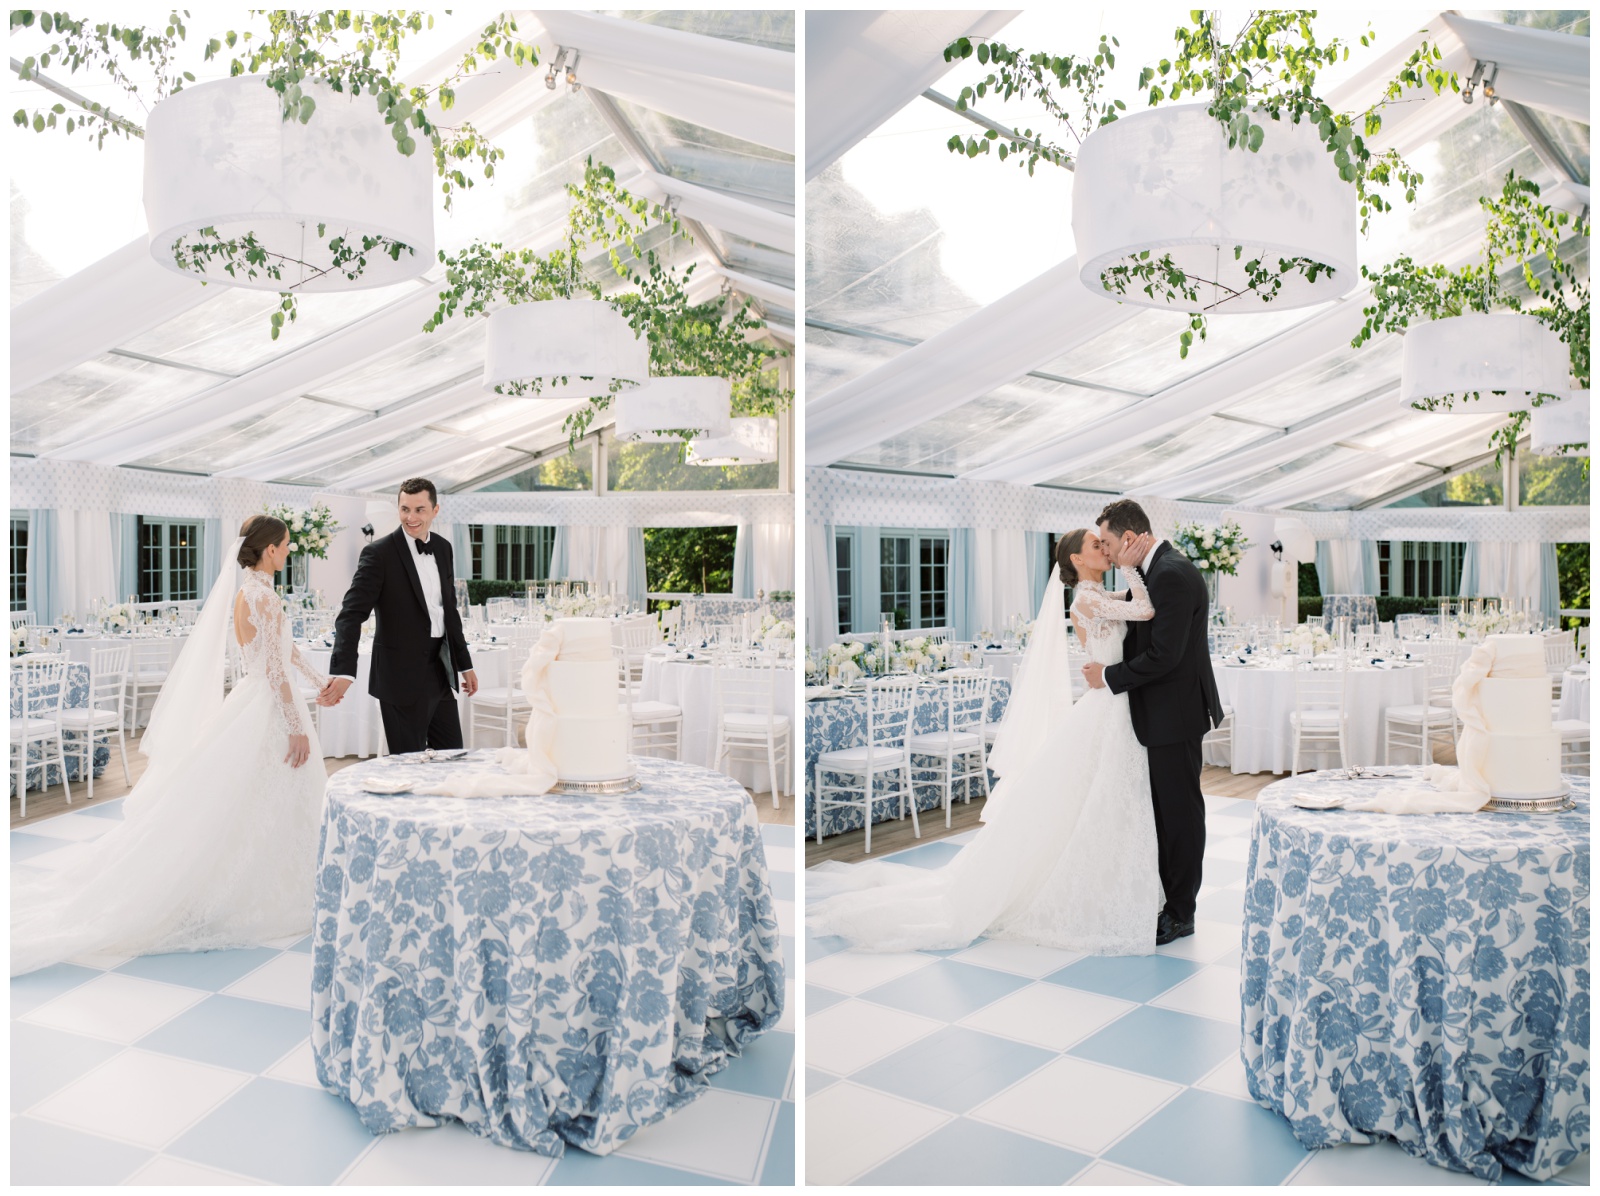
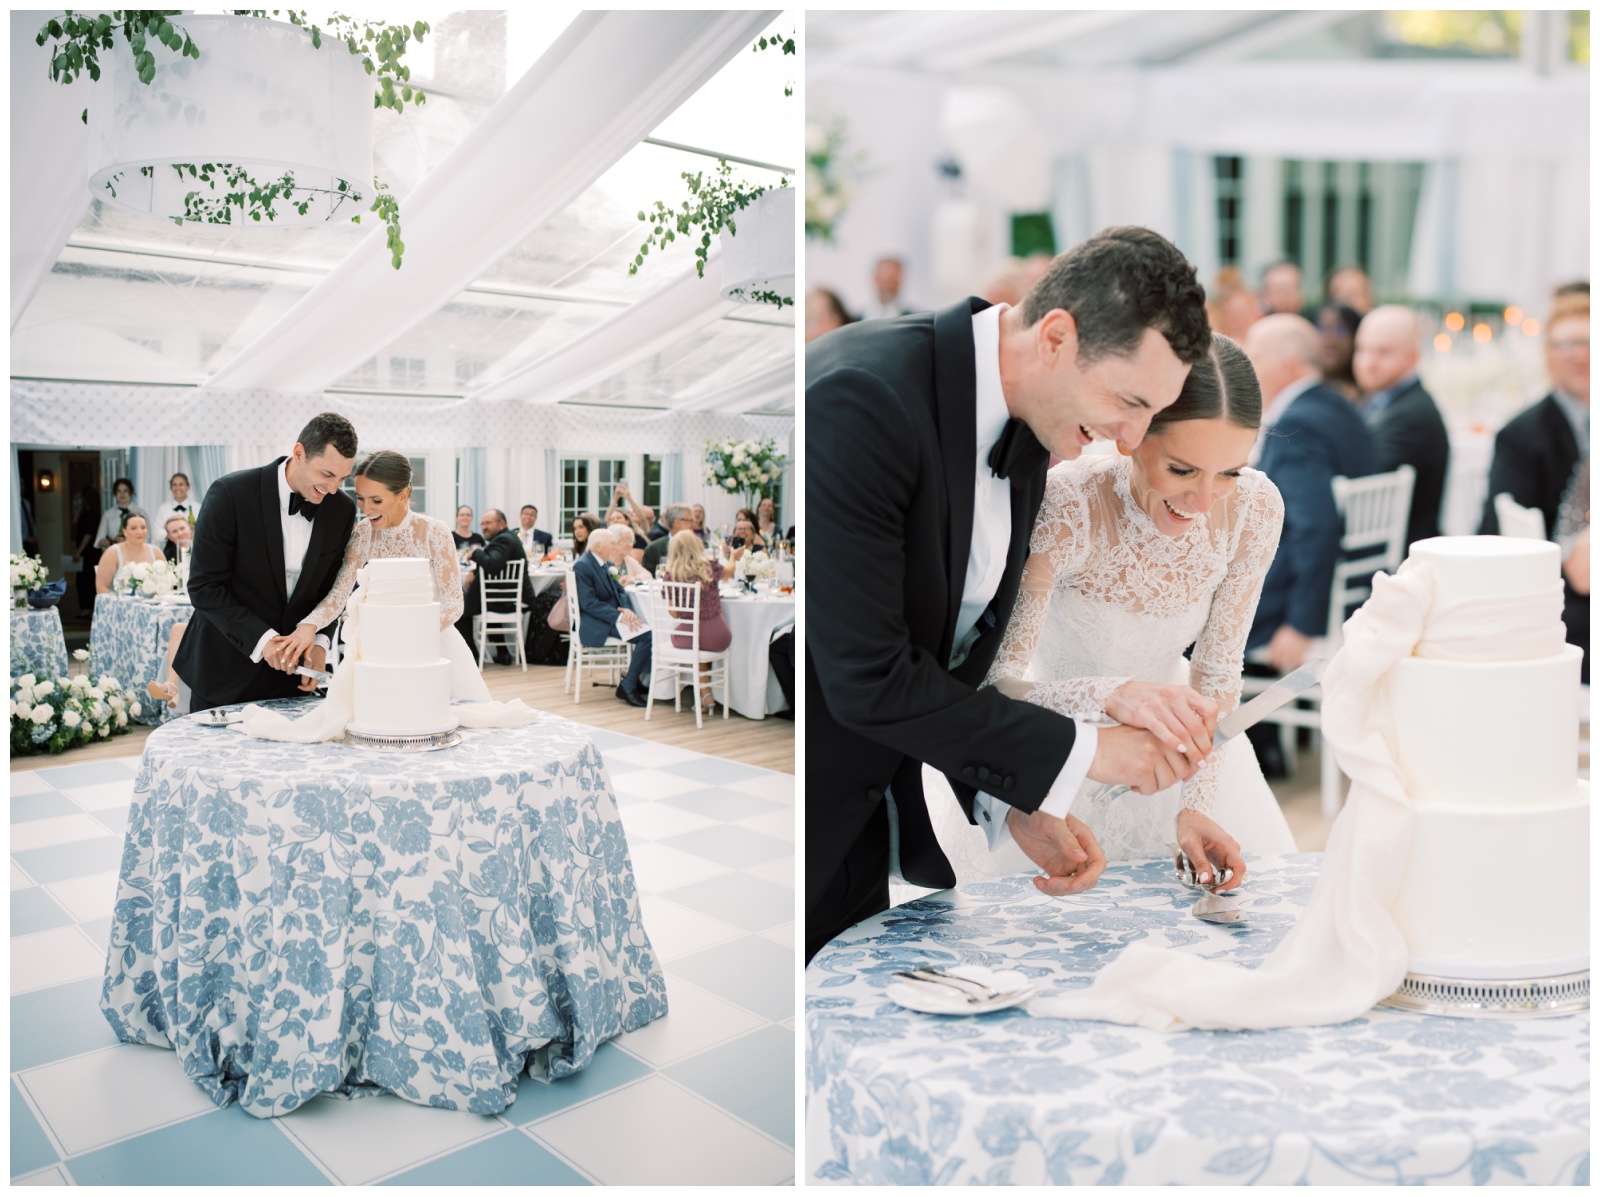
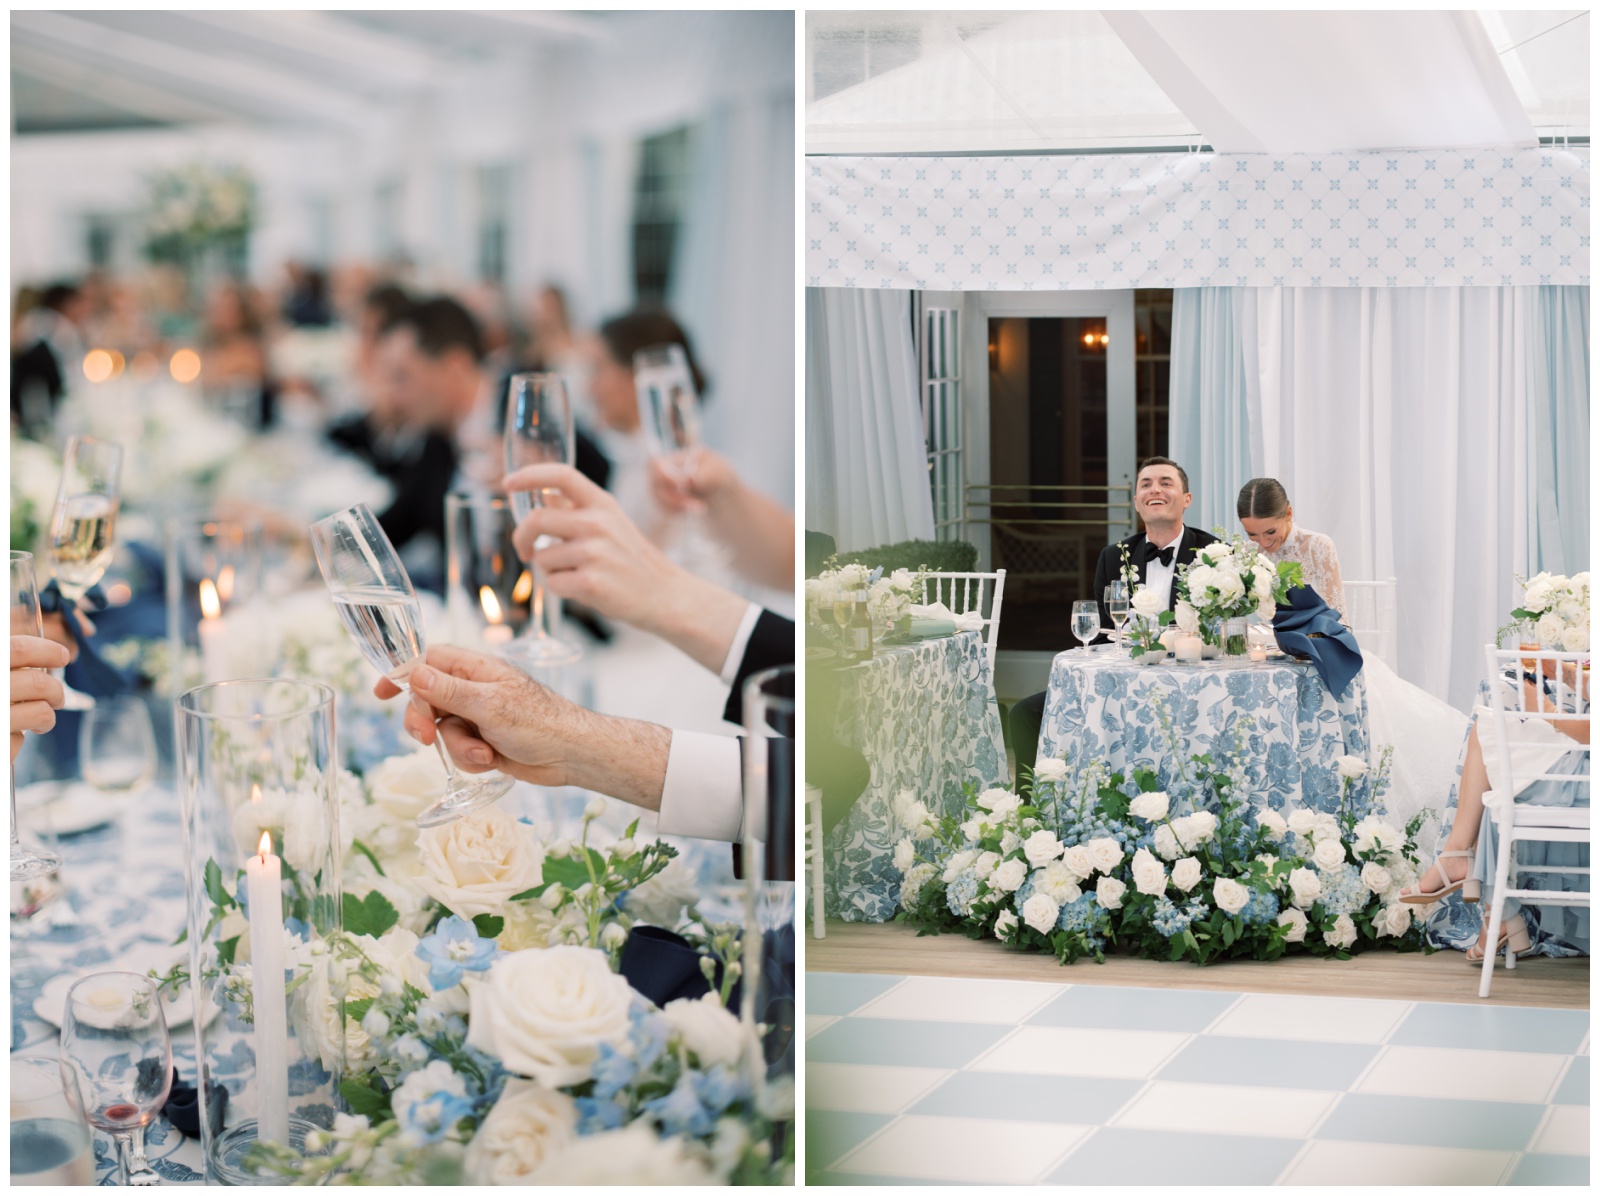
The tented reception itself was entirely custom-designed, featuring a light blue and white checkered dance floor, bespoke bar build-outs with chandeliers, and layered tablescapes alternating between soft blue florals and crisp white linens. Hydrangeas, roses, and delphinium created a romantic, lakeside feel—an homage to the couple’s love of Door County, where they spend much of their time together. Signature drinks inspired by their favorite Door County bar added another layer of personality: a Masters-inspired Azalea for her and a classic Wisconsin Old Fashioned for him.
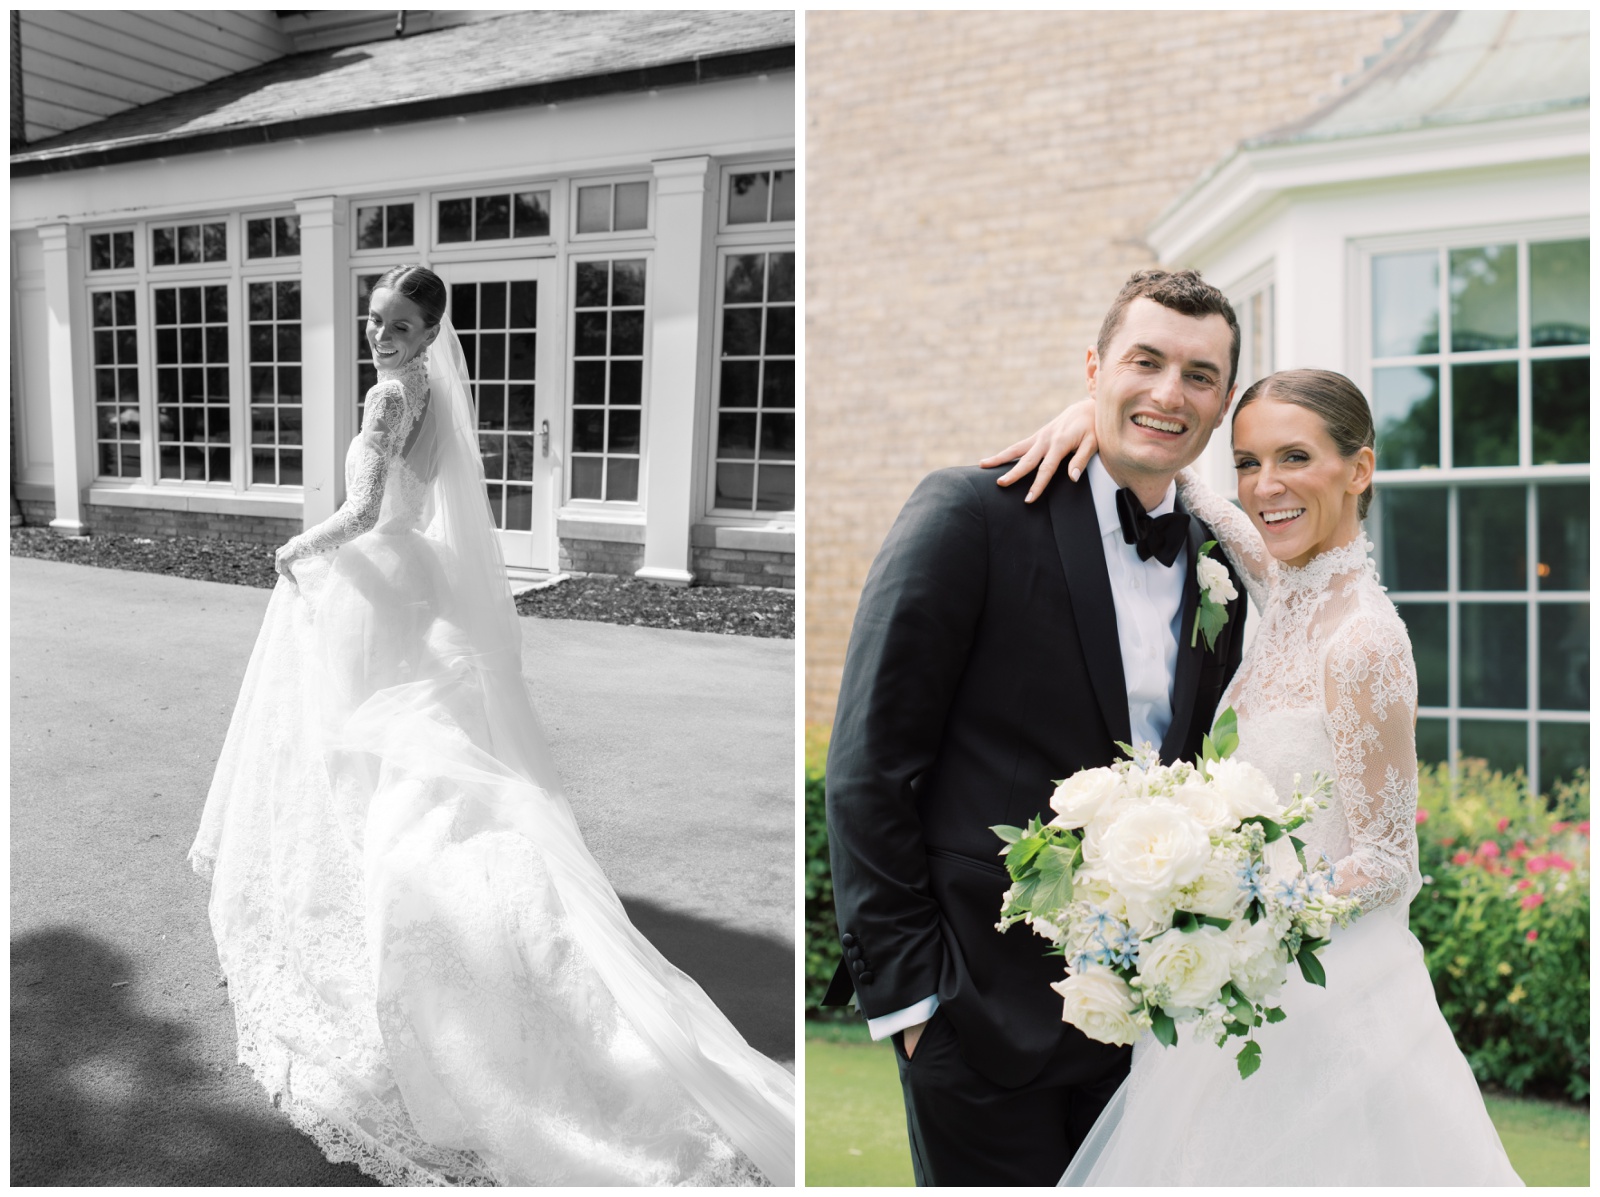
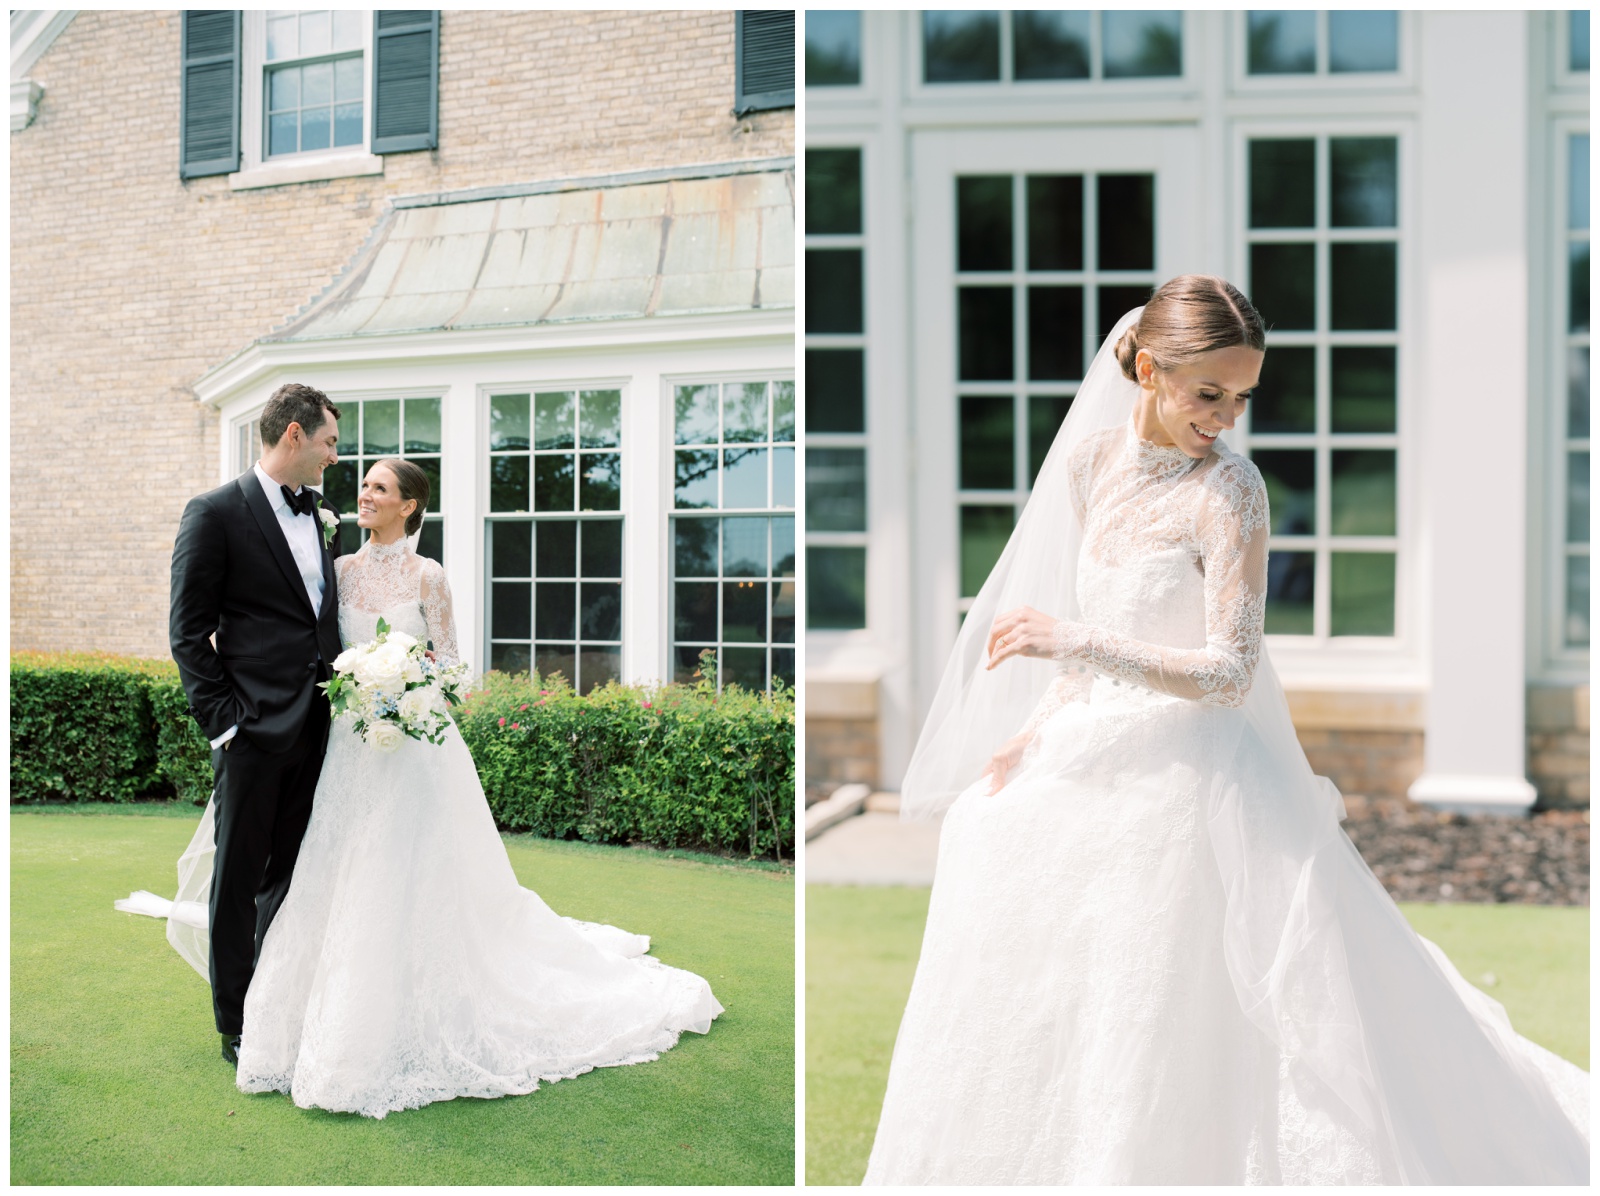
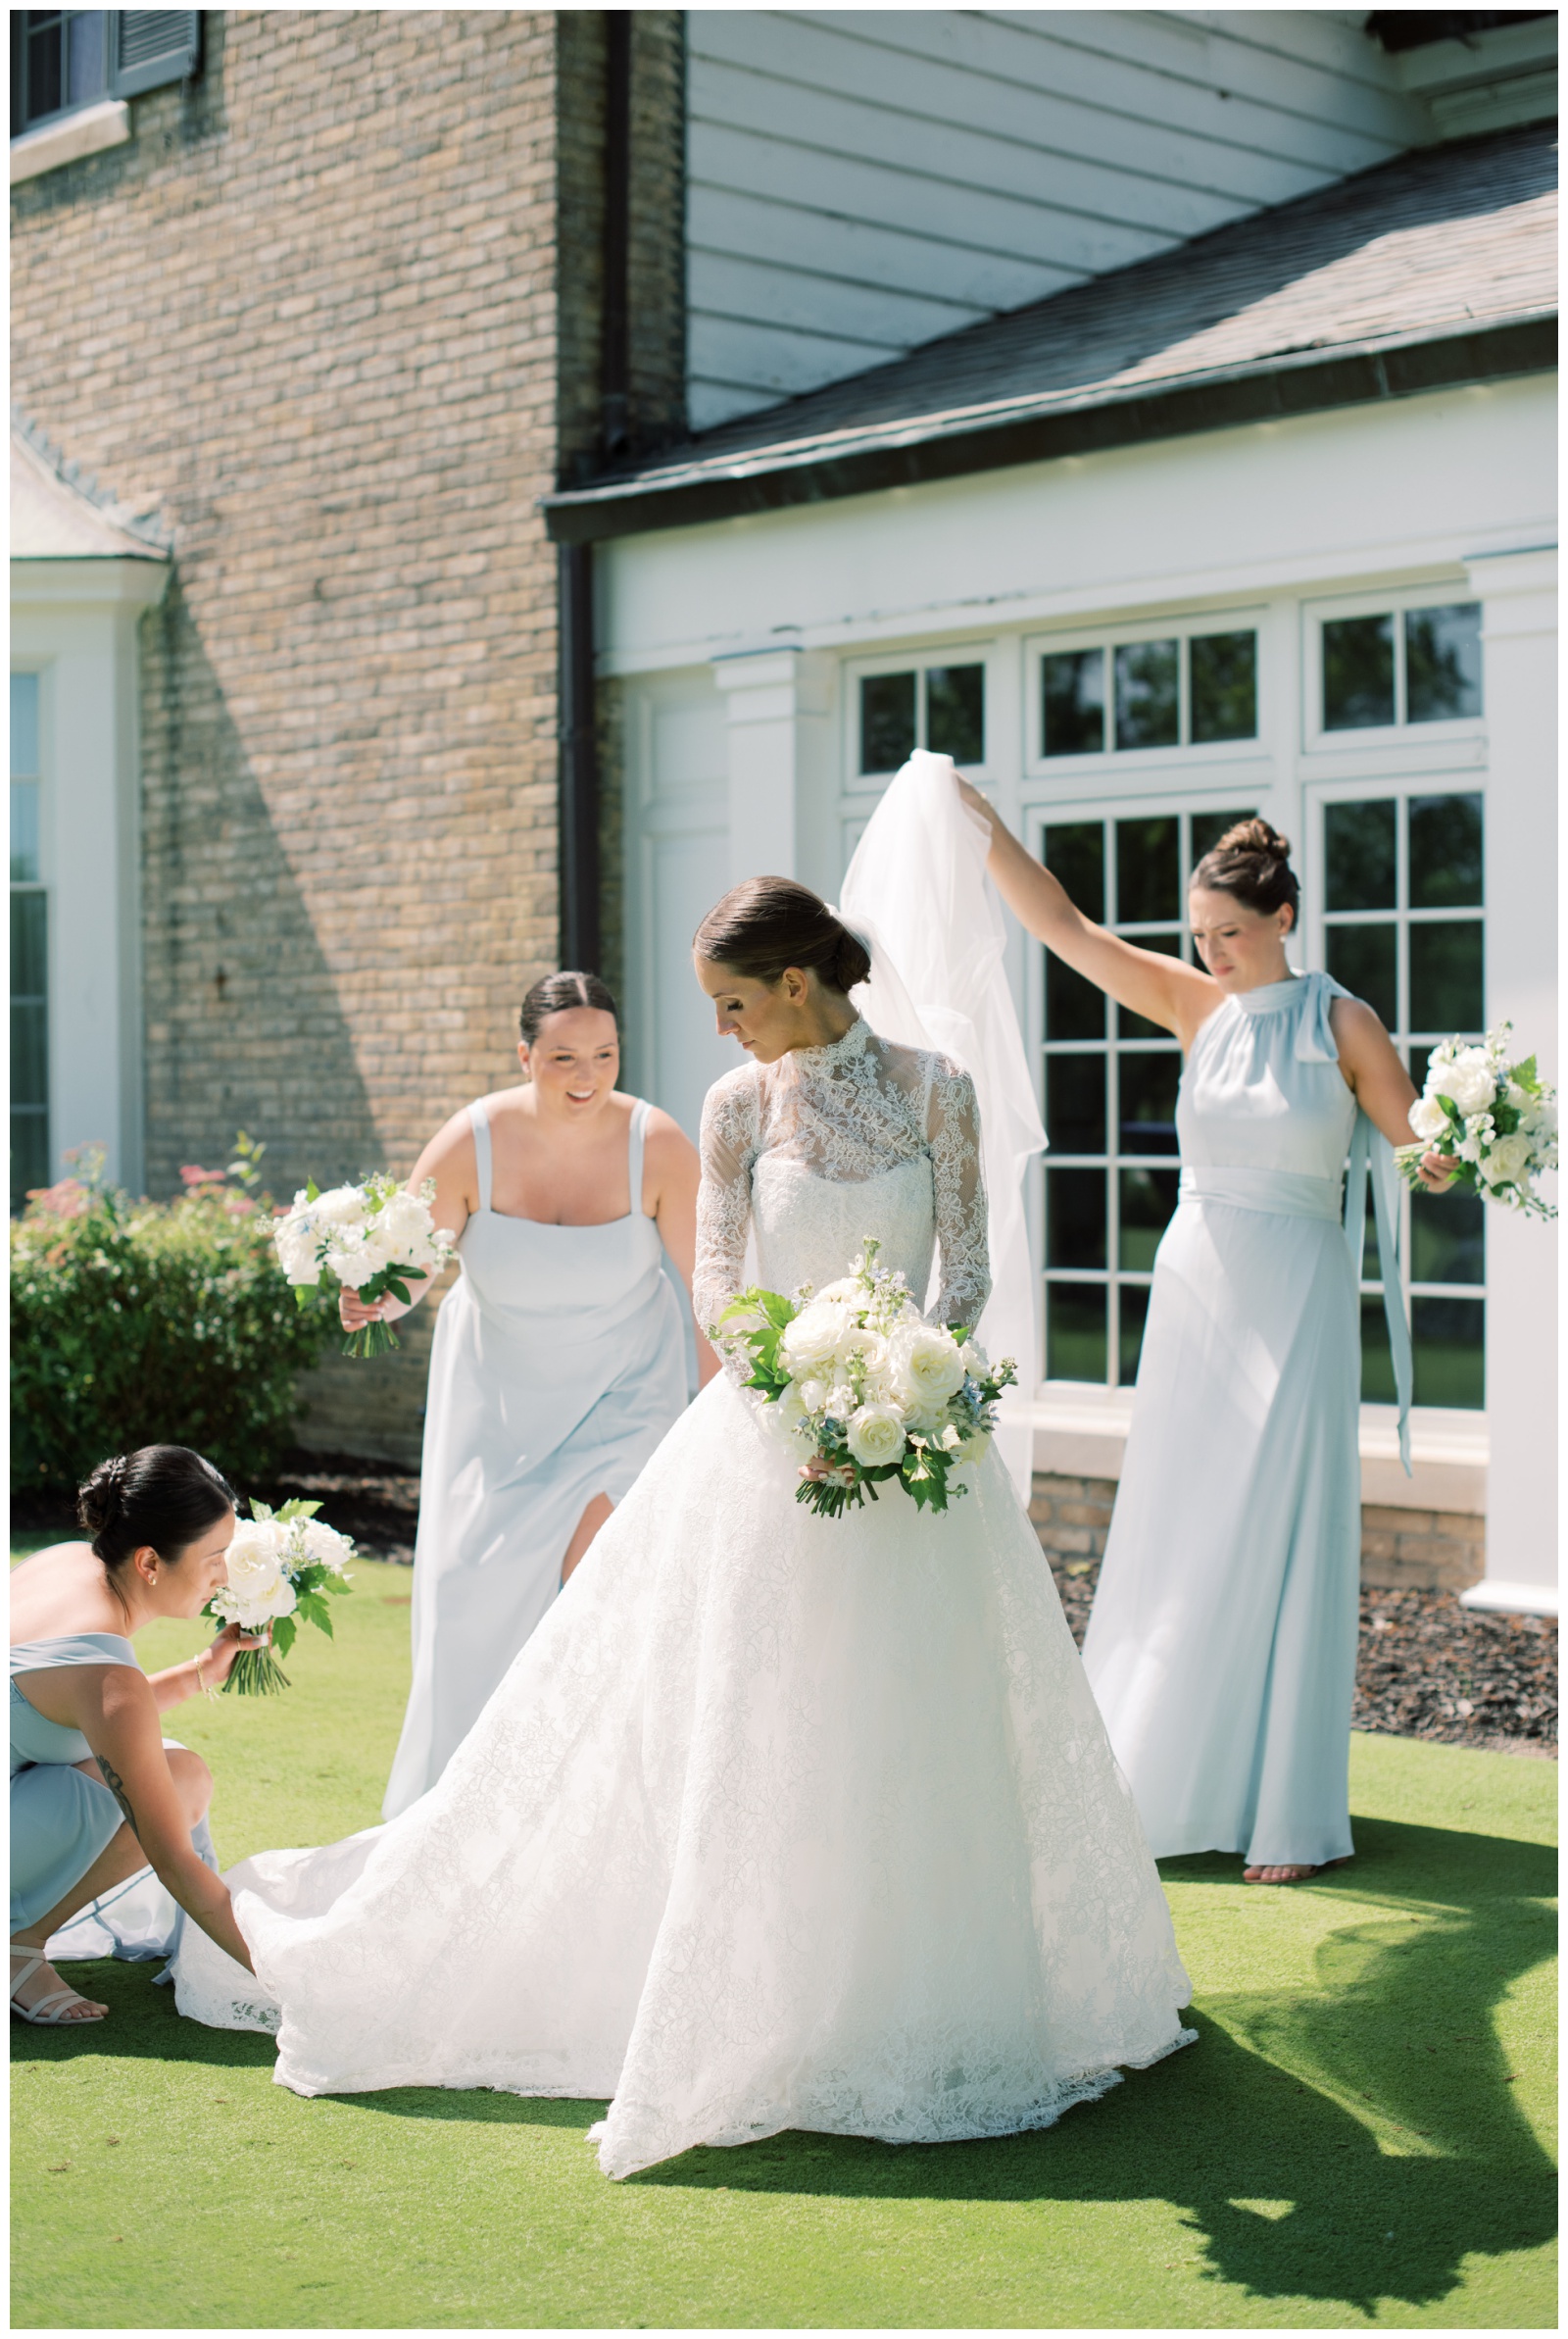
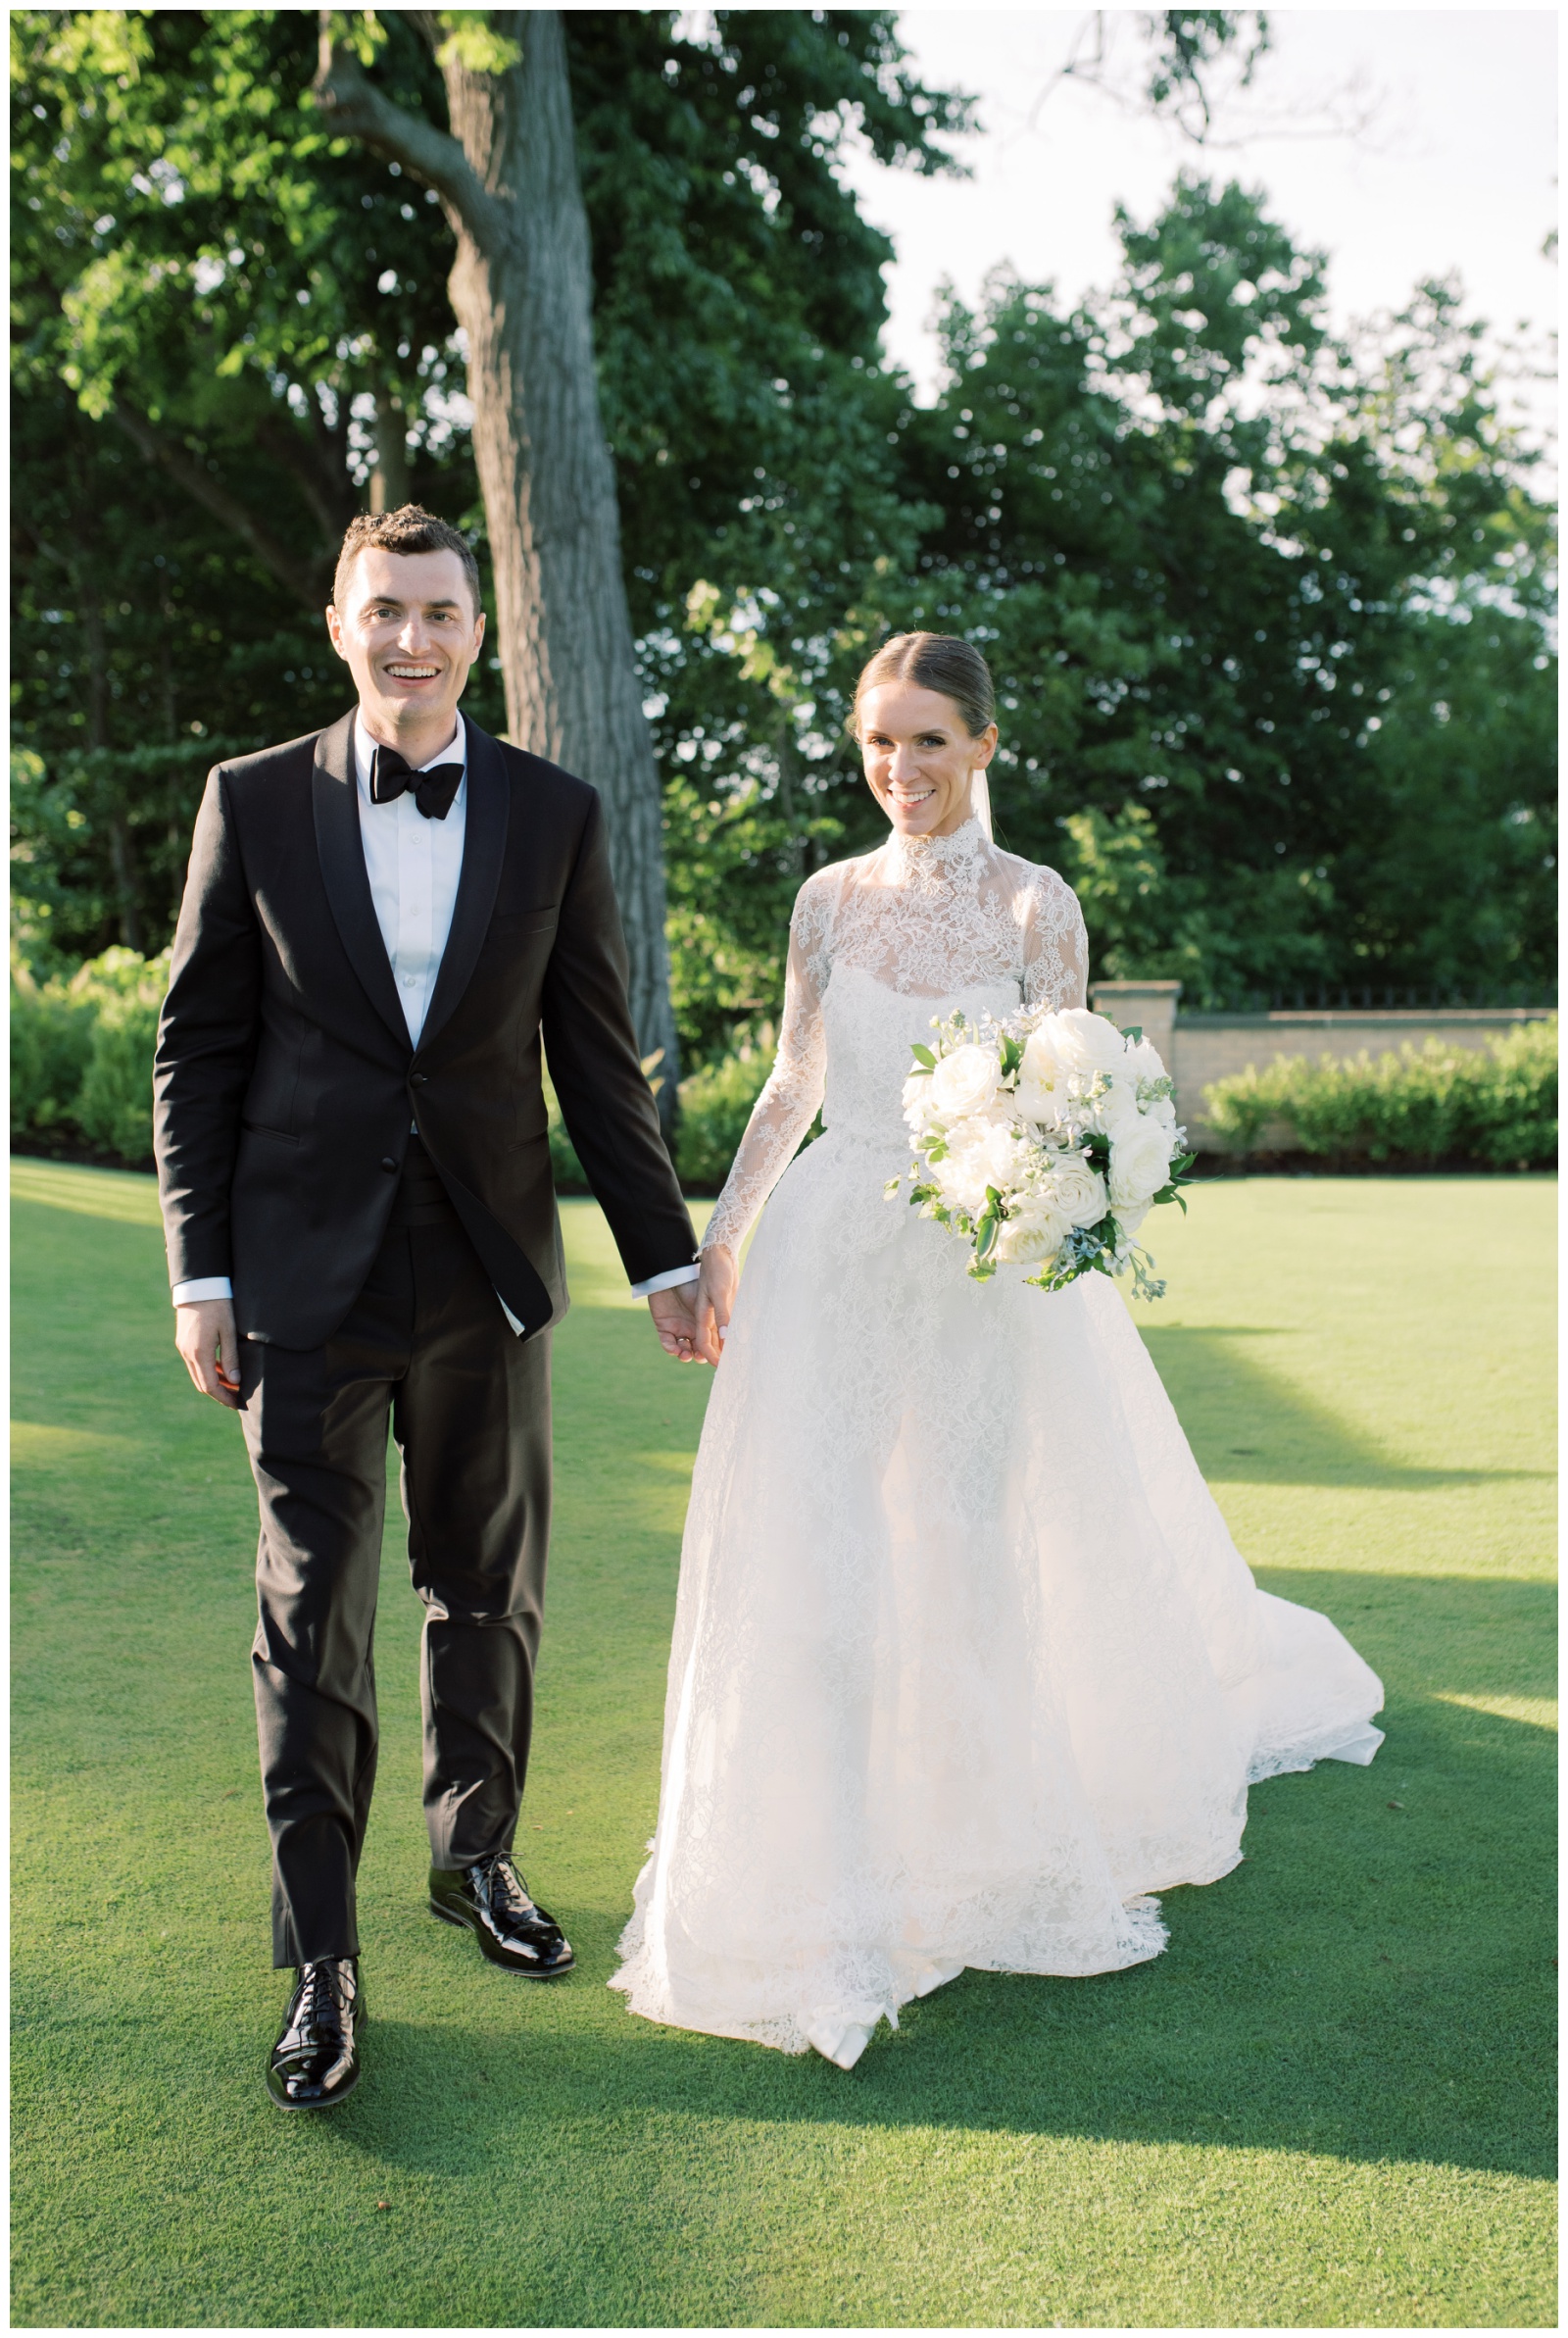
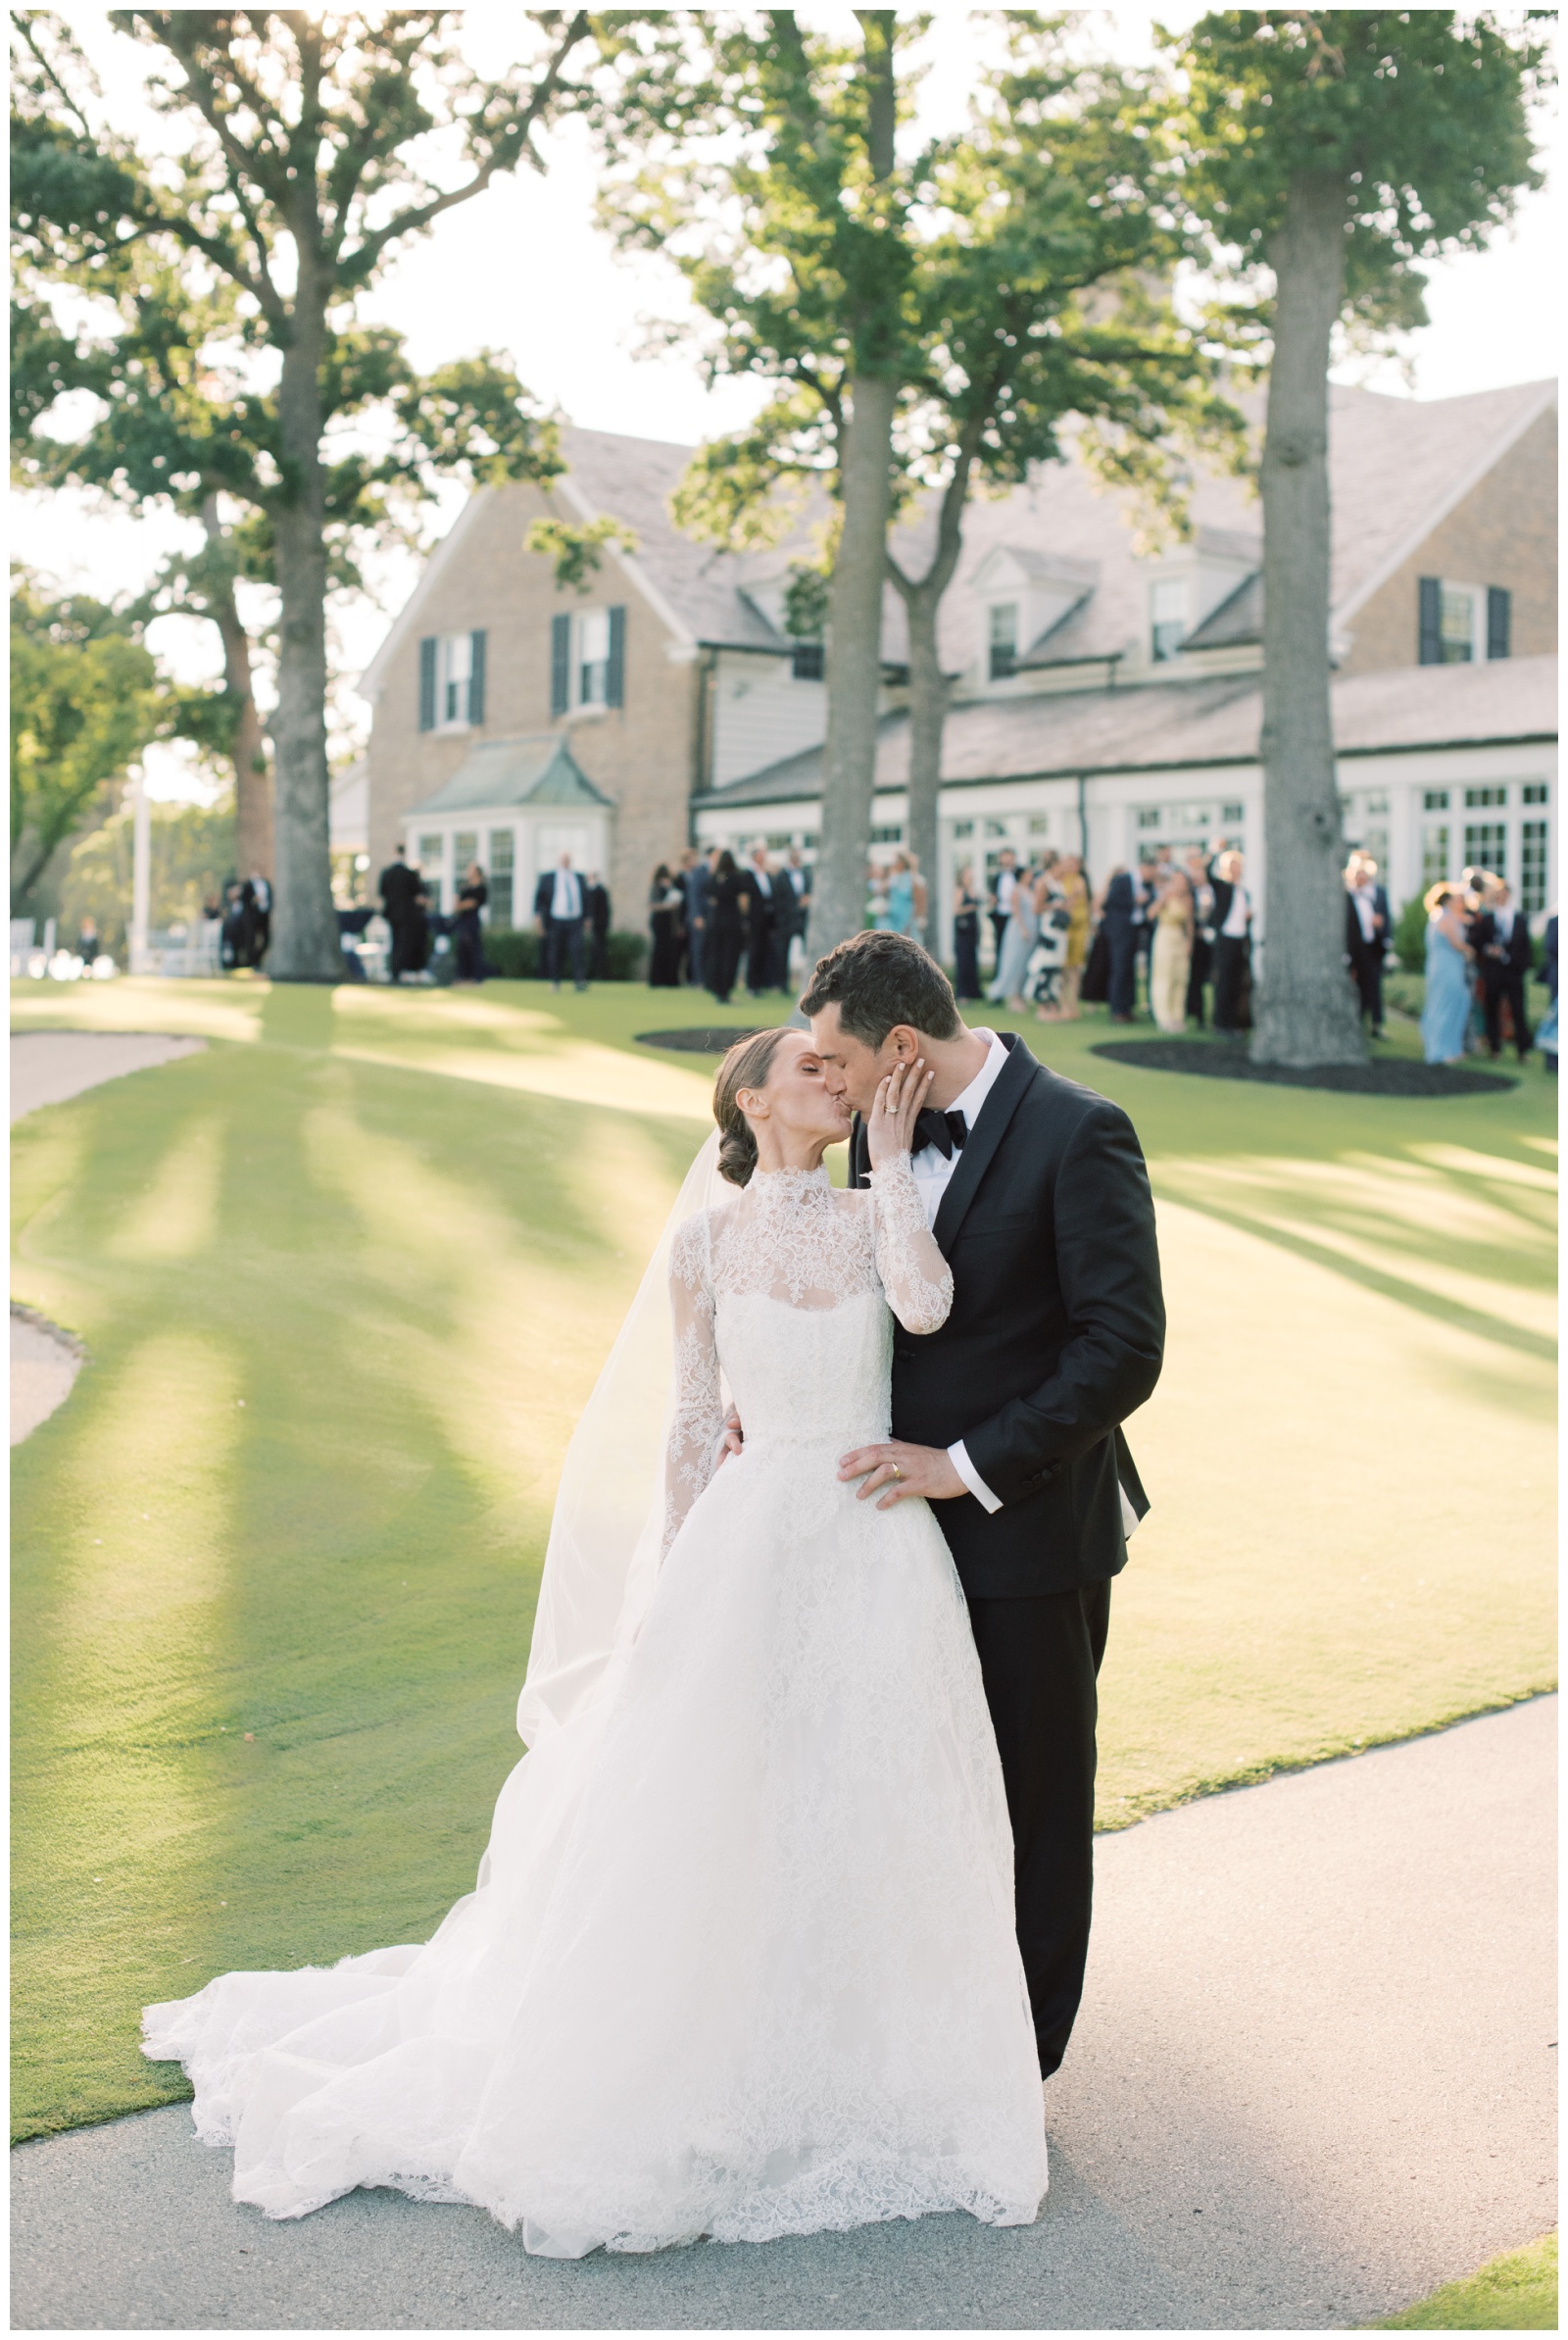
Their party included no shortage of after sun fun— a nostalgic late-night spread of Kopp’s custard, fries, and sliders. Guests grabbed their pair of blue party sunglasses and white baseball hats reading “From Milwaukee with Love” and set out on the dance floor. Zoe’s look shifted seamlessly from formal dinner to dance party, with her timeless Monique Lhuillier Chantilly lace gown with a full skirt, and long-sleeve Chantilly lace keyhole jacket which she removed for dancing. Will also slipped into a second look, a white suit coat which belonged to his late father whose presence was felt deeply.
Their day felt like that perfect mix of elegant yet playful. And showcased that same thoughtfulness and care as they do with their passionate careers in the medical field. Every detail, no matter how small, was designed not just to be beautiful, but to feel meaningful–thoughtful, and deeply rooted in the places and people they love. This was a special one! Here’s a few highlights of their incredible day!
—TEAM—
Venue: Milwaukee Country Club | Planning & Design: Events to a T @eventstoat (Emily) | Floral: Milwaukee Flower Co @milwaukeeflowerco | Photography: Meghan Lee Harris @meghanleeharris | Videography: Salem Media Productions @salem_media_productions | Paper Products: Bay View Printing Co @bayviewprintingco | Hair & Makeup: The Bridal Beauty Team @bridalartistryteam | Dress: Monique Lhuillier @moniquelhuillier | Dress Shop: Ultimate Bride Chicago @ultimatebridechicago | Production & DJ: Sound By Design @soundbydesign | Tent: Canopies Events @canopiesevents | Draping: Quest Events @quest_events | Catering & Bar: Milwaukee Country Club | Cake: Milwaukee Country Club | Live Music: Dream City Strings @dreamcitystrings | Linens: Stradley Davidson @stradleydavidson | Linens & Chargers: BBJ La Tavola @bbjlatavolalinen | China: The Festive Frog @thefestivefrog | Ice Cream: Kopp’s Frozen Custard @koppsfrozencustard | Transportation: Think Limo @thinklimo


April 29, 2026

Preppy, timeless, and personal— every detail was thoughtfully chosen for Zoe & Will’s tented Milwaukee Country Club wedding. From their custom “ZW” monogram woven throughout, to their two dogs, Millie and Sunny, making subtle appearances from bar menus and cocktail napkins to their country club themed favors—blue tennis balls signed “Love, Millie & Sunny.” The […]
VIEW THE FULL POST
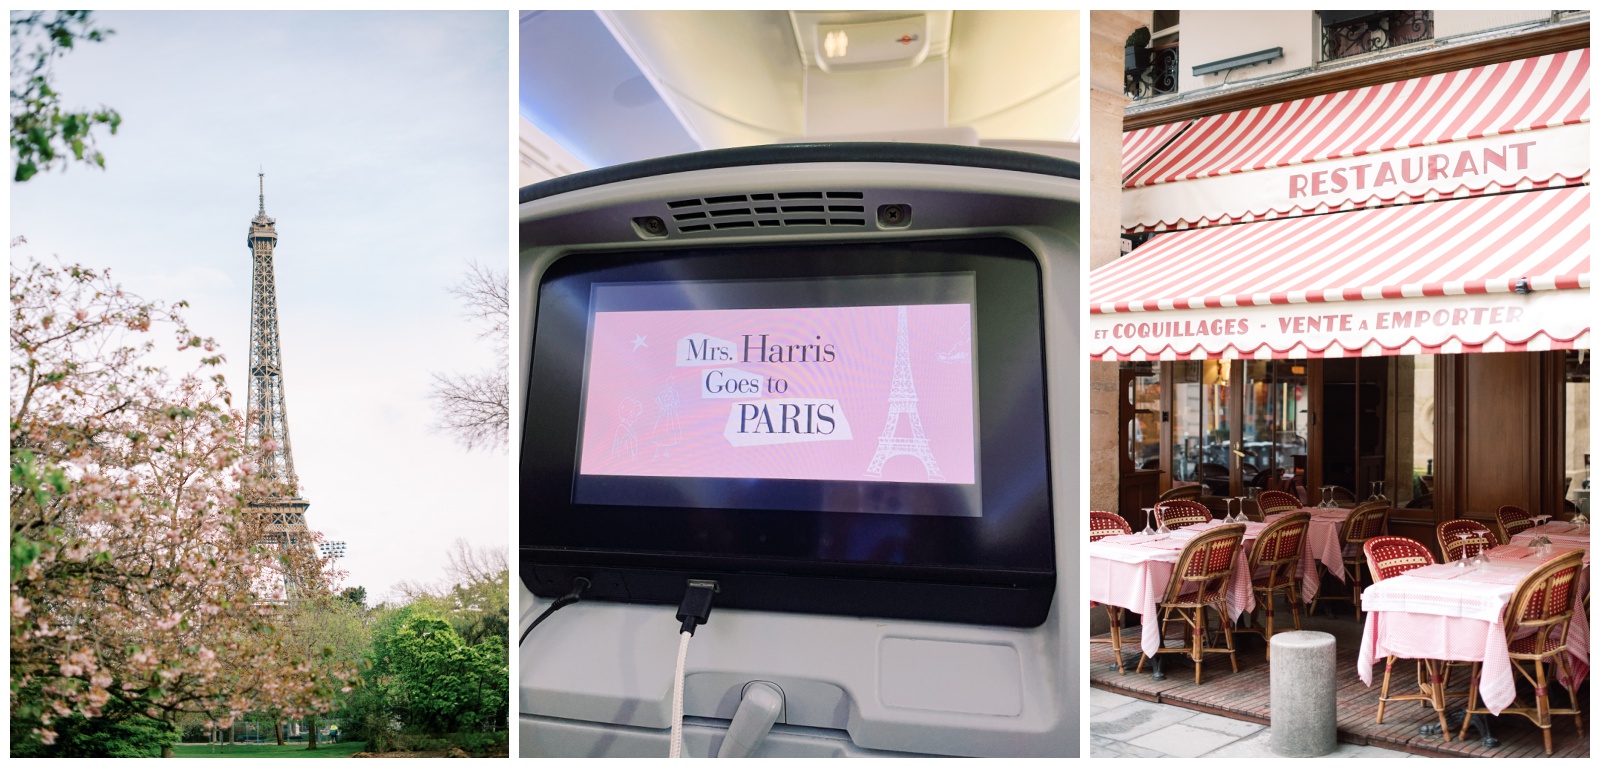
Where to Stay in Paris
With so many incredible neighborhoods and sights to see, it can be overwhelming to narrow in on just one or two locations to unpack your bags and stay a while. If this is your first time in Paris, you’ll likely want to situate yourself close to all the action, or at least in walking distance. But if you’re like us, you also want to get away from the crowds and experience the city more authentically and like a local. If this sounds like you, you’re in the right place! I’ll be covering how I narrowed in on our two market street neighborhoods, as well as a 4-day bulleted itinerary of how we decided to divide and conquer our limited 4 days in Paris. Seeing all the main attractions of course! But still leaving some room for improvisation and our own magic along the way. Because the BEST way to spend a day in Paris is ultimately to just stroll the romantic streets and discover wherever your heart takes you!
MRS HARRIS GOES TO PARIS =)
As a wedding photographer and lover of fine art, Paris was always one of those top of mind places to visit. A large part also being I had studied the language for 6 years in grade school and learned all about the culture, the food, the famous monuments. I studied Van Gogh’s paint strokes and learned how to make crepes. We watched international House Hunters and movies like Les Misérables and Amelie (my favorite movie ever is Moulin Rouge). Although I could hardly remember how to speak anything other than “Oui!” and “Bonjour” and “Merci!” I was hopeful it would all come back to me while there (and like clockwork, it did)! By day three, I was able to brave up the courage to order my breakfast, ask for the bill, and where the bathroom was – all in French (casually *brushes shoulder off* – it was one of the proudest moments of my life okayyy :’) Even Alex was thrilled for me.
We originally were supposed to do an extensive 10-day trip to Paris (and day trips to nearby French Christmas Markets) in December of 2023, but life threw us a curveball and we ended up taking up Alex’s grandparents property suddenly in November (getting a new home was not on our end-of-year bingo card!) We decided to cancel our trip to focus on the new home projects, with hopes to do a mini trip in Spring if the revised budget allowed.
It always turns out that January is a great time to score some good flight deals, so when I saw some on sale for $450ishh round trip I jumped on board & said “Alex – shall we Paris!?” We decided 4 days would be juuuust enough time to give us the chance to see what Paris was all about for a few early spring days, give us a mental vacation after moving & renovations, and revive our spark & inspiration before our upcoming wedding season would kick off later in April.
LOCATION LOCATION LOCATION
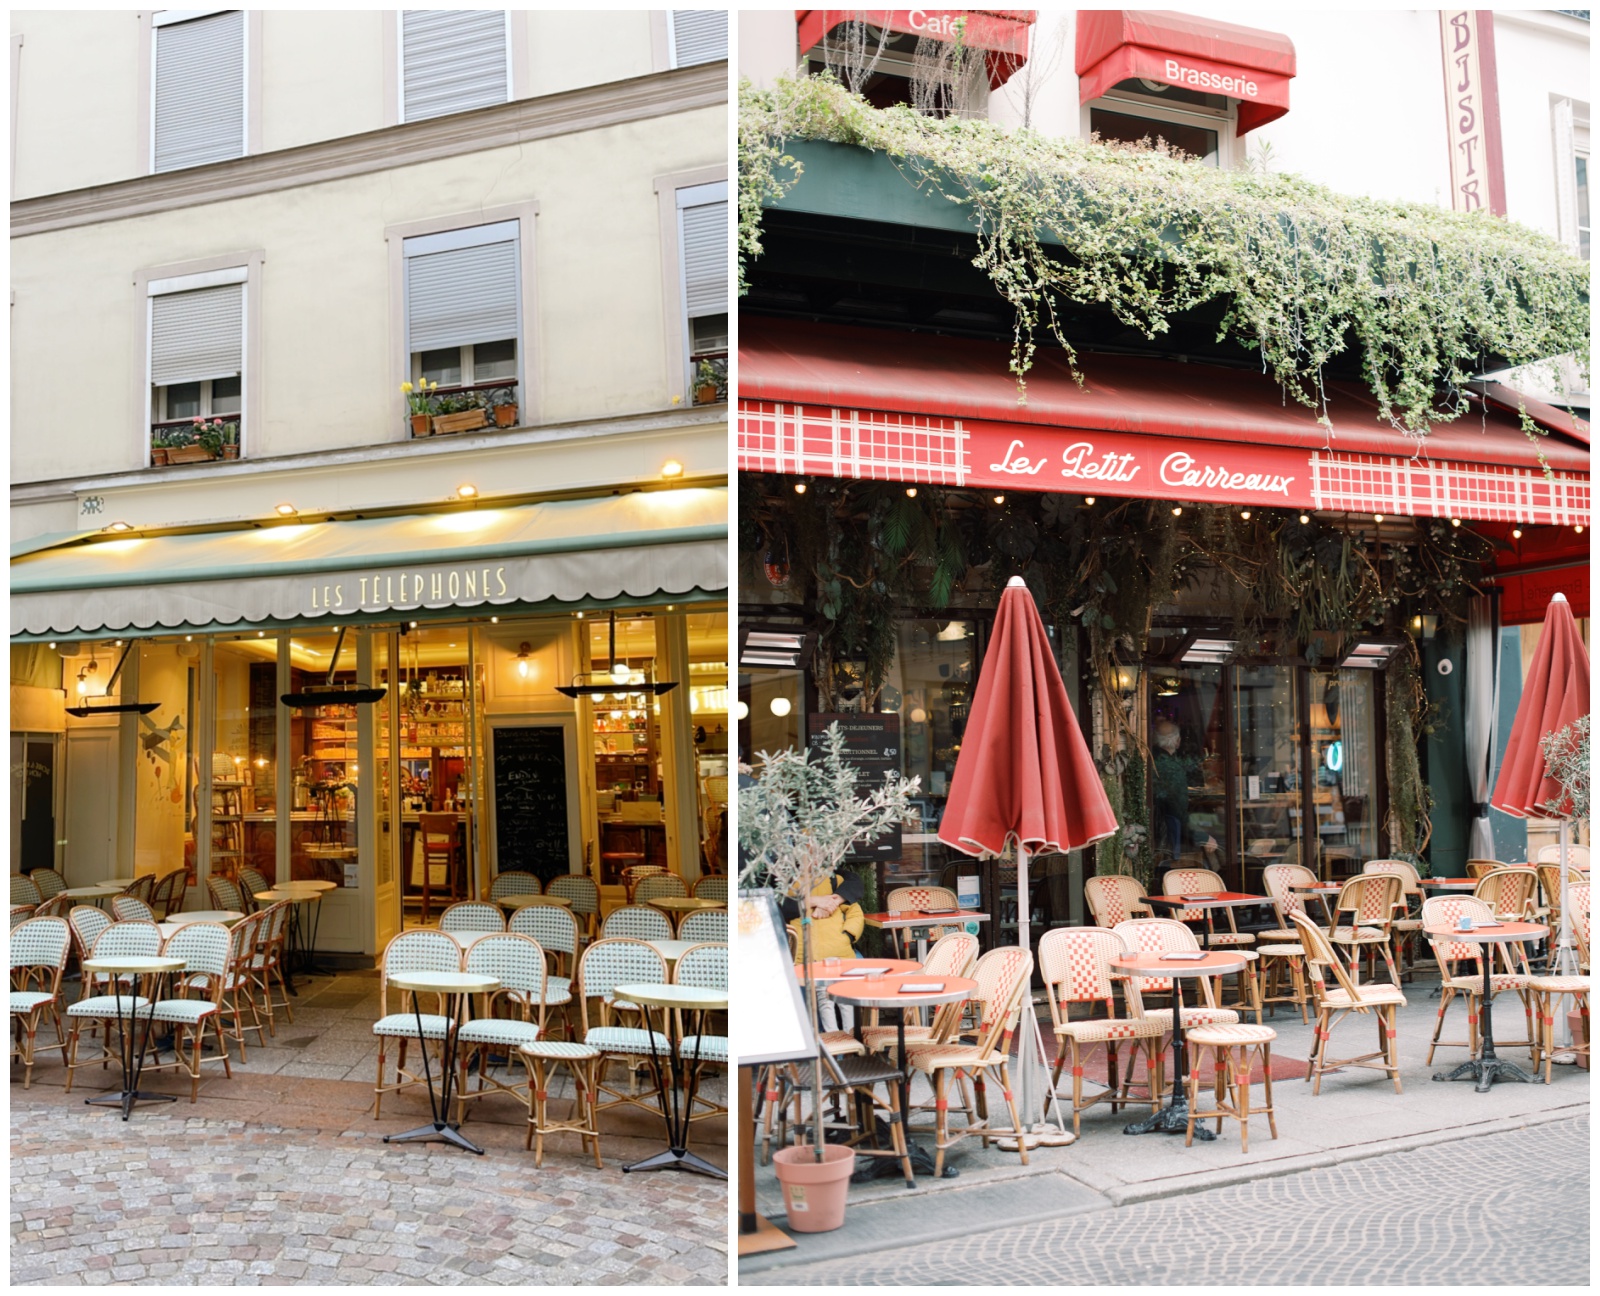
Rue Bachaumont / Montorgueil neighborhood
Having only four total days meant each day would be pretty packed full to make it worth the long flight. So a hotel with all the perks was not of much importance, but the location of the hotel and it being close to everything we’d be wanting to see was of top priority.
Having done some travel before and getting a feel for what we always tend to like and don’t like as travelers, I knew we’d want to avoid heavy tourist and commercial areas (like the Champs-Élysées) and really get a better feel for authentic Parisian life – without being TOO far out from the main sightseeing of course. Think cobblestone streets with fresh produce & flower shops, a “Patisserie” (pastry shop to snag a croissant), “Boulangerie” (bakery for the quintessential French baguette), and many “Brasseries” to choose from (which function as cafés by day, and dinner/spirits by night – and of course, those cutesy Parisian bistro chairs for people watching).
So I googled something like “Best market streets in Paris” and received a list of about 25 different authentic streets. From there – and this is probably way too much research for the average person, but having only four days and wanting my first experience in Paris to be **everything I had dreamed** – I plugged each street into Google Maps and virtually started walking around. It was a great way for me to get a sense of a neighborhood without ever having been there, and imagine what would feel most like our vibes. Something that serves all the market street staples, but is aesthetically beautiful and inviting and close to other attractions.
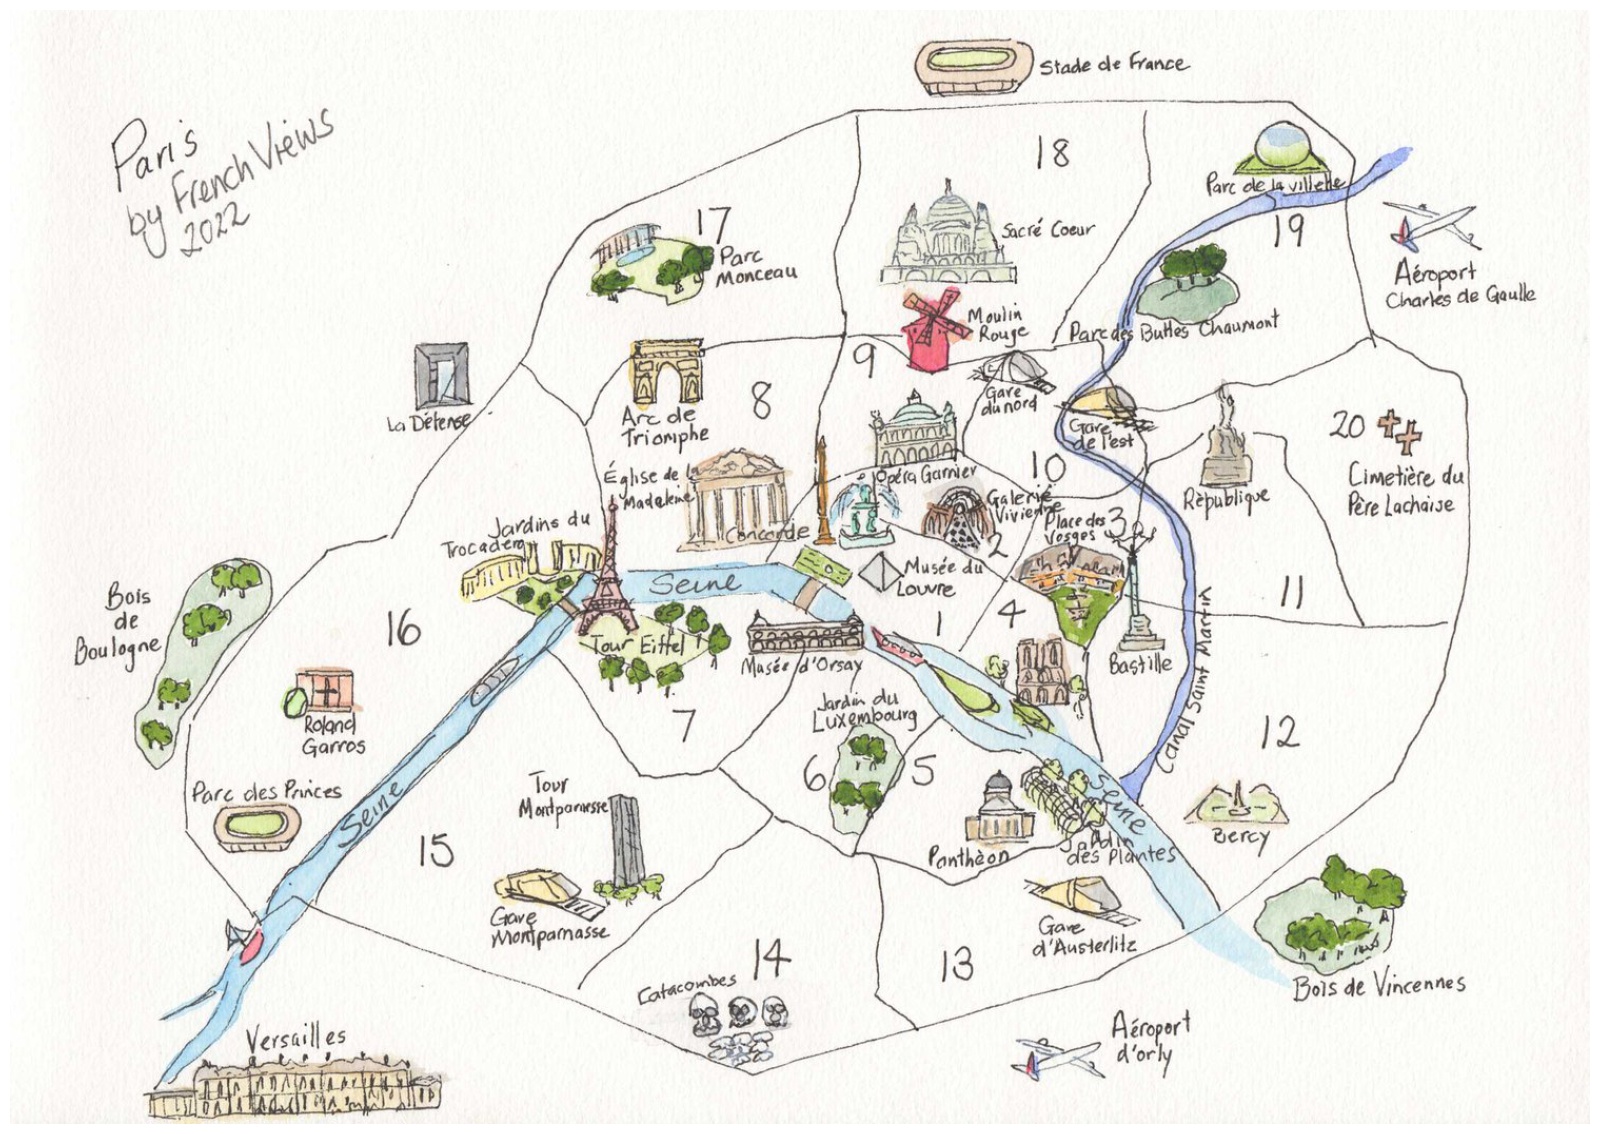
Because it was hard to choose just one, I settled on the two market streets (“Rue” = street) named below. They were located in two different “arrondissements” (or districts) which the city is divided into, numbered 1-20, and that make a spiral around the center of the city like an escargot (snail). Although our stay was brief, I thought it could be nice to get a feel for two different locales in Paris rather than just one. That way I can compare/contrast, and also not put all our eggs into one neighborhood’s basket. SPOILER, both locations were *phenomenal, chef’s kiss, exactly what I was looking for* and would easily revisit both again next time.
- *Rue Cler* in the 7th (quieter market street near the Eiffel Tower) Stayed: this excellent little boutique Hotel du Champs de Mars
- *Rue Montorgueil* in the 2nd (buzzy foodie location, central and walkable to many things) Stayed: this 4 Star Art Deco Hotel Bachaumont
Rue Cler on the left, Montorgueil district on the right
7th Arrondissement – Eiffel Tower area
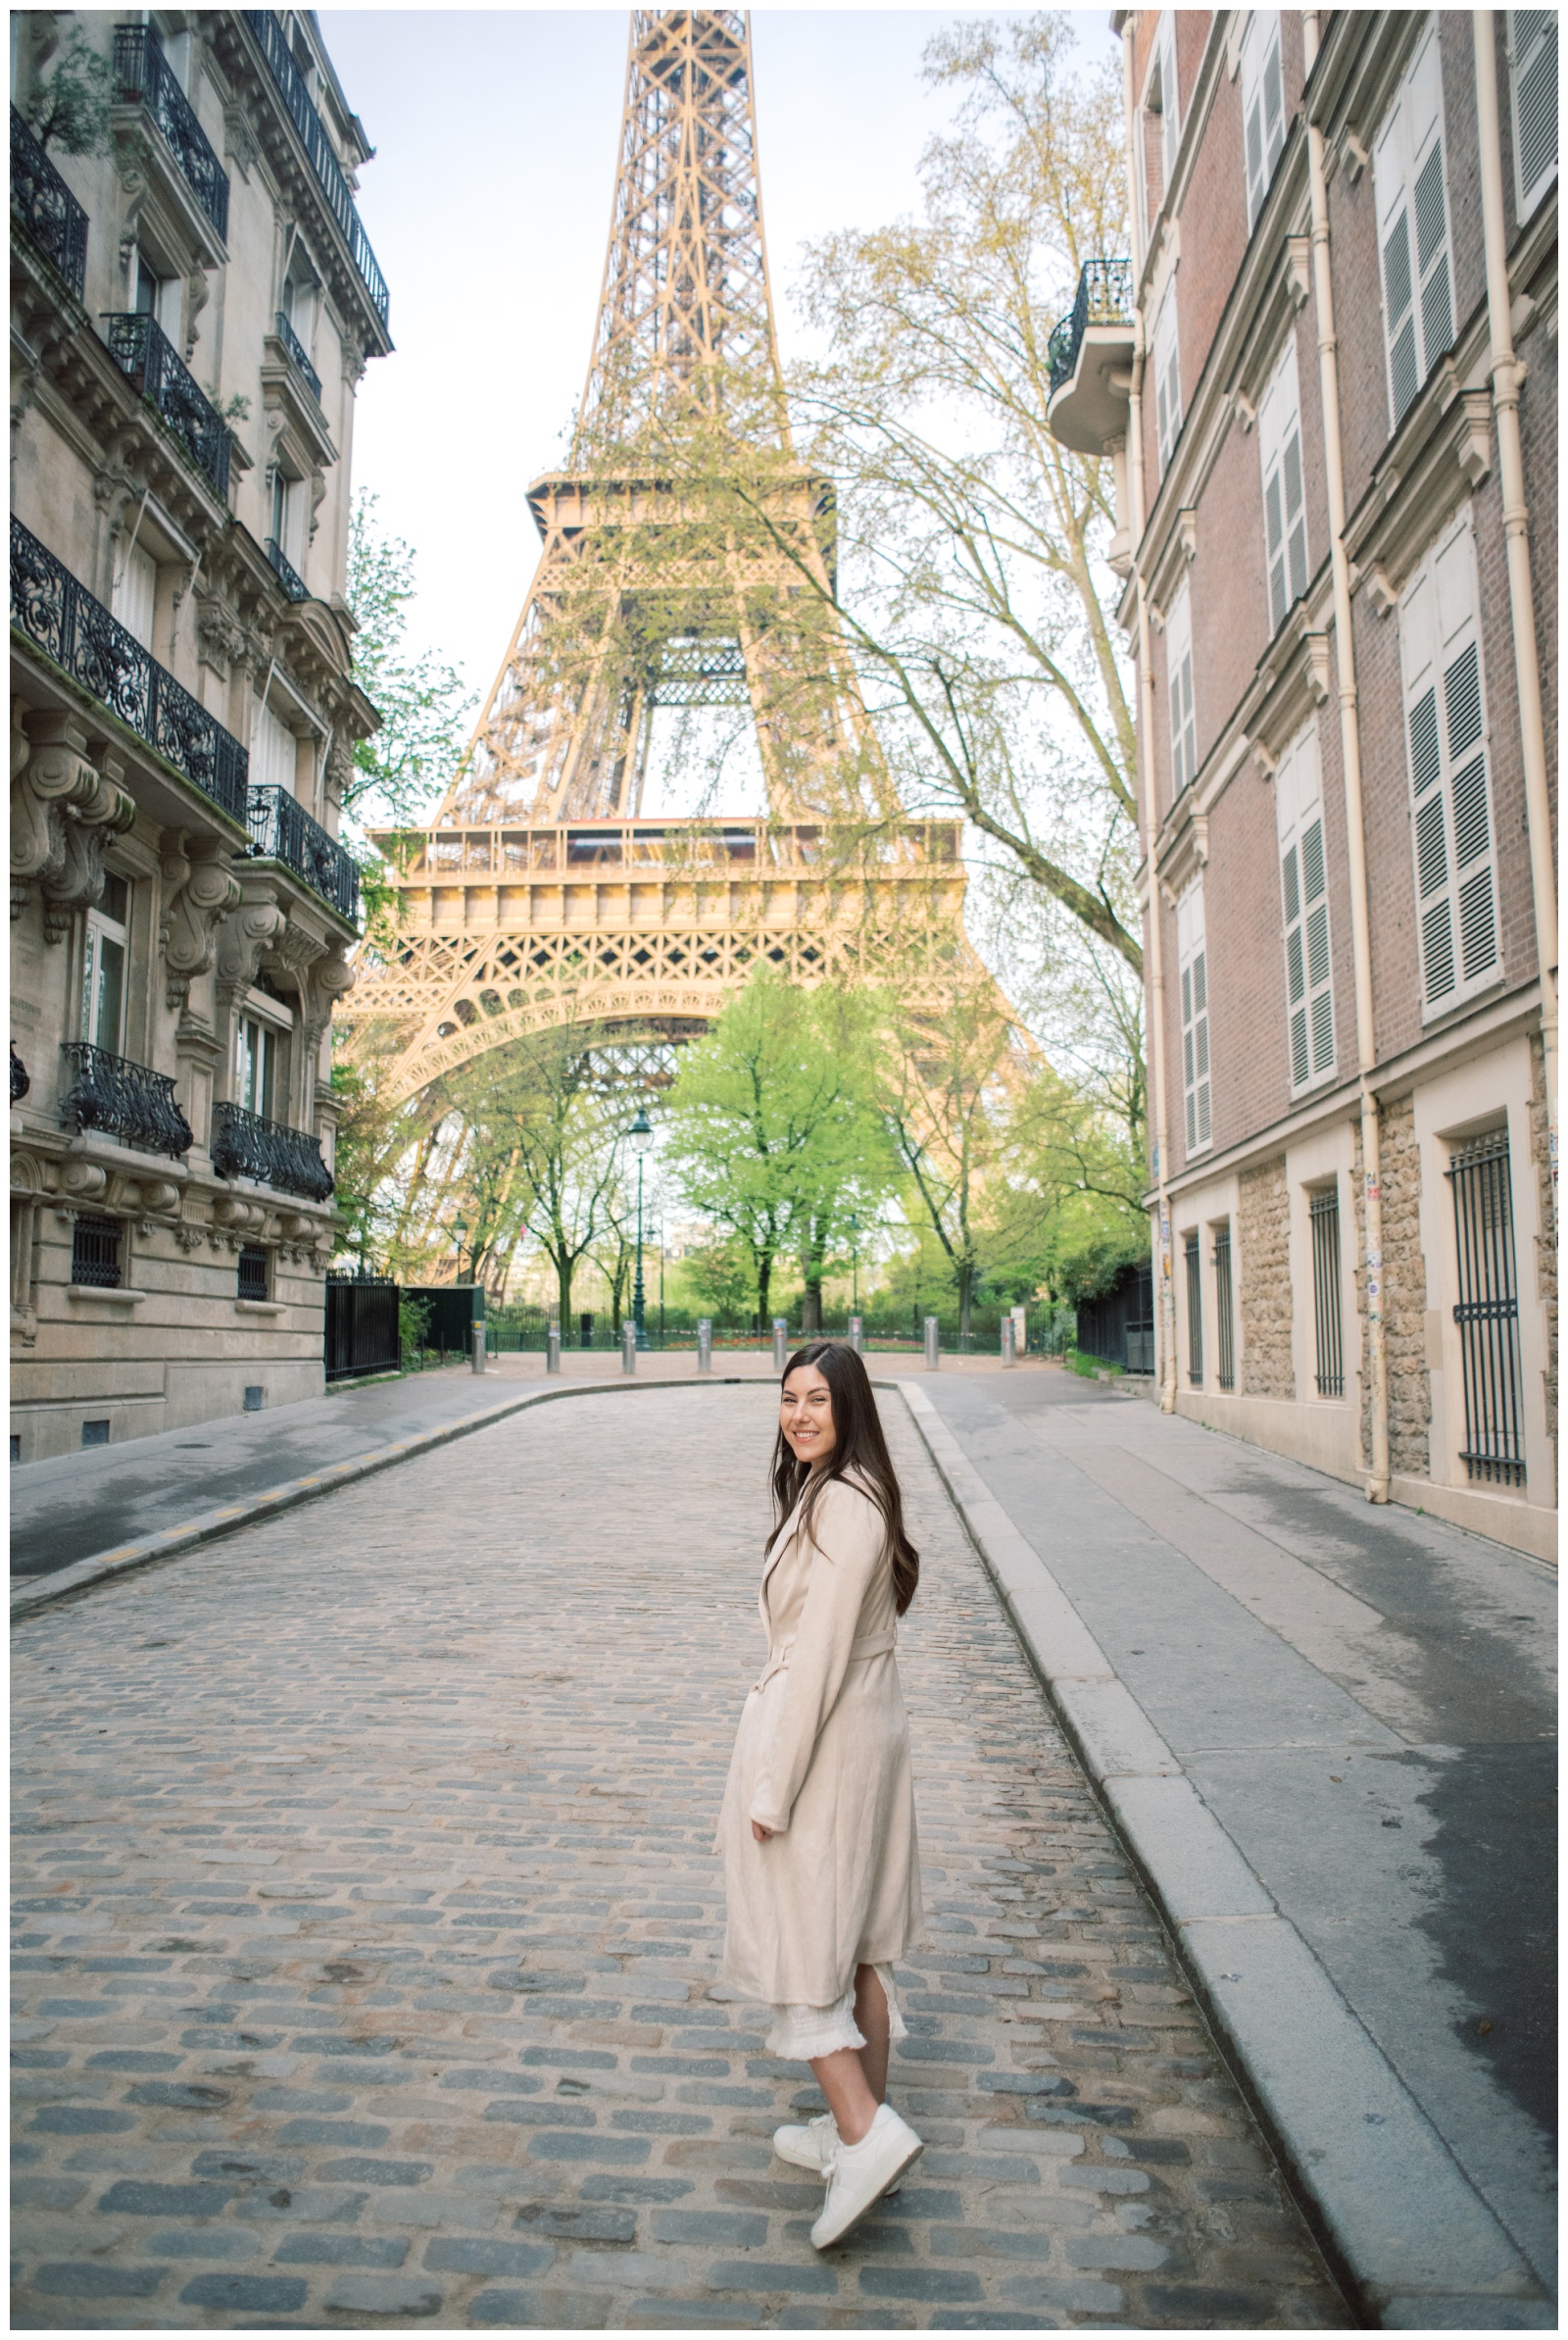
The Eiffel Tower is actually not the most convenient location to stay your entire trip. It is situated in the 7th arrondissement, which is west of many of the other popular attractions in the city. However it’s likely something you’re going to want easy access to for a memorable first day in Paris (picture walking the market streets and having a cute picnic afternoon) or last night in Paris (grabbing a bottle of champagne and watching it light up at night)! And something about being able to walk from your hotel to the Eiffel Tower Champs de Mars lawn and stumbling back makes it seem all the more romantic.
Tip: If you’re wanting to spend a day or two around the Eiffel Tower, I would personally recommend the 6th (Saint-Germain-des-Prés) or 7th (Rue Cler) areas. We knew we’d be spending majority of our time sightseeing, but wanted easy access to the Eiffel Tower on our first day, so we chose a small boutique hotel within quick walking distance in a cutesy market area of Rue Cler (being able to wake up, walk the cobblestone pedestrian street and and grab an authentic croissant sounded so charming).
1st-3rd – Central Sightseeing areas
If you plan on doing a lot of sightseeing and want something more centrally located to avoid metros and be able walk most places within 20 minutes any direction, staying somewhere in the 1st-3rd arrondissements is recommended.
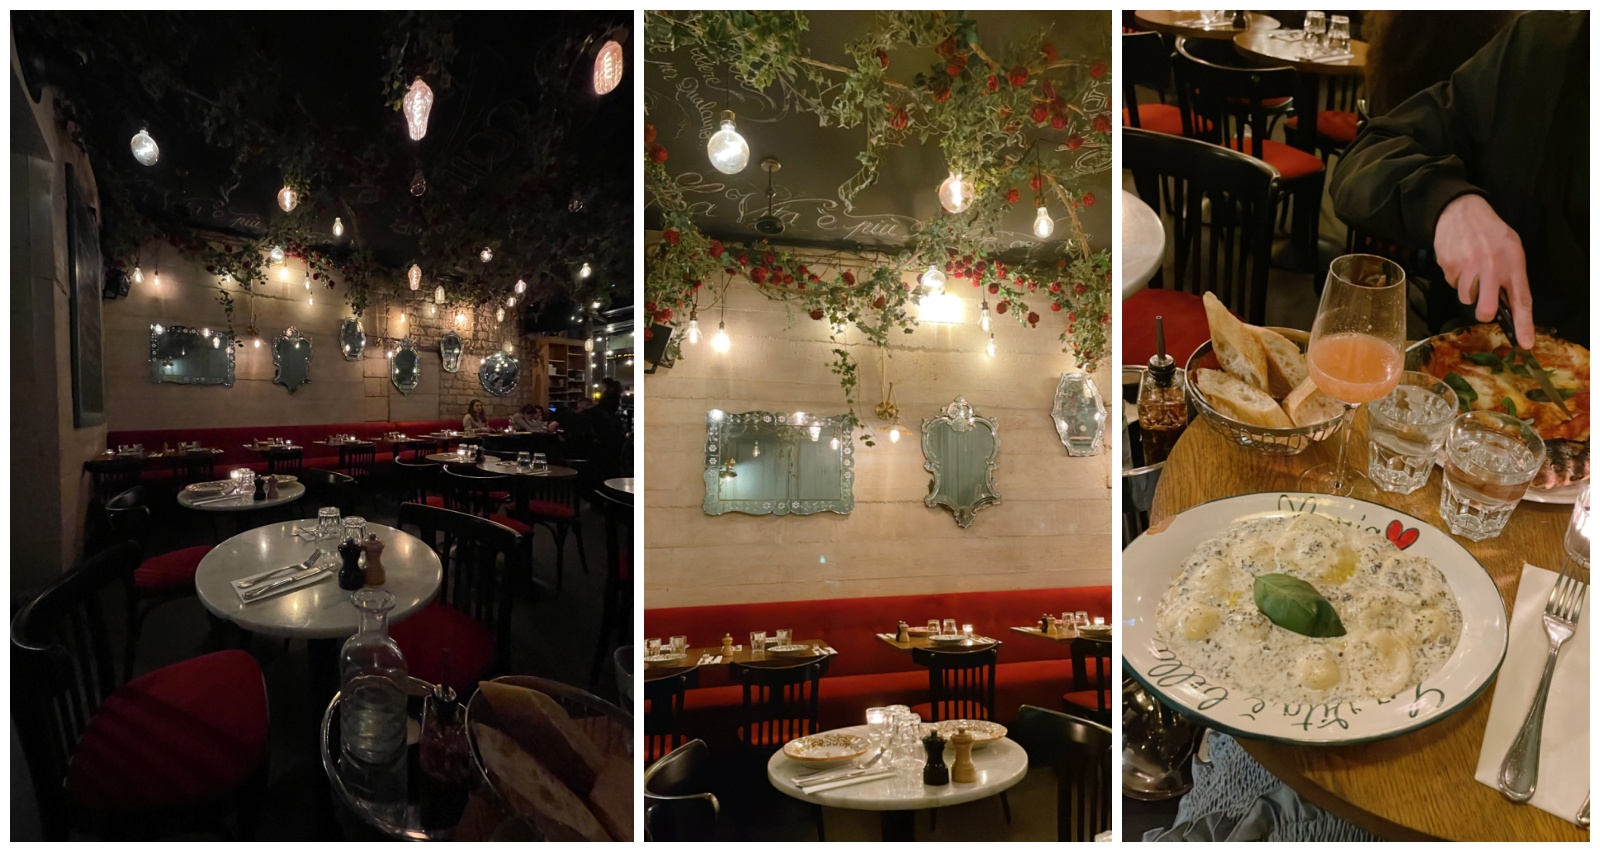
If looking for a more neighborly feel (which would be my personal recommendation), consider Le Marais neighborhood in the 3rd/4th. We didn’t get to explore this one as much but have heard great things. Or Montorgueil neighborhood in the 2nd (where we were at Hotel Bachaumont). Although it’s busier than our first location of Rue Cler in the 7th, this area felt like a well kept secret from tourists and was filled with so many restaurant choices each evening buzzing with energy. I want to go back and try so many more! I seriously ate the best Italian of my life (but more specific itineraries & recommendations to come).
Itinerary
I promised myself I wouldn’t do as much rambling this time around and stick to the goods, so here is our final outlined Itinerary. I’ll include other recommendations of things that we had to scratch because we didn’t have the time – in case you have more 🙂
DAY ONE:
HOTEL ON RUE CLER | BRIEF WALKING TOUR OF SOME 1ST, 4TH, 6th, 7th ARR
- Arrive Paris from overnight flight
- Take private Taxi to Hotel Du Champs De Mars to drop off luggage


- Walk boulevard St Germaine
- Café De Flore – a Parisian icon since 1940, attracting many writers and philosophers over the years.
- Les Deux Magot – adjacent to Cafe De Flore, equal in history and a gathering place for intellectuals, both are everything a typical Parisian café should be with excellent people watching and soaking in the bohemian spirit of Paris
Note on above cafés: make advance reservations, as there is hardly ever an open seat. Luckily, we scored a front row at Les Deux Magot on our final day. Order the old fashioned hot chocolate. Just do it!
- Tour Sainte-Chapelle, an incredible stained glass chapel. *Advance reservations recommended*
- Admire the Notre Dame (it was still closed when we went so just snagged a few exterior pics)
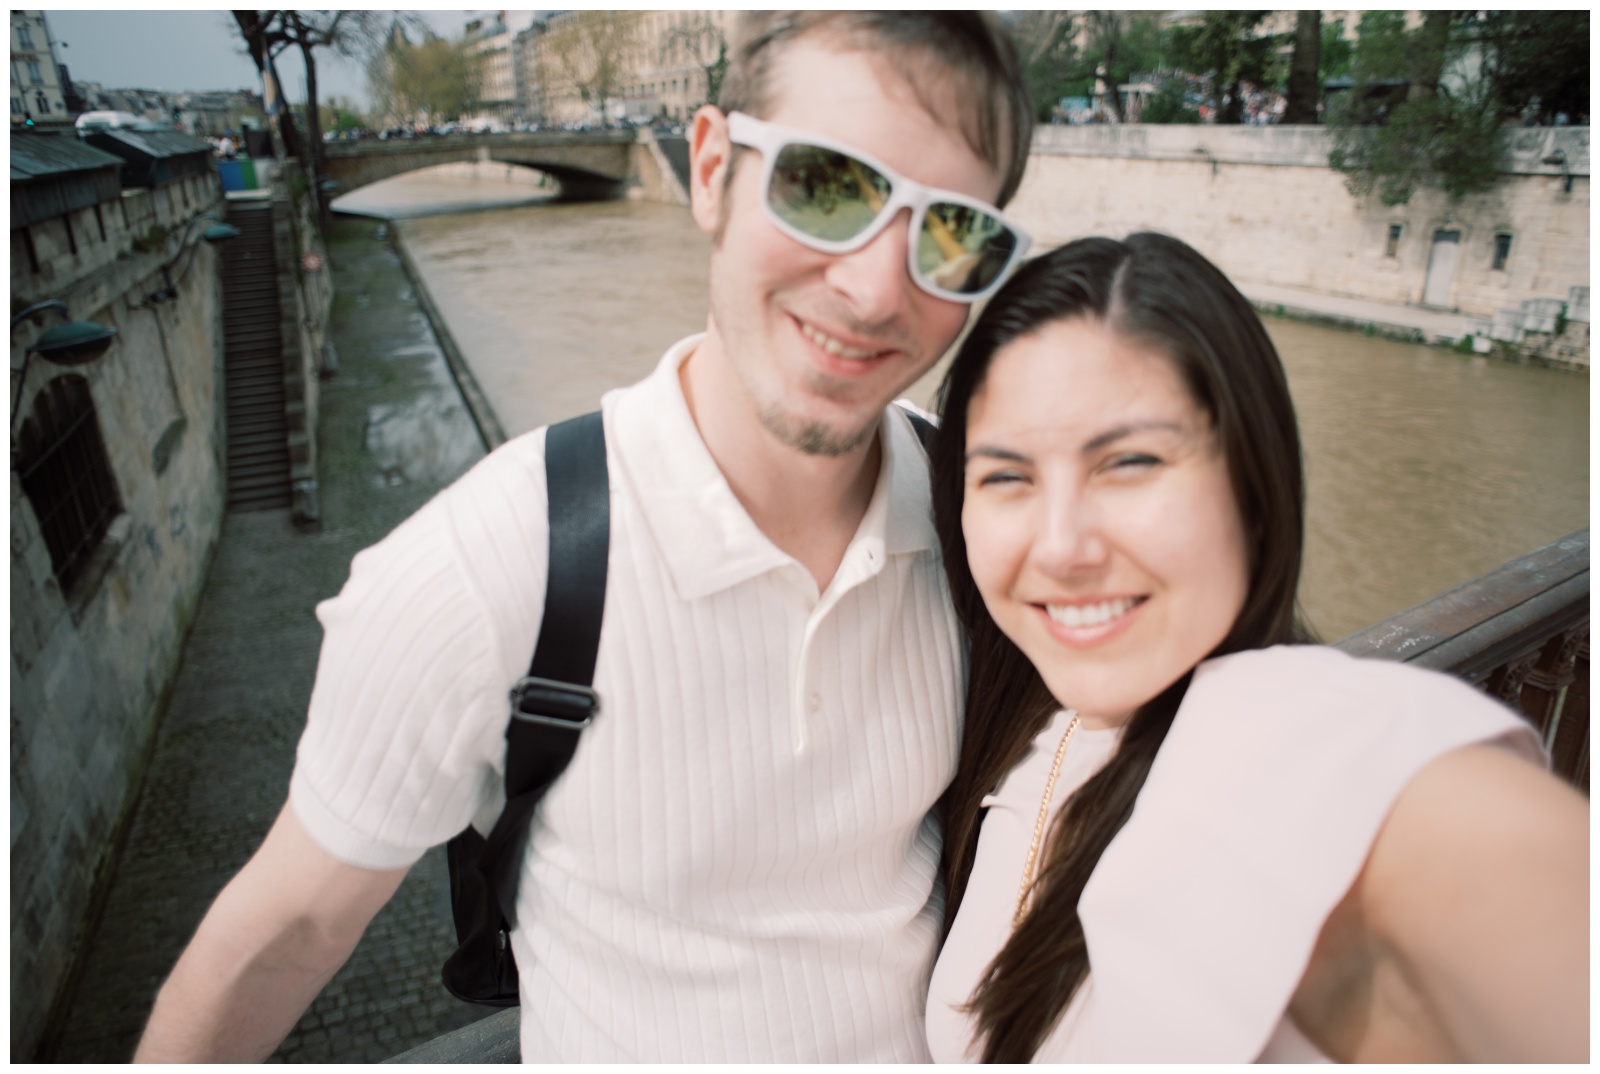
- Walk the Seine river, crossing at Pont de Sully and continue walking along the river bank on Ile Saint Louis.
- La Brasserie de L’isle Saint-Louis (and surrounding corners) have lots of cute bistros with a view of the Seine. Emily in Paris ate here, but reviews aren’t the best. So maybe just take some pictures 🙂
- Optional (ran out of time): briefly cross the river into the Latin quarter (left bank) for Shakespeare and Company (a popular book store attraction).
- Optional (ran out of time): Keep walking Le Marais down Rue De Rivoli until you get to the Canal Saint Martin. Walk along the canal in the pretty gardens (Jardin du Port de l’Arsenal).
- Optional (ran out of time): Enjoy the pretty colors of Rue Cremieux
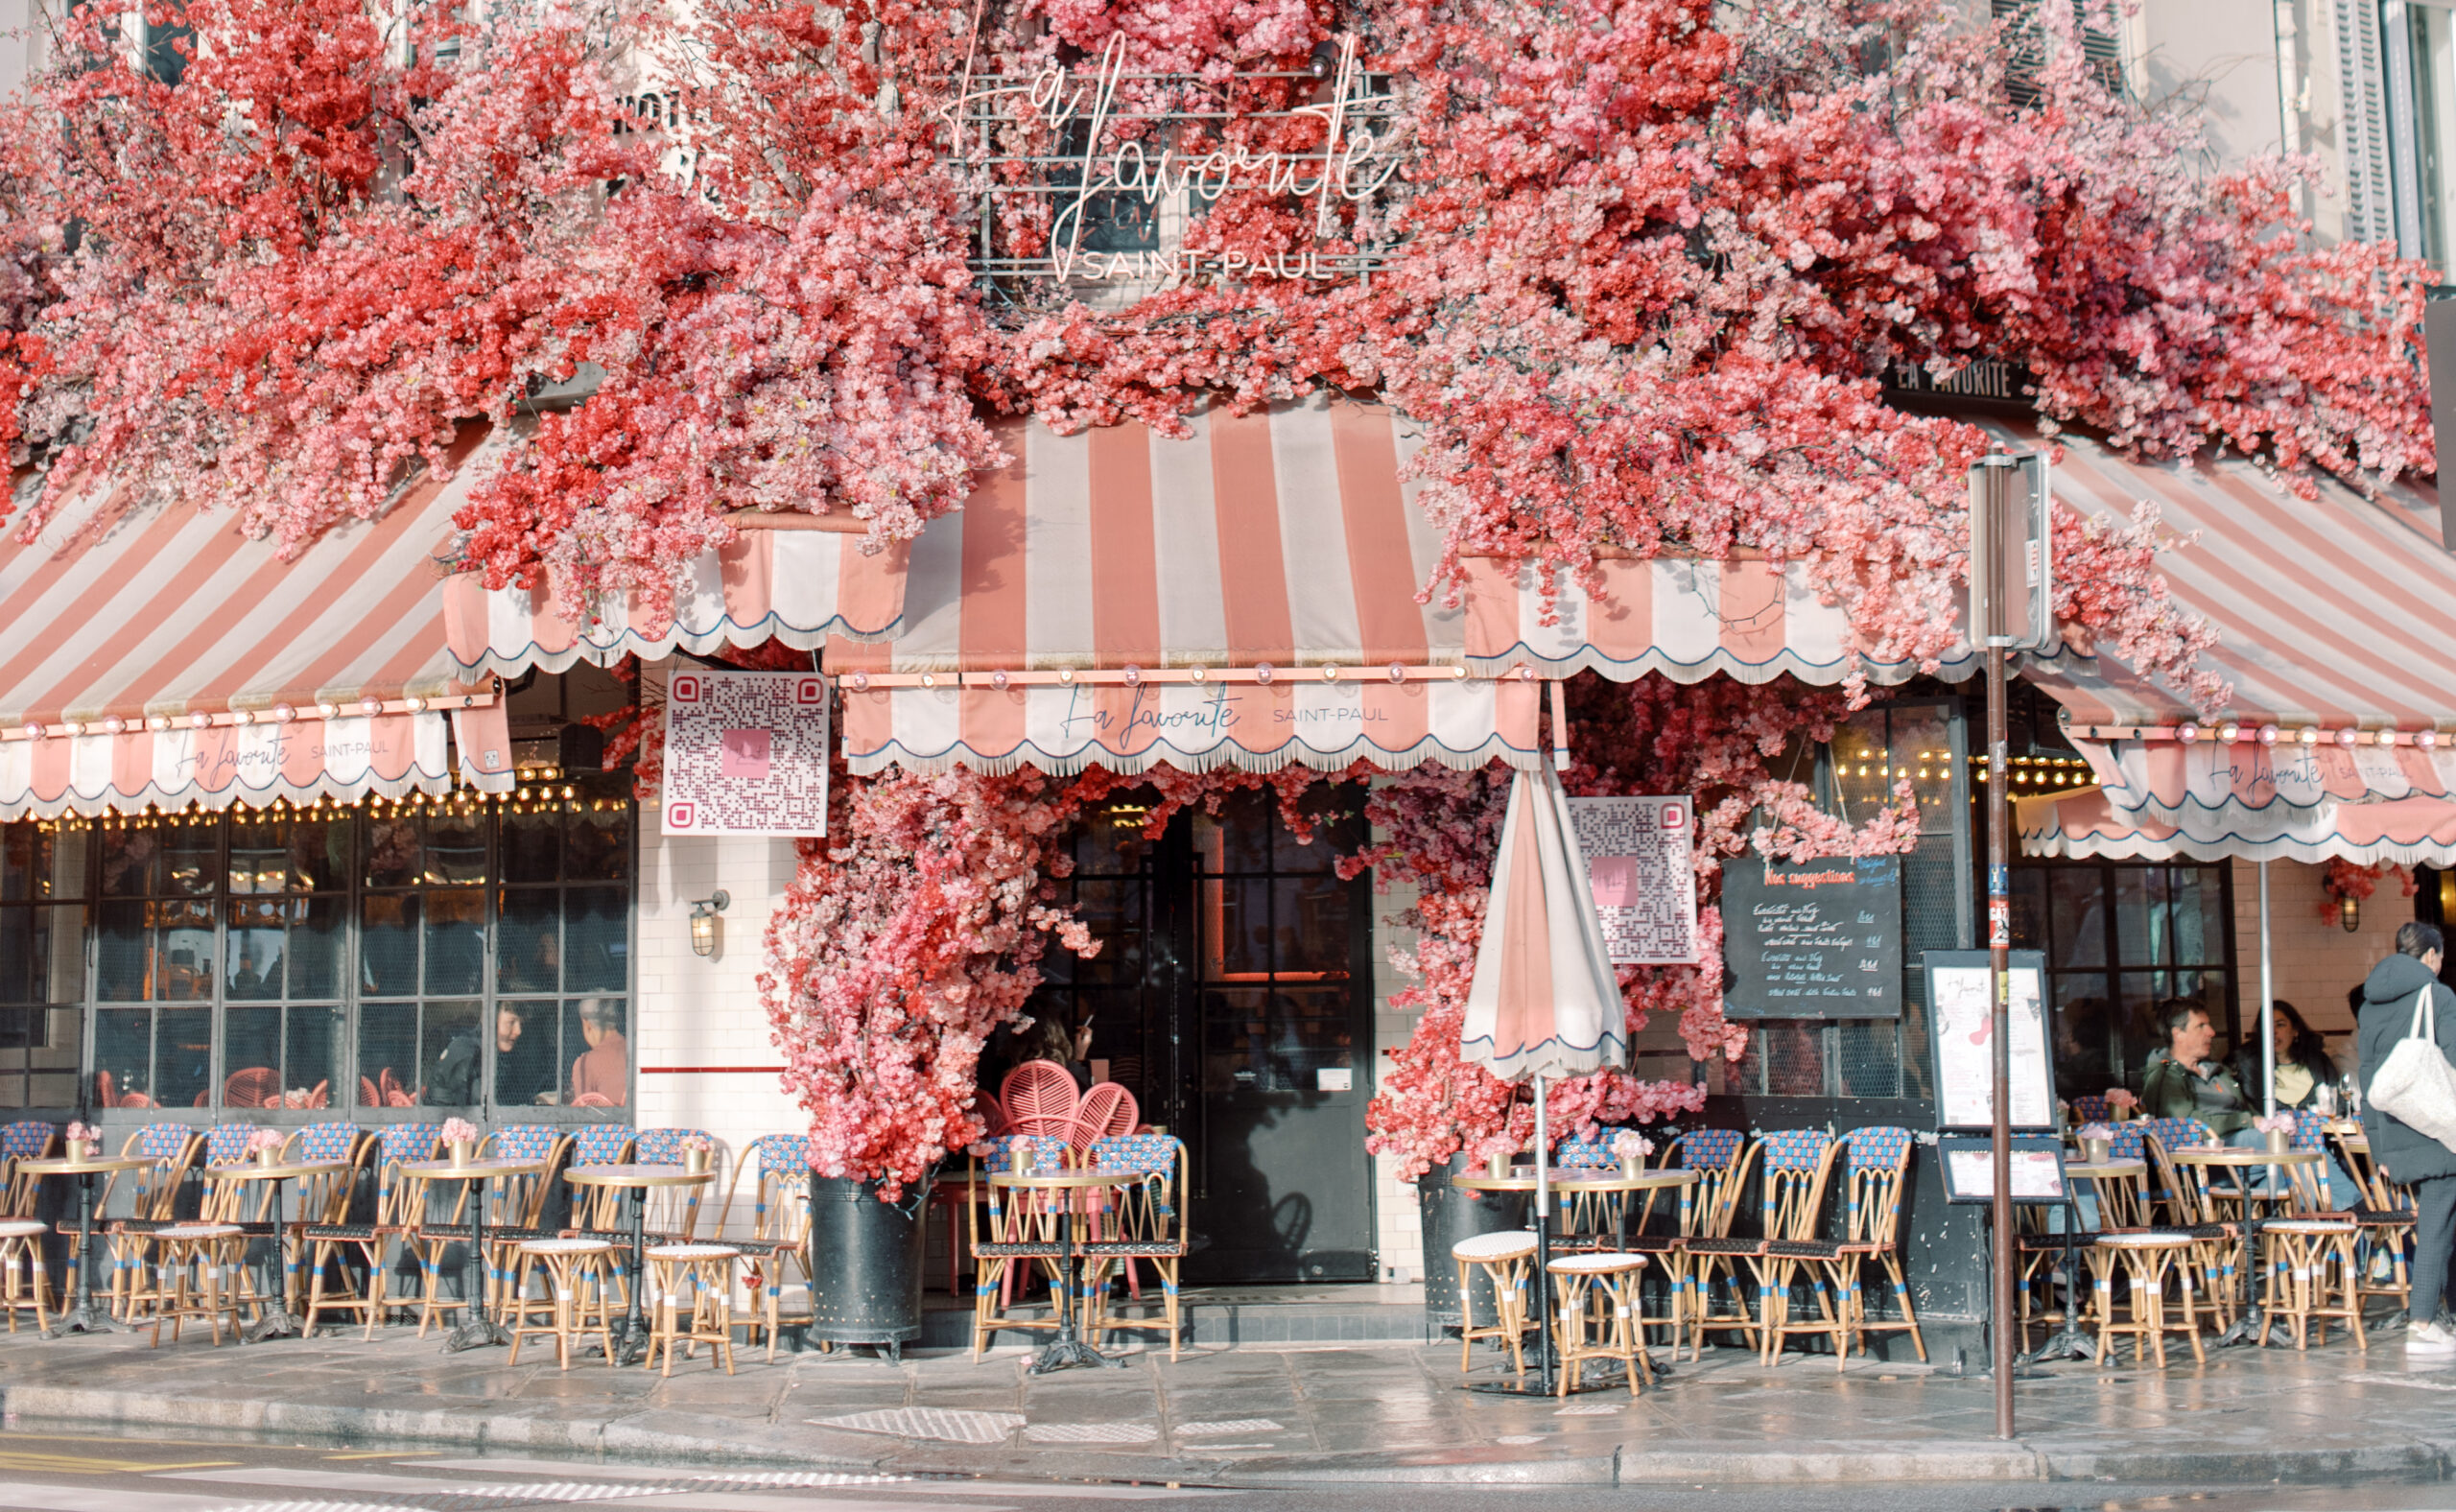
- Optional (ran out of time): Continue to walk La Marais neighborhood to La Favorite, a recognizable bubblegum pink café with pink florals. **We quick hit this spot on our last day
- Enjoy the market street Rue Cler and find a bite to eat whatever that calls you


**MOST MEMORABLE STORY OF THE DAY**
I’m not sure why I always stack our Day 1 so heavy, especially coming off a red eye flight and inevitably having to go with no sleep for 25+ hours come dinner time, but I do! Of course, we decided this 25th hour, deliriously overtired by this point and hungry for dinner, would be the time we decided to put our brains to the test for our first Paris metro experience. Everything up until this point was going well, we were walking around hitting most of our spots on our list until it came time to get back home to the hotel.
We got a 10-punch card for the metro and got to our designated metro spot. The train was about to leave and as we approached the door, the closing sound was beeping rapidly and more rapidly. I was assuming we’d just pause for the next, but without hesitation, Alex leaped on just as the door of the metro closed, leaving me stunned and fully separated from my husband. He looked at me through the window, I mouthed an F bomb, and waved him goodbye as he and the other attendees witnessed the ordeal and were laughing at my profanity.
My first concern was Alex is on a metro, with no idea which stop to get off at because I am our navigator. I have the map/guide on my phone. ANDDD crap. Second MAJOR concern, now realizing he is the one with our anti-theft backpack carrying all my essentials like a wallet/cash/credit cards, my identification, and our personal travel WIFI. So, I now am left to my own devices in a foreign country, having no wallet or cash or ID, and no foreign cell service to keep the directions up and running on my phone.
I quickly text Alex “get off at fifth stop”.
Luckily it goes through despite no foreign internet access. He texts back “the train was going the wrong way, I just got off at the second stop”
NO!
Panic sets in more because now I have NOOO idea where he is, or if the metro I’m now getting on is even the right one. I get on the metro and look at the upcoming stops to confirm I’m going the right direction, which I am, and wonder why Alex thought he was going the wrong way. I decide not to get off at my second stop just in case his second stop is different. So I text him “Mine is going the right way, get back on and go the direction of Metro 8 – Les Halles”
Clearly my words are gibberish to him, as he responds with a few profanities and asks me what the name of the hotel is.
Panic is now at a full 100%. Because *I* need him to **reunite with me** so I can get back on our travel wifi and continue to get directions back.
“I don’t have pocket WiFi or a wallet. I can’t get a taxi or get directions.”
Alex: “Where are you? I’m walking. I found the Seine then I found the Eiffel tower and am just walking toward it”
In this moment I realized, my husband has no intentions of reuniting with me back in this metro maze. We are now on two separate journeys. I now have to fully fend for myself and get myself home using old school maps 101. And I can’t fully blame him, he didn’t do any research on any of this, doesn’t even know our hotel name, and I’m just always the navigator. However without the internet I’m going to have to really settle down my anxiety and focus. Unfortunately, this wasn’t a direct route, it involved a connecting route. So when I got off at stop 5, I was suddenly in this underground hub of 5:00 traffic, a complete maze, much bigger than the first metro station. I couldn’t understand where I needed to go next and really just needed some dang WIFI to double check my progress. So followed the signs for “SORTIE” which meant EXIT. Hoping maybe my phone would pick up some signal if I wasn’t underground.
As I finally exited the underground maze trap and saw the light of day again, I wish I could say I felt relief, but the connecting line led me to a neighborhood in the 11th, which was much further out and not easily walkable back to the hotel. I suddenly really envied Alex and his nice little leisurely stroll along the Seine he’d be doing near sunset in Paris. Crap, I need to figure this out before dusk. I am literally dressed like an Emily in Paris tourist, in a frilly top, with an expensive camera around my neck and nothing else. I wanted to laugh and also cry.
Luckily, there were two options for me: embarrassingly walking up to a crowd of french police asking if they could escort my lost ass back to the hotel. OR go inside the french McDonalds, which I assumed would have free WIFI, and get myself sorted out. I chose the latter option. Once connected to internet again, I made tons of screenshots of my directions, and decided to brave the underground maze of anxiety once more. Thank god I at least had a prepaid 10-card punch because who knows how many I’ll need to use to try to get back.
I followed the directions for what seemed to be the right way, and when I got to the platform I realized, “This is it: I’m either going on the right train and going home, or I’m about to get myself really lost.” Maybe it was my anxiety, but everyone around me seemed a little sketchier, it was getting close to dusk, and traffic was increasing because of getting out of work. There was a classic black bob-haired French looking lady about my age that was hurrying by, I felt so dumb but she was the only one I felt comfortable asking “Excuse-moi? Is this the direction of the Eiffel Tower?” as I pointed to my phone. I forgot they don’t call the Eiffel Tower that in French, they say “Le Tour Eiffel.” pronounced “ee-FELL.” So she didn’t really understand me at first, and almost kept walking (I only looked like the most typical American tourist ever). But I think she could sense the fear in my eyes and voice and stayed with me and tried to understand me, eventually she realized what I was asking and reassured me this was the direction and to get off at such and such stop. Which matched my phone directions. Whew. She even stood by me to make sure I’d be okay because not gonna lie, lots of French men were around at this time and have you ever seen the movie Taken? Because I did not want to be.
We got on the metro together and I got off at the right stop. Exited, and found myself in the most beautiful, most quintessential, Parisian market street of my dreams. It was my first time seeing Rue Cler alive, as the market wasn’t up and ready earlier in the day. I instantly went into photography mode, capturing the street, forgetting I should probably check on Alex now and tell him I’m okay. Although I’m still mad at him a little, he really ought to be here with me and see this!
“I got it figured out”
Alex was shortly behind, and I spotted him down the street. We laughed that in all this chaos, we both managed to make it back to the area within the hour, 50 minutes to be exact. Really only a 20 minute detour.
I asked, “I can’t believe you weren’t scared for me and freaking out.” (I am STILL shocked, by the way at his nonchalance!) But he was like oh why would I be freaking out, I knew you’d figure it out.
🙂
…Honestly that might have been the best compliment of my life.
Because I did figure it out. I successfully navigated my way around a Paris metro system alone, on my first day ever in Paris, without the mental security of the internet, cash, credit cards, or identification, and jetlagged on 25 hours of no sleep. Either the gods are looking out for me, or I am much more capable than I thought :’)
TIME FOR A DRINK.


DAY TWO:
ART MUSEUMS | 1ST & 5TH ARR
We successfully entered the metro side-by-side this morning (read: my two arms wrapped fully around him like a koala), and got to the Louvre for our opening timeslot.

Me with my husband entering the Paris metro
- Arrive Louvre (*advanced tickets recommended for opening timeslot* and arrive 1 hour early for clean pics before the area gets busy, and to line up at entrance (there is still a little line))
- Mad rush race to find the Mona Lisa before everyone else does – this was a fun challenge. We went the wrong way, of course, so were running around the Louvre by ourselves. Which was actually more fun. There was only 30 or so people in the room when we got there.
- Optional (ran out of time): hot chocolate & croissant at Angelina’s within the louvre (great surrounding view!)
- We really didn’t see much of the Louvre, as we had other museums to get to, but of course had to cross it off. Will come back for a full Louvre Day eventually! You truly could spend a month in here.


- Palais-Royal (quick pics)
- Grab a nearby bite & walk Tuileries garden
We chose Café Carrousel which was somehow our first actual sit down café experience and first time eating Pain Au Chocolat – croissant with chocolate – a muuuust. We now get them weekly in our trips into town to our favorite pastry shop, although it’s never quite the same as one in Paris.
“Je voudrais un pain au chocolat, s’il vous plait” –> the only words you need to know (I would like a chocolate crossiant, please).
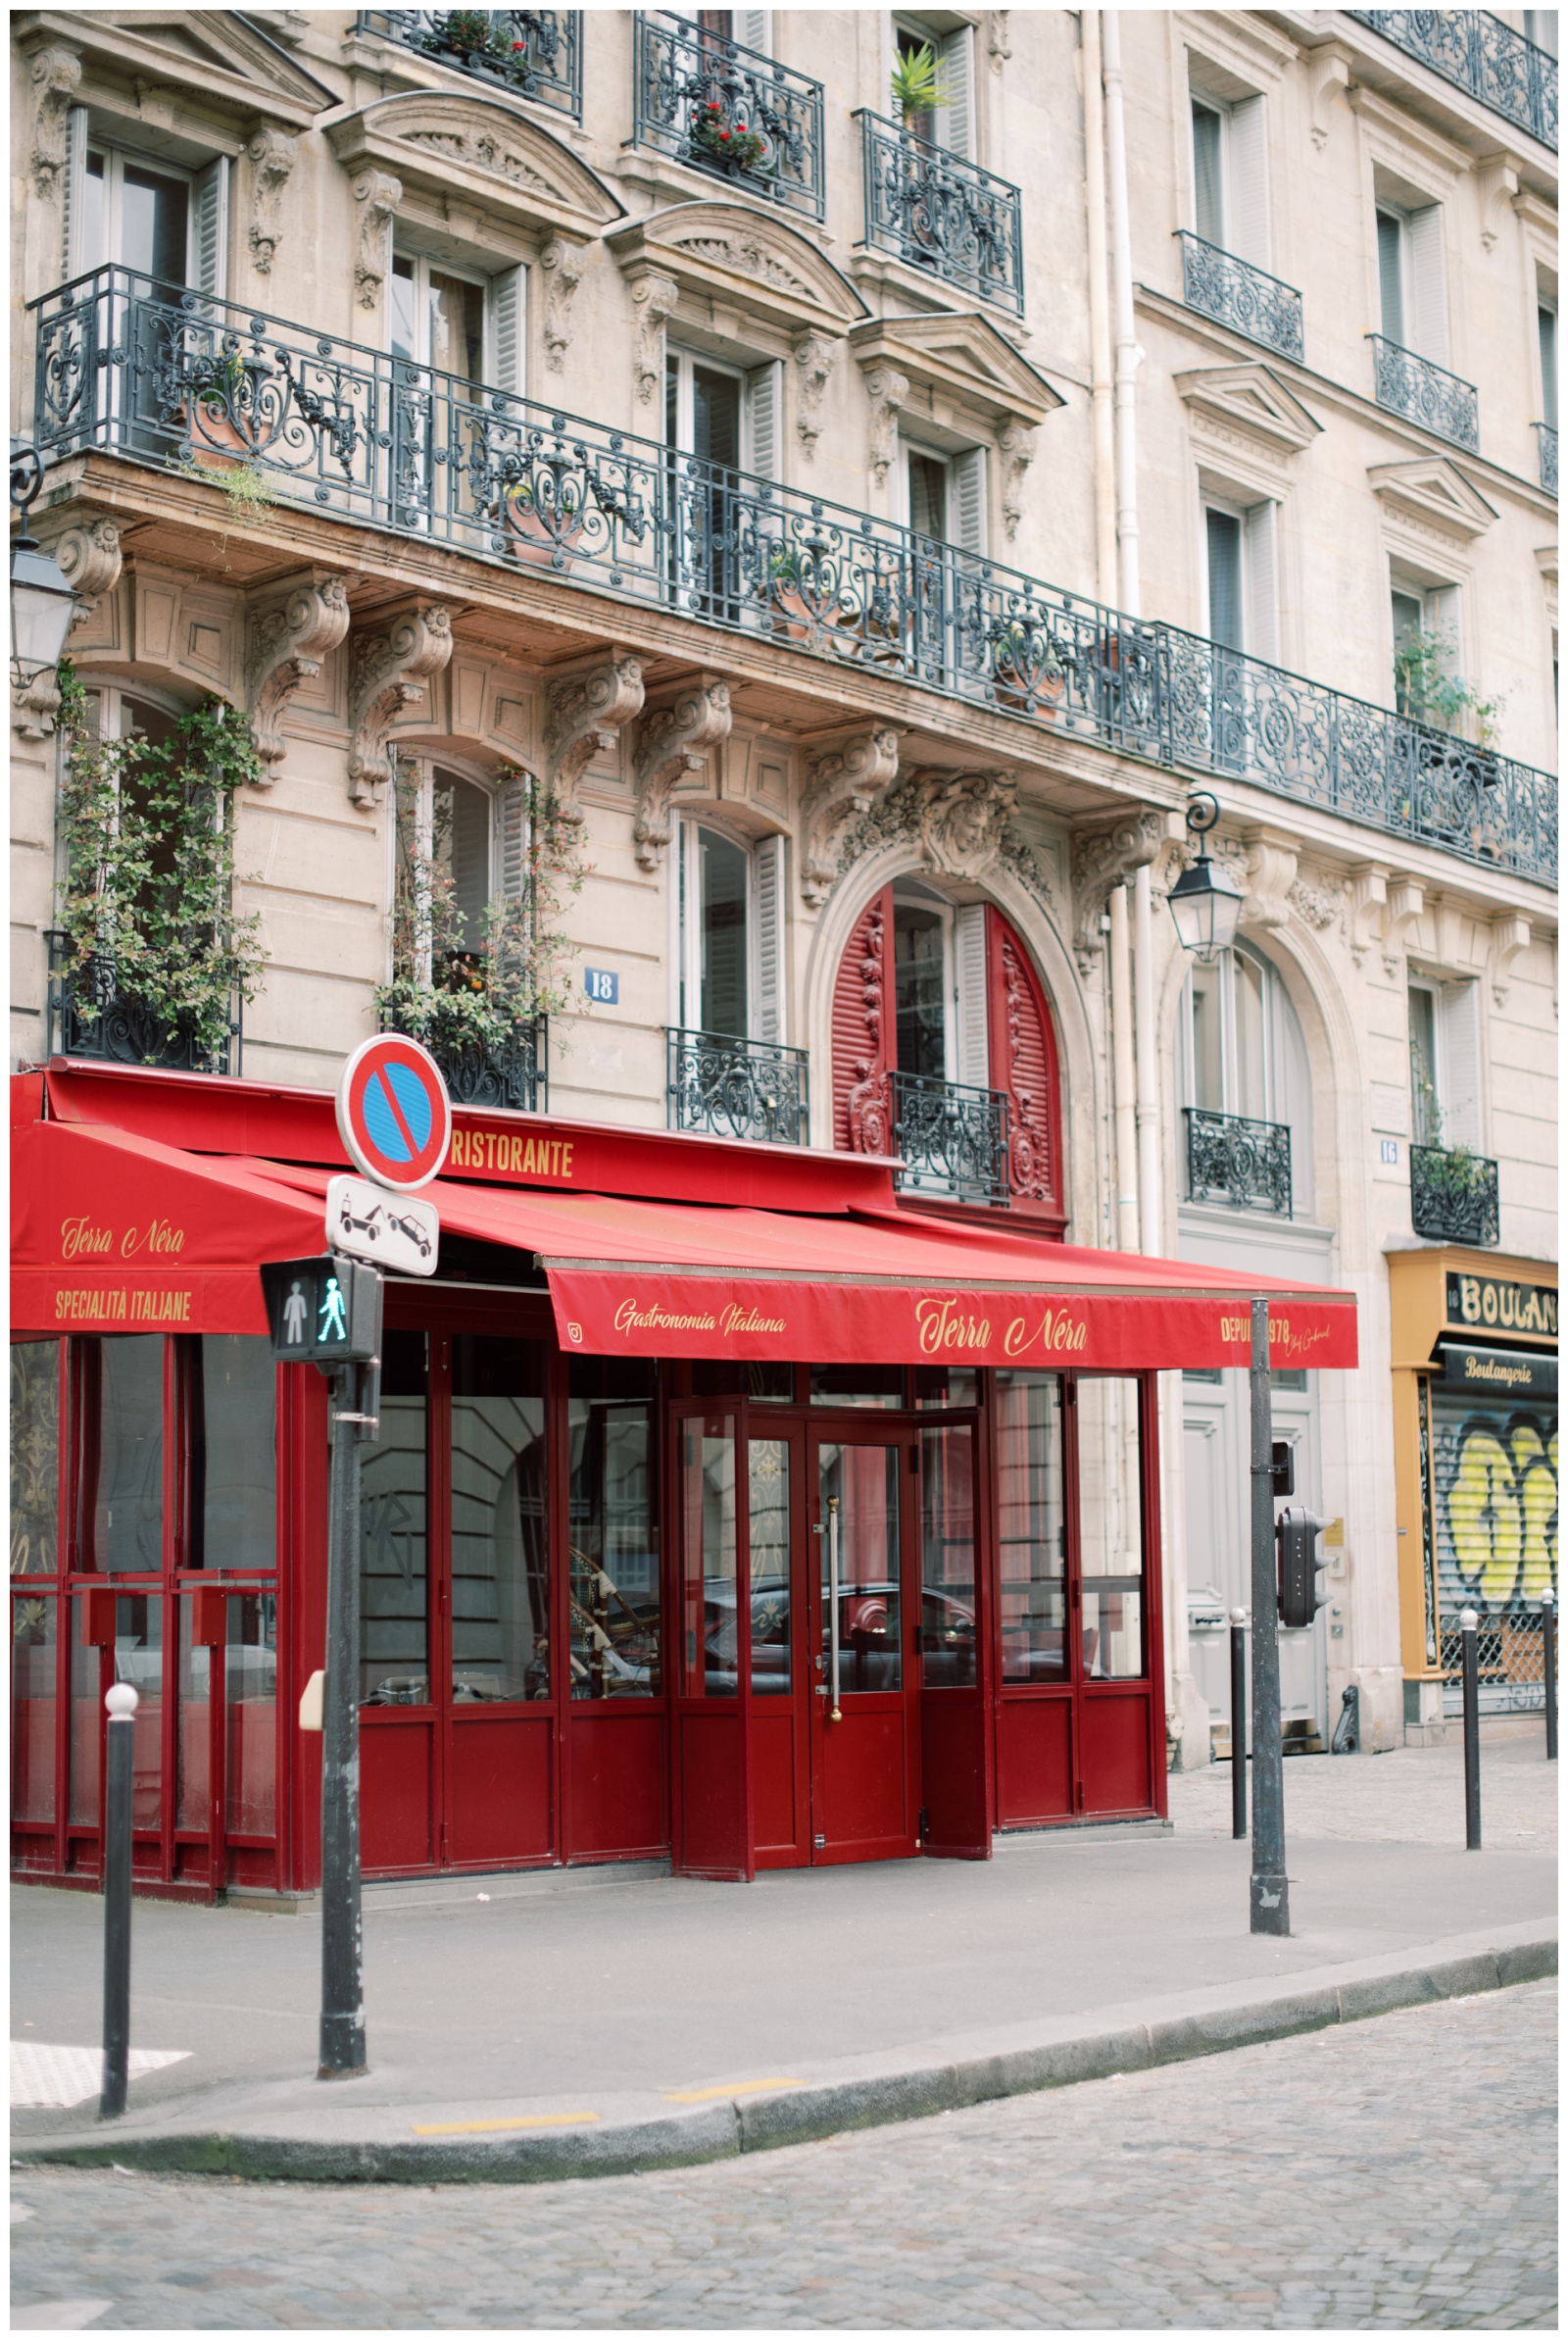
- Emily in Paris Savoir location – 6 Place de Valois
- We had some time to kill before our next art museum timeslots at The Musée D’Orsay & L’Orangerie, so visited some more Emily in Paris spots in the 5th 🙂
- Emily’s Apartment (1 place de l’Estrapade)
- Terra Nera (Gabriel’s restaurant) located right there also
- If it’s open, grab another pain au chocolat at Boulangerie Moderne where Emily first tries one
- Optional (we ran out of time): If you’re into fancy doors, Rue De Varenne has a lot to photograph


- Musée de l’Orangerie **for a giant display of Monet’s waterlilies
- Musée D’Orsay **A must if you like Van Gogh and Monet as they have a whole impressionism wing.
- Optional (forgot to look for this): go into the ballroom Salles des Fetes for gorgeous Versailles type interior.
- Dinner back in the 7th: La Fontaine de Mars serving French Classics
- Get whatever their special is & chocolate mousse dessert
- Sit outside & enjoy the ambiance of this historical restaurant *reservations required*


**MOST MEMORABLE STORY OF THE DAY**
Don’t really have an epic story for this day, it was just a nice smooth-sailing day. Much better than the evening prior. It was really fun racing to see the Mona Lisa and momentarily feeling like we had the Louvre to ourselves, experiencing our first Pain au Chocolat together, and seeing Emily in Paris locations in real life as well as some of my favorite paintings was surreal! We also got to experience our first “Paris in the rain” moment on our way walking to dinner, and had to pop out the umbrellas. Got to enjoy our first relaxing sit down meal and take in the dusk with some classic French dishes and dessert. A great touristy day 🙂
DAY THREE:
EIFFEL TOWER PHOTOS | 8TH, 5TH ARR | 2ND HOTEL — MONTORGUEIL DISTRICT
Sooo, because Alex still owed me a little from the metro stress, I decided to make this last morning near the Eiffel Tower a bright and early wake up call for photos at various Eiffel Tower spots 😉
If you want these places to yourself you can minimize crowds by getting there just after dawn. Even in the chilly mornings of early April, and right before the Olympics and all the construction, it still didn’t deter people from making their way to these spots bright and early too, although it certainly helped in keeping crowd size more manageable (with several at each and about 30 at Trocadero). I cannot even imagine these spots on a mid summer day. Below are some of the best photo locations for epic Eiffel tower views!
EIFFEL TOWER PHOTO SPOTS
- 228 Rue de l’Université, 75007 – open street view
- Trocadero – view from giant platform or pretty stone steps
- Port Debilly – view from the river (we skipped this)
- Avenue de Camoens – another street view with balcony (was too busy by the time we got there & bad lighting)
- Statue Jean d’Arc – view from Pont de bir Hakeim bridge
My favorites were probably the first two, you can’t beat the clear view from Trocadero and we’ll have to revisit again sometime when the construction is gone as it took away from its beauty (I even had to edit out a huge crane across the Eiffel Tower haha) We also couldn’t have access to the beautiful steps for a foreground or the area below was all closed off. And I would like to revisit Avenue de Camoens at a different time of day to see it in some better lighting!
- Grab a bite to eat at a local cafe
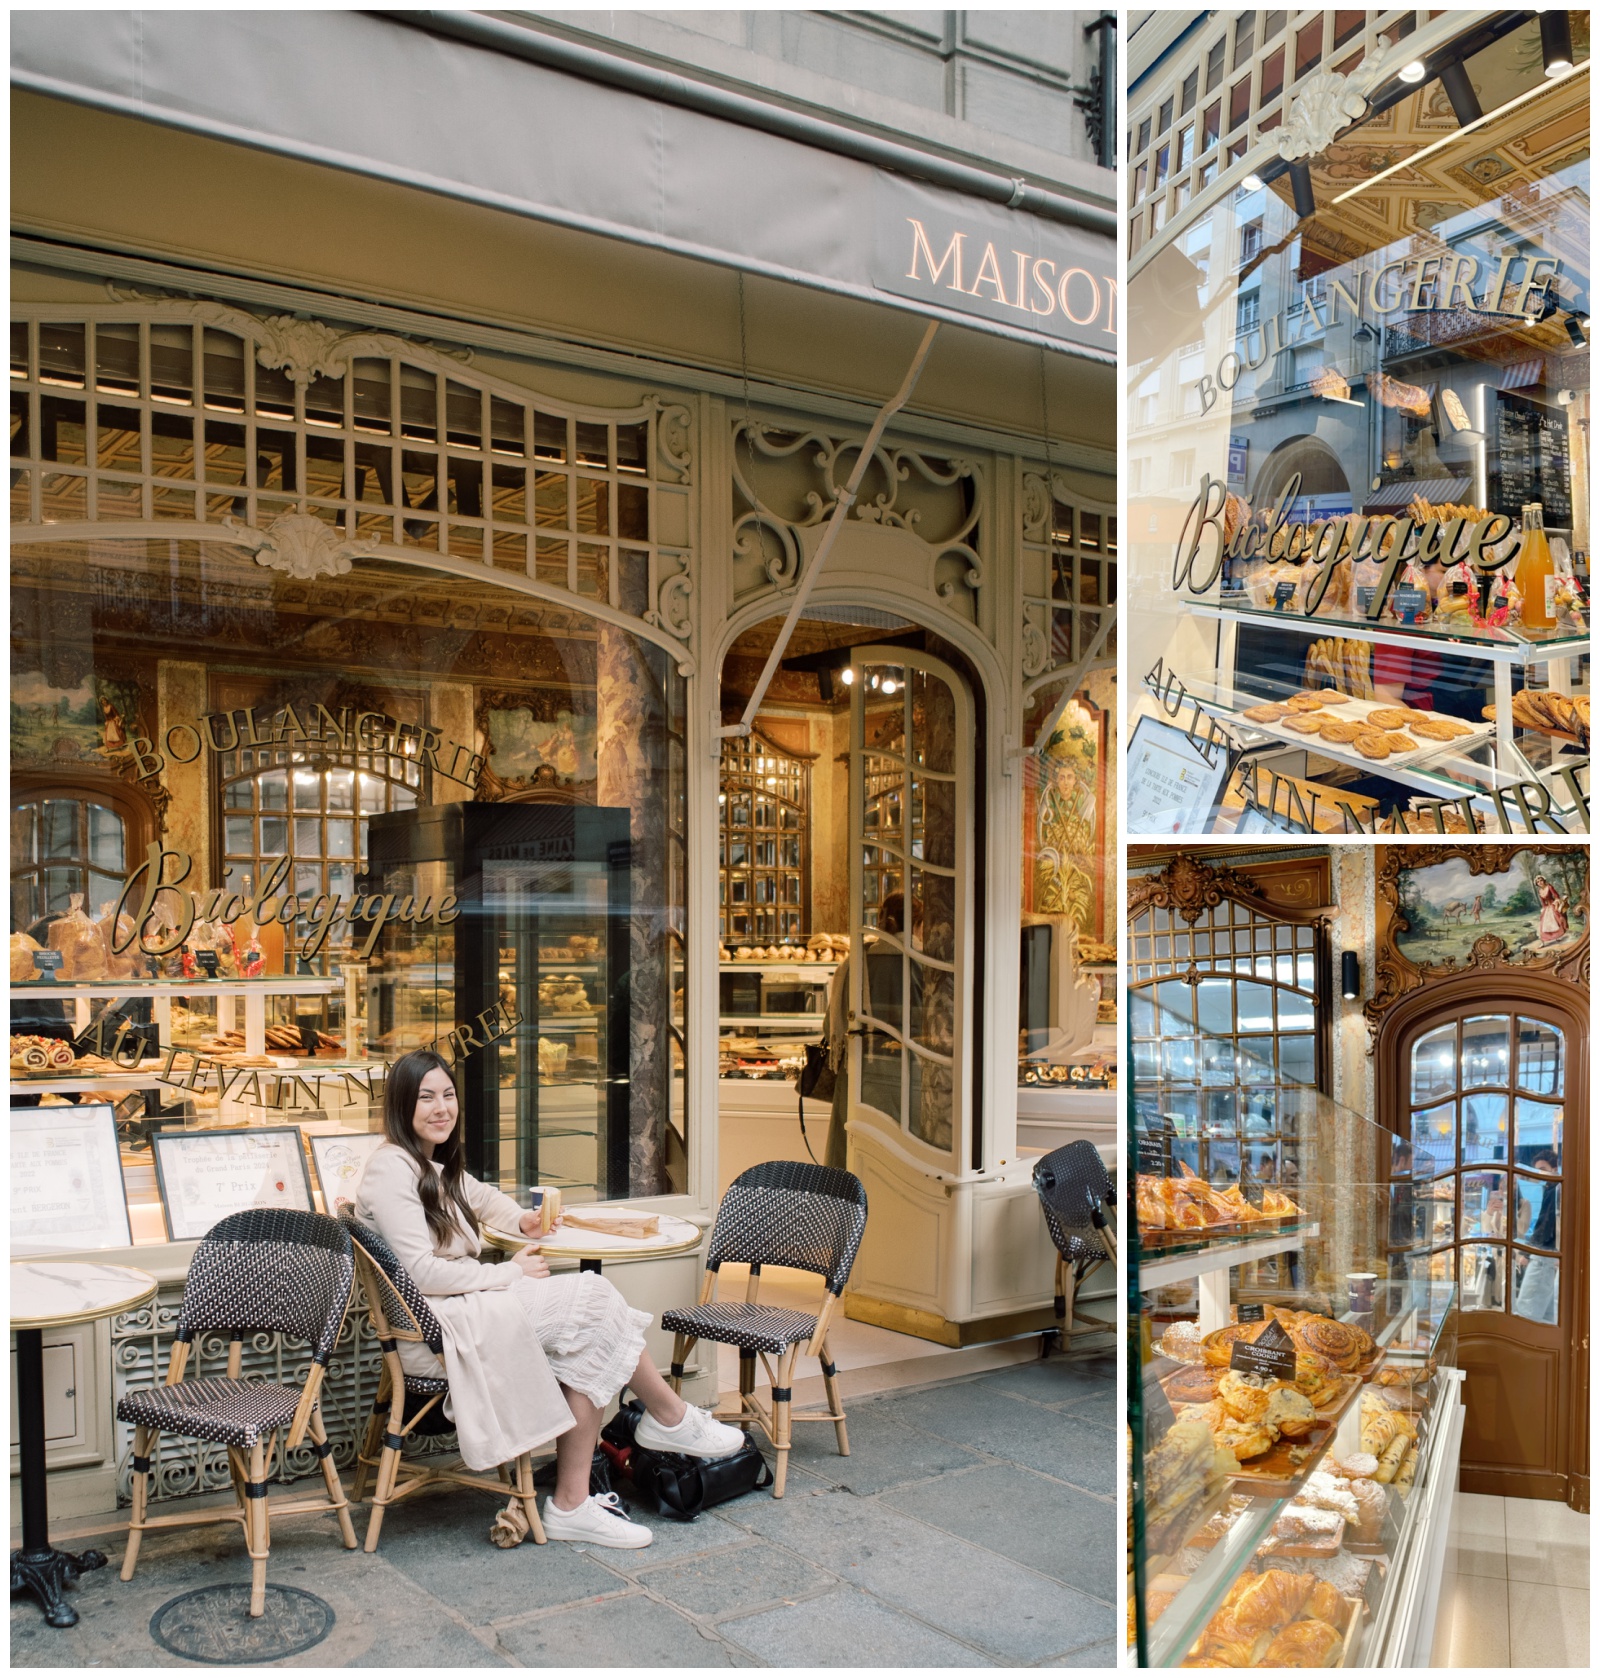
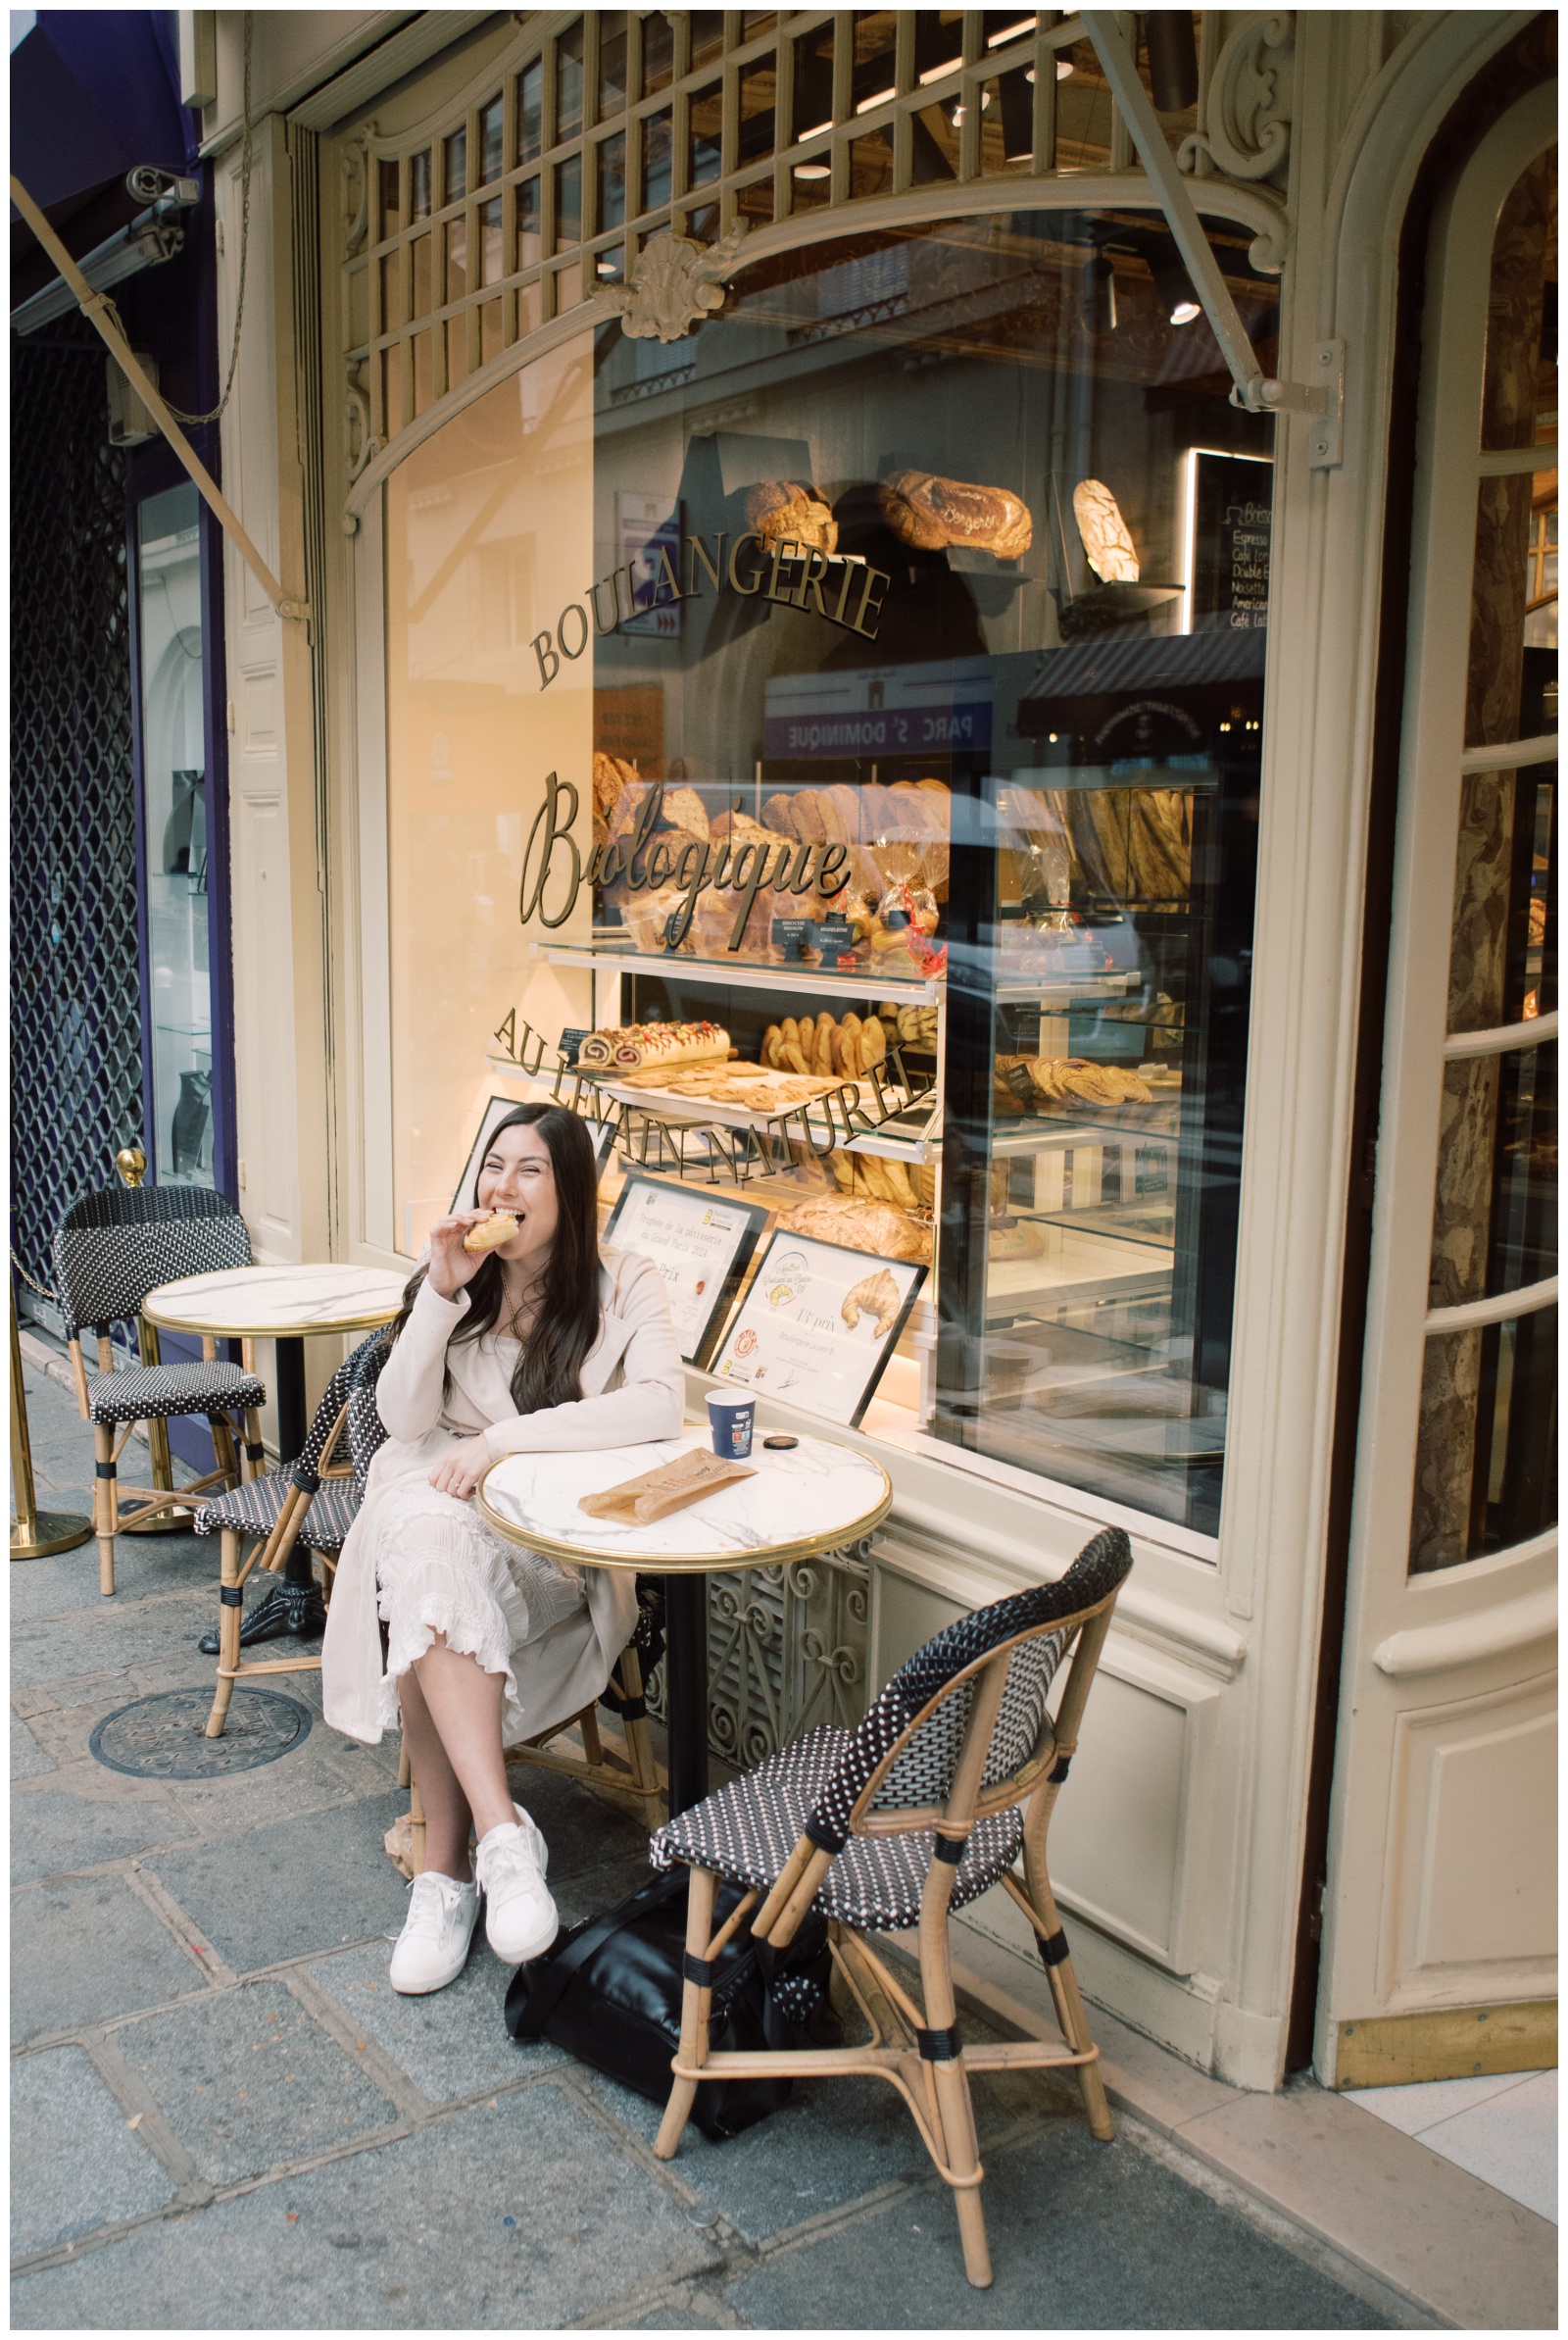
- We chose Maison Bergeron near our hotel
- Pain au Chocolat, Sandwich Rosette, Café Creme (American version of a latte)
- We chose Maison Bergeron near our hotel


-

- As you can see there was quite a bit of construction ahead of the Olympics but we made the most of it :’)


- Check out Hotel
- Taxi to second & final hotel location
- Hotel Bachaumont – 18 Rue Bachaumont
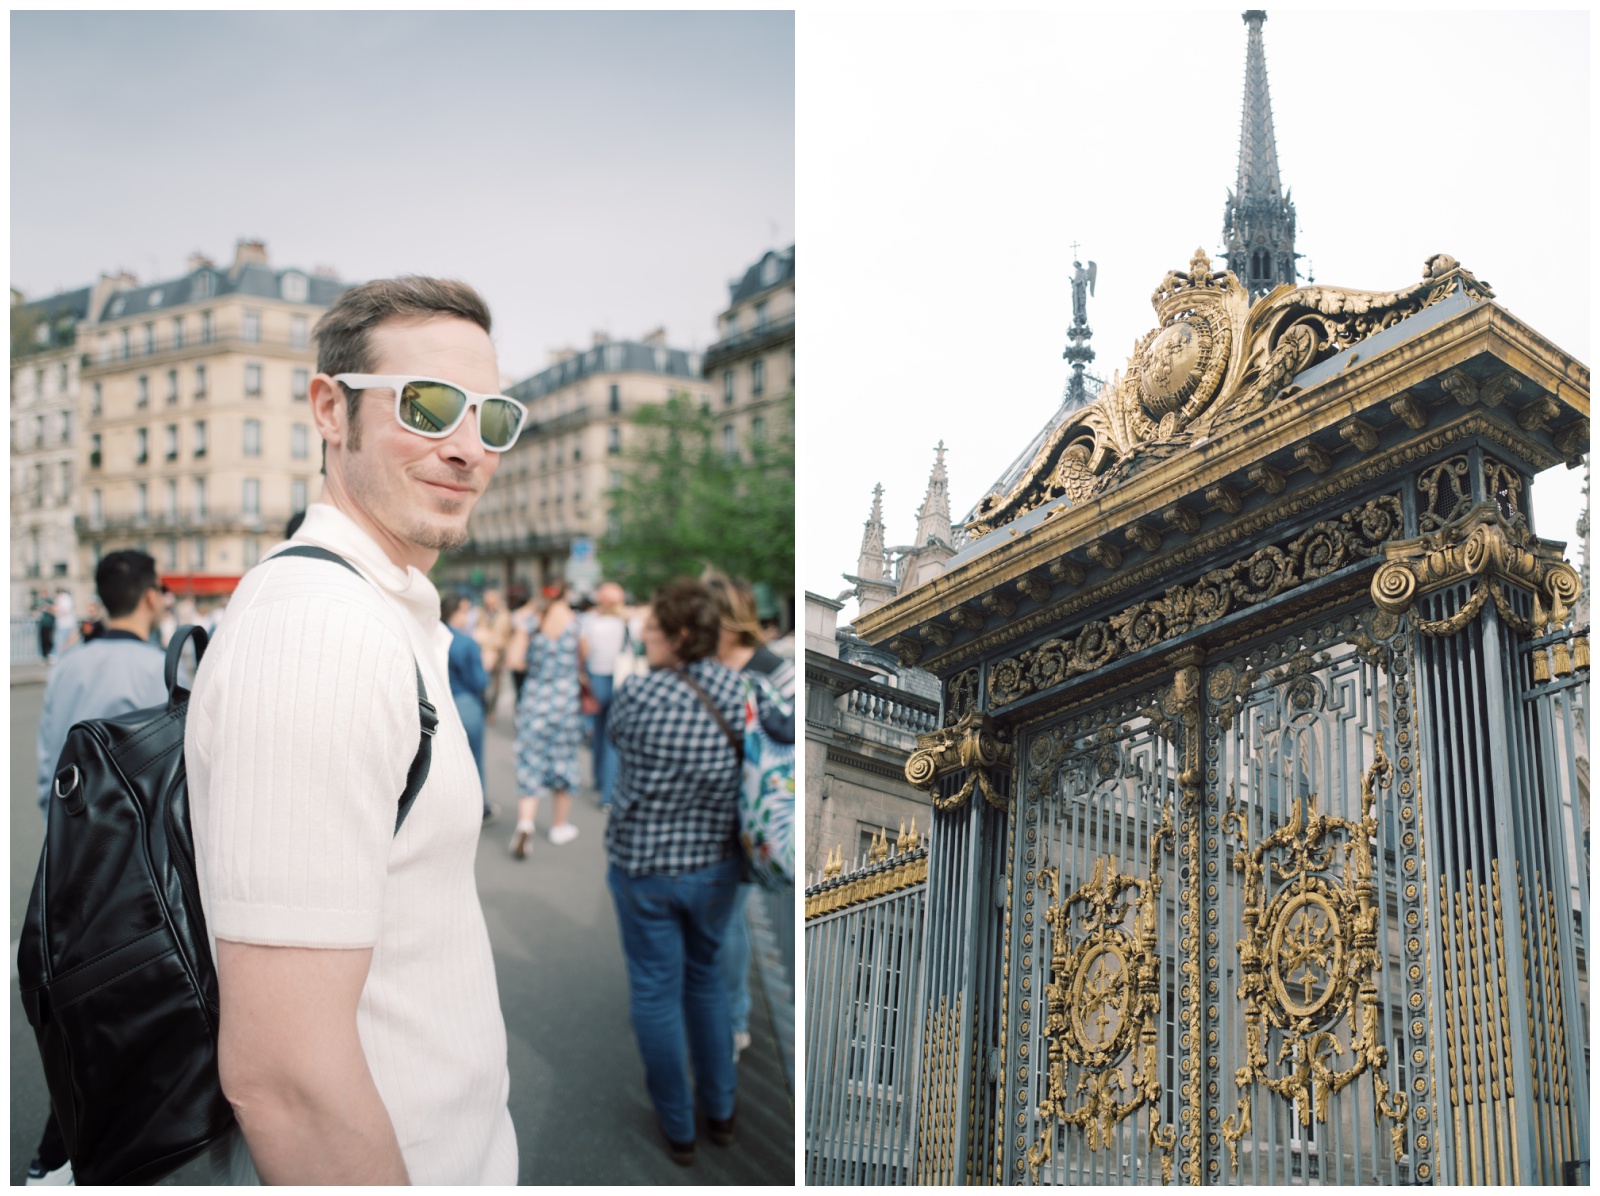
- Metro to Petit Palais (gold doors)
- Optional: Le Jardin du Petit Palais (hidden outdoor café / secret garden that’s part of Petit Palais – a free museum which I totally forgot about actually going inside the golden doors *was too distracted* until later on – BUMMED)
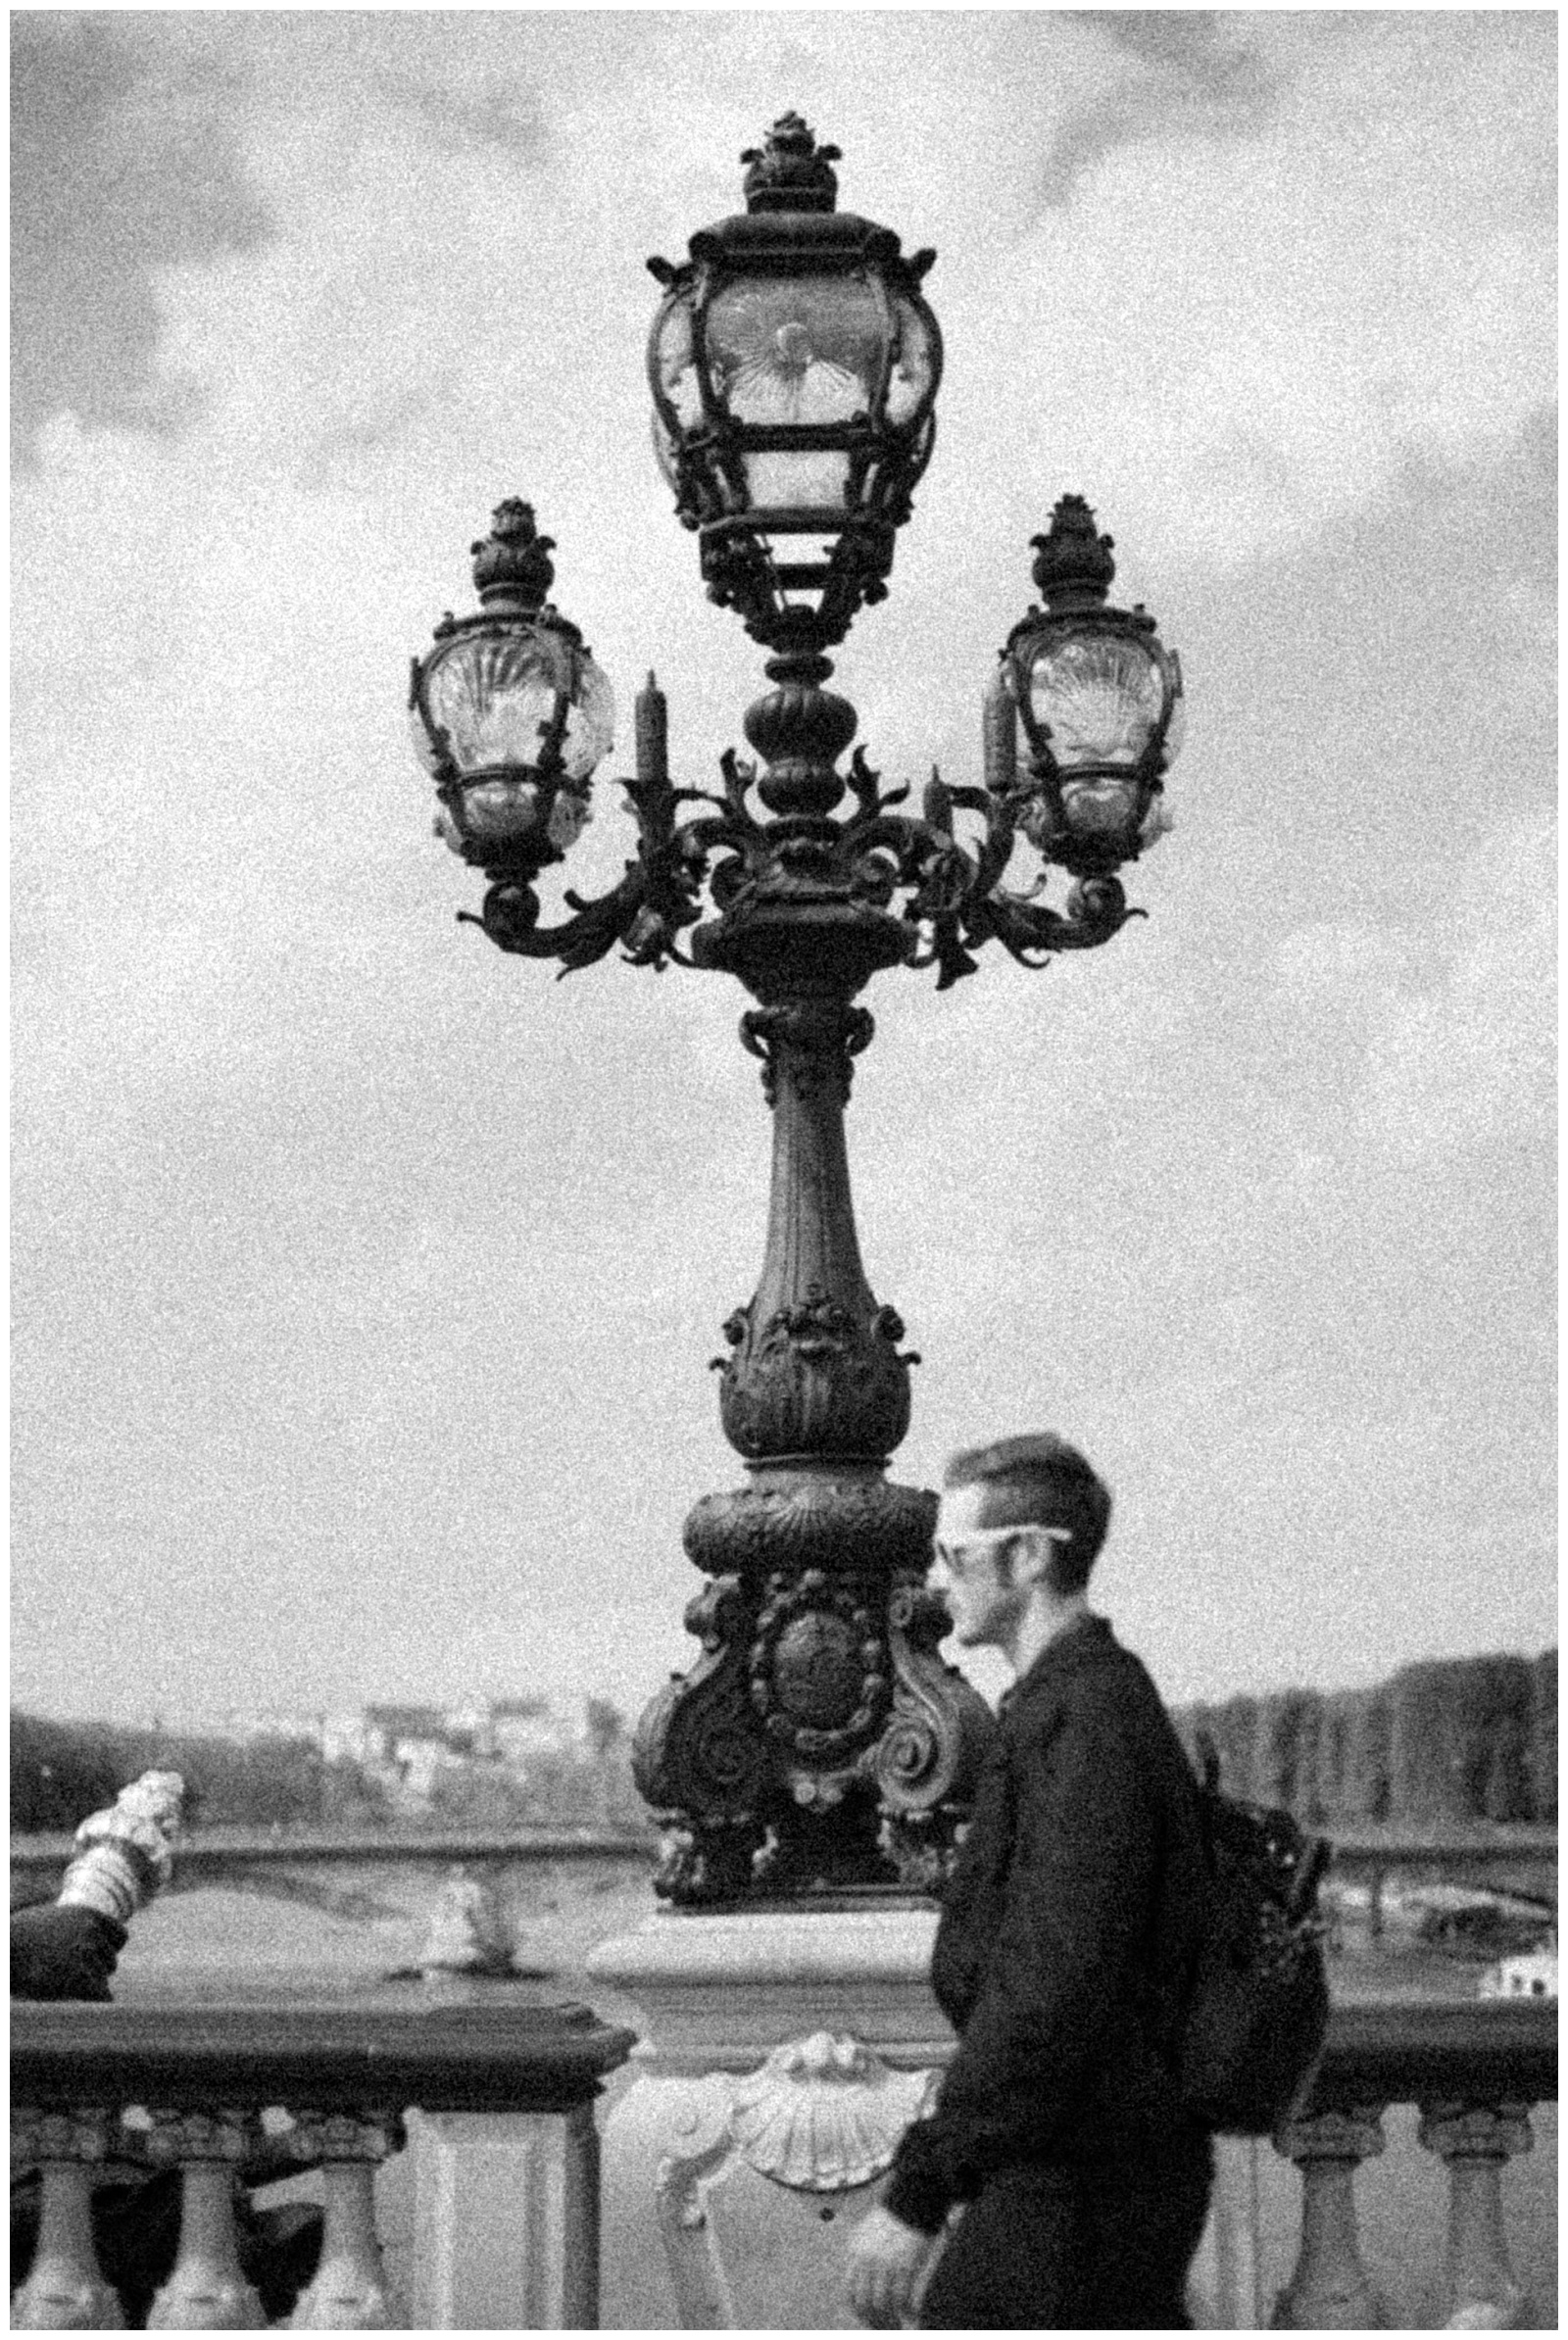
- Pont Alexander III bridge
- This bridge always reminds me of Adele’s “Someone Like You” music video, incredibly gorgeous stonework and a must see. The most beautiful bridge in Paris, and gives you sweeping views of iconic Paris monuments.
- Optional: Walk the Champs Elysees
- We did but instantly regretted it lol 🙂 You’ll either love it or hate it.
- Tip: Walk ave Montaigne for still very exlusive yet more relaxed, off the busy main street, vibes.
- Optional: Arc de Triumph (climb to the top for a panorama view)
- We got tickets for this but ultimately decided to scratch
- Don’t try to cross the roundabout, it’s very dangerous, there are underground walkways


- Metro to Palais Garnier area in the 9th
- Fragonard Musée du Parfum (9 Rue Scribe) includes 20 min guided tour & 15 minute perfume creation – so fun! We really enjoyed this actually
- Café de la Paix (outside terrace that overlooks the extremely architectural Opera Garnier and Academie Nationale de Musique) for lunch/snacks before touring the Opera. *make reservations*
- I got the Norwegian smoked salmon sandwich with Dill cream, lemon. So good.
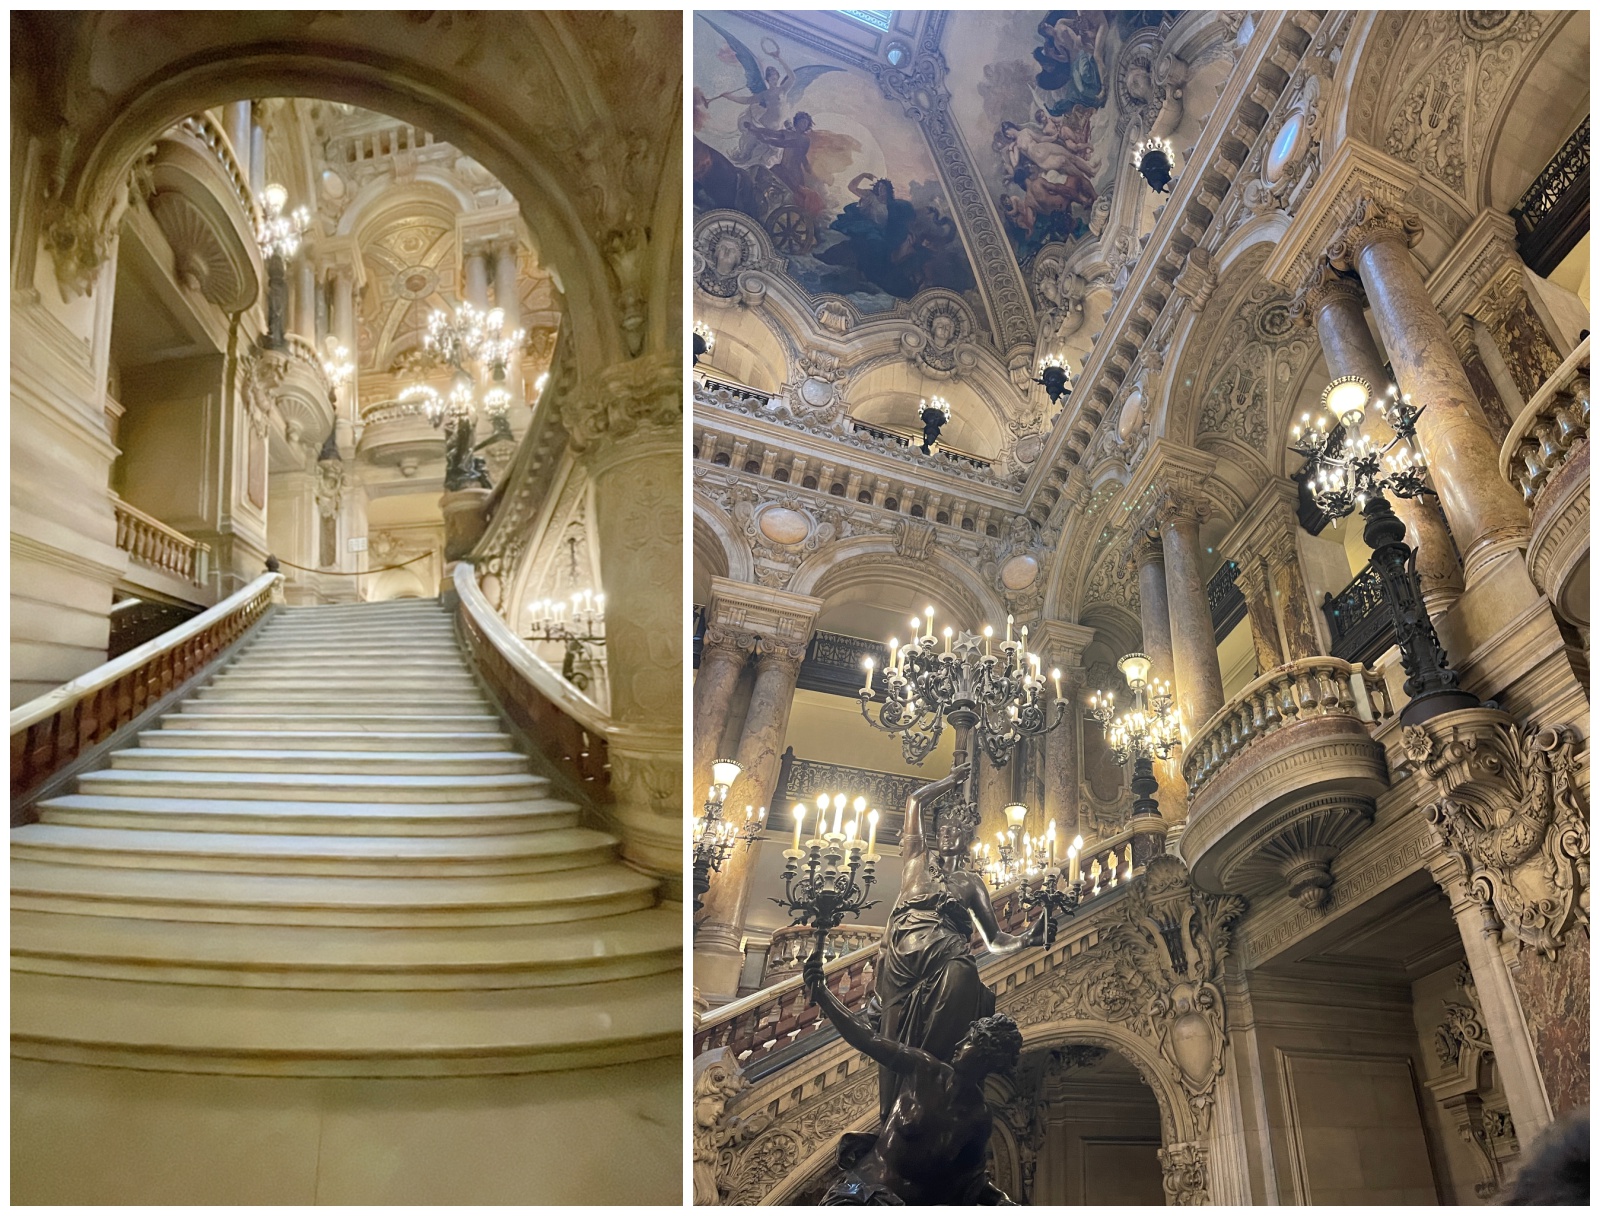
- Palais Garnier “after hours / mystery” tour
- This was nice because it was no longer open to the public, so the only people inside were the few tour groups.
- Touches on the Phantom of the Opera, the real incidents and rumors that occured at the Opera House which inspired the novel and show.
- Would love to see a show next time and get the full experience
- Head back to hotel & explore Rue Montorgueil & surrounds
- See the opulent Rocher de Cancale
- Pick a spot to eat & enjoy watching the evening turn to night
- Dinner at Maria by Cesar (Italian, recognized for its bear stuffed animals)
- woodfired pizza & pasta – I got the Ravioli with truffle sauce and basil and I still dream of it.
- no reservations needed, but you’ll likely have to sit inside if you don’t want to wait
- Dinner at Maria by Cesar (Italian, recognized for its bear stuffed animals)


**MOST MEMORABLE STORY OF THE DAY**
Beating the crowds early morning to take a neighborly walk, turning the street and audibly gasping to the grand Eiffel Tower view that awaited. Up until this point we didn’t really get to admire the Eiffel Tower too much, so it was nice to see it from multiple perspectives and treat it like a scavenger hunt around that portion of the city. The Pont Alexander III bridge was also incredibly romantic and beautiful and may be my favorite spot in Paris. I wish we could have gone back at night! The Champs Elysees and Palais Garnier area felt a bit too touristy / ritzy for us but the Palais Garnier interior is not to be missed. For lunch & dinner we much preferred wandering the local foodie scenes back in the Montorgueil neighborhood and people watching. I also can’t believe how much we loved our mini perfume class haha! I would totally do it again only maybe make an official cologne/perfume together vs a little sample size. Something to always remember Paris by after we’re gone! 🙂
DAY FOUR (FINAL DAY):
MONTMARTRE | DINNER CRUISE
We had tickets to spend the first half of the day at Versailles, but ultimately decided to scratch it entirely. Versailles felt like a place that deserved more time, and the logistics of getting there felt too overwhelming after an itinerary-stacked few days. We just wanted to spend our last day leisurely enjoying Paris, leaving room for improvisation and our own magic. I am SO glad we did, because it gave us much more time to enjoy Montmartre at our own pace, and ended up being our favorite day of the entire trip.
Montmartre itinerary:
* Enjoy the quiet streets as cafés open on Rue des Abbesses – claimed by many the most beautiful street in Paris
* 33 – Café Le Vrai – LOVED this spot just off the Abbesses metro station…it wasn’t busy at all early in the morning, and was a great vibe indoors on a chilly morning
* 14 – Wall of Love – aka “Le mur des je t’aime” which says “I love you” in 250 languages
* Vintage Photoboth: 53 Rue des Trois Freres, 75018 (sadly was being fixed when we were there)
* Metro Station Lamarck-Caulaincourt double staircase (photo from both top & bottom are iconic)
* Rue de l’Abreuvoir – another street voted most beautiful in Paris
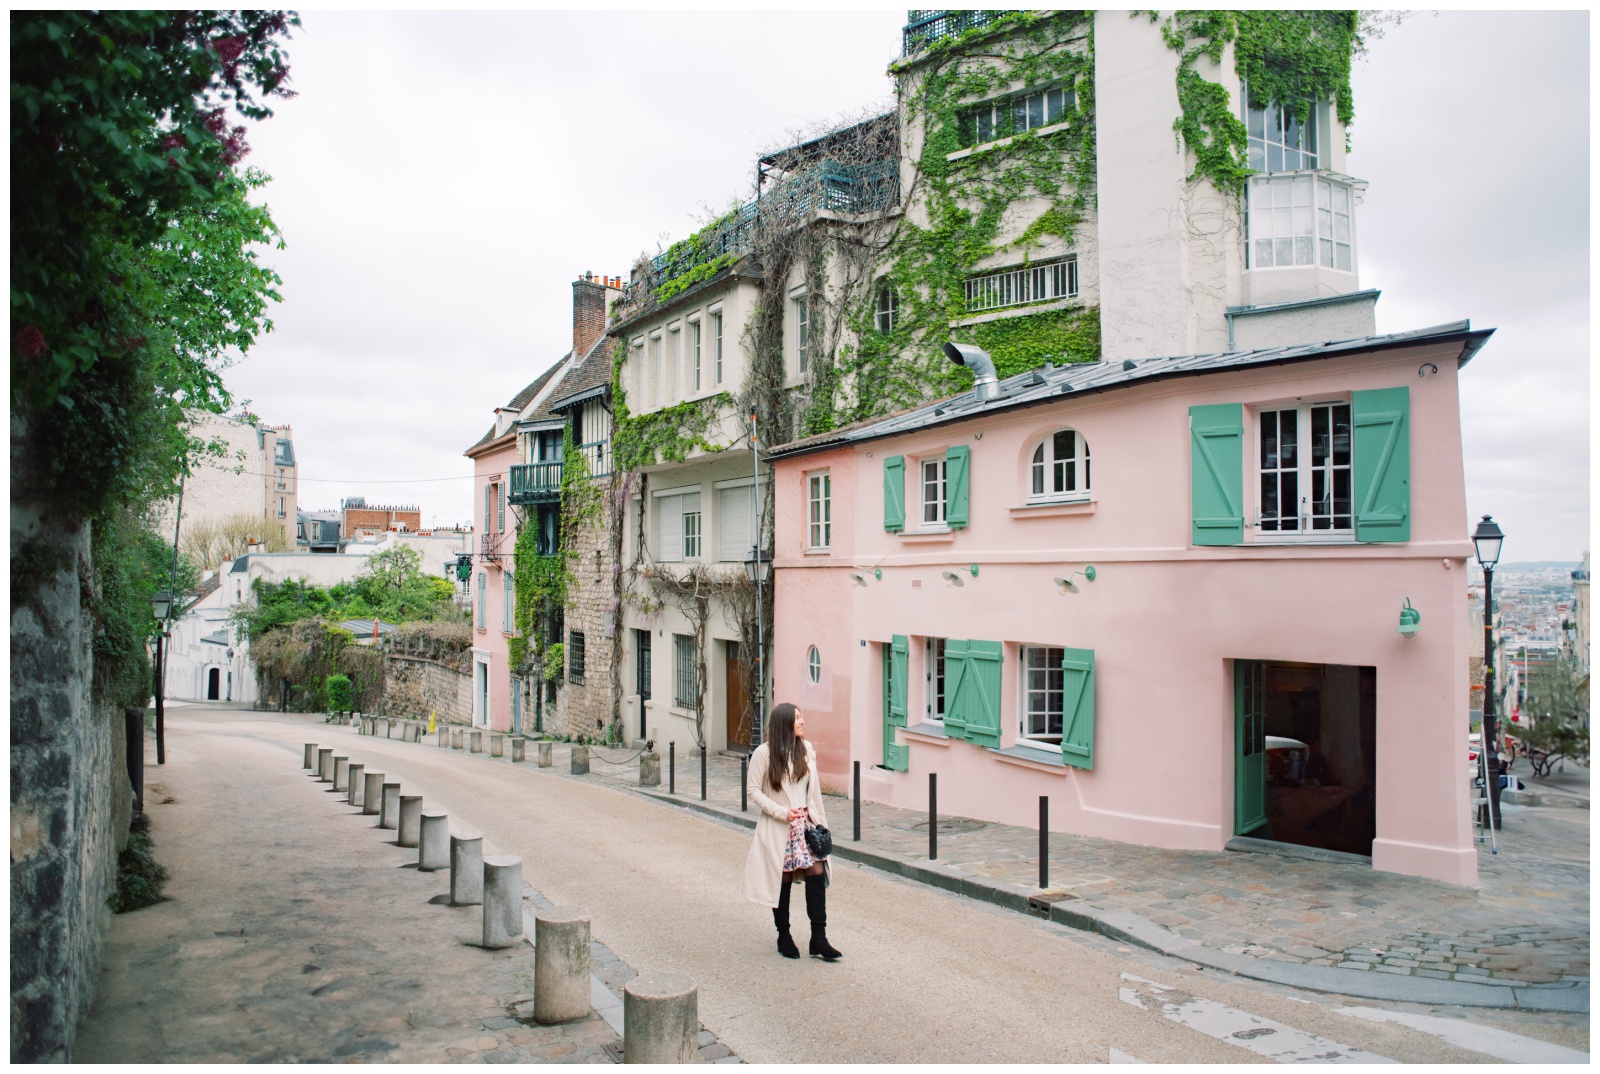
* Starts at the famous La Maison Rose
* Continue past the café and wak towards the Statue of Dalida, where you will find a stunning view with parts of the Sacre-Coeur in the distance
* Place du Tertre for local artists painting on cobblestone square
* Sacre Coeur – we entered from the backside with a covered green arbor and picnic benches, which was much more discrete than the swarm of tourists on the front side and so beautiful. When I think of our most special spot in Paris, I think of this little Parc de la Turlure. After enjoying the back side, head to the front for a grand view of the basilica and Paris from above
* Place Saint Pierre (vintage carousel in front of Sacre Coeur)
* Moulin Rouge = favv fav movie ever since I was 12 no biggie


After a several *INCREDIBLE* hours in Montmartre, it was early afternoon. We had a few more hours to spare before our River Seine dinner cruise so we decided to make advance reservations for Les Deux Magots to finally get to see what the fuss was all about (it is worth the long wait in my opinion for the old fashioned hot chocolate alone!) Then headed back to Le Marais to explore a little more before heading to the port for our final dinner on the Seine!


-

- Le Marais Neighborhood


-

- Back in Montorgueil Neighborhood


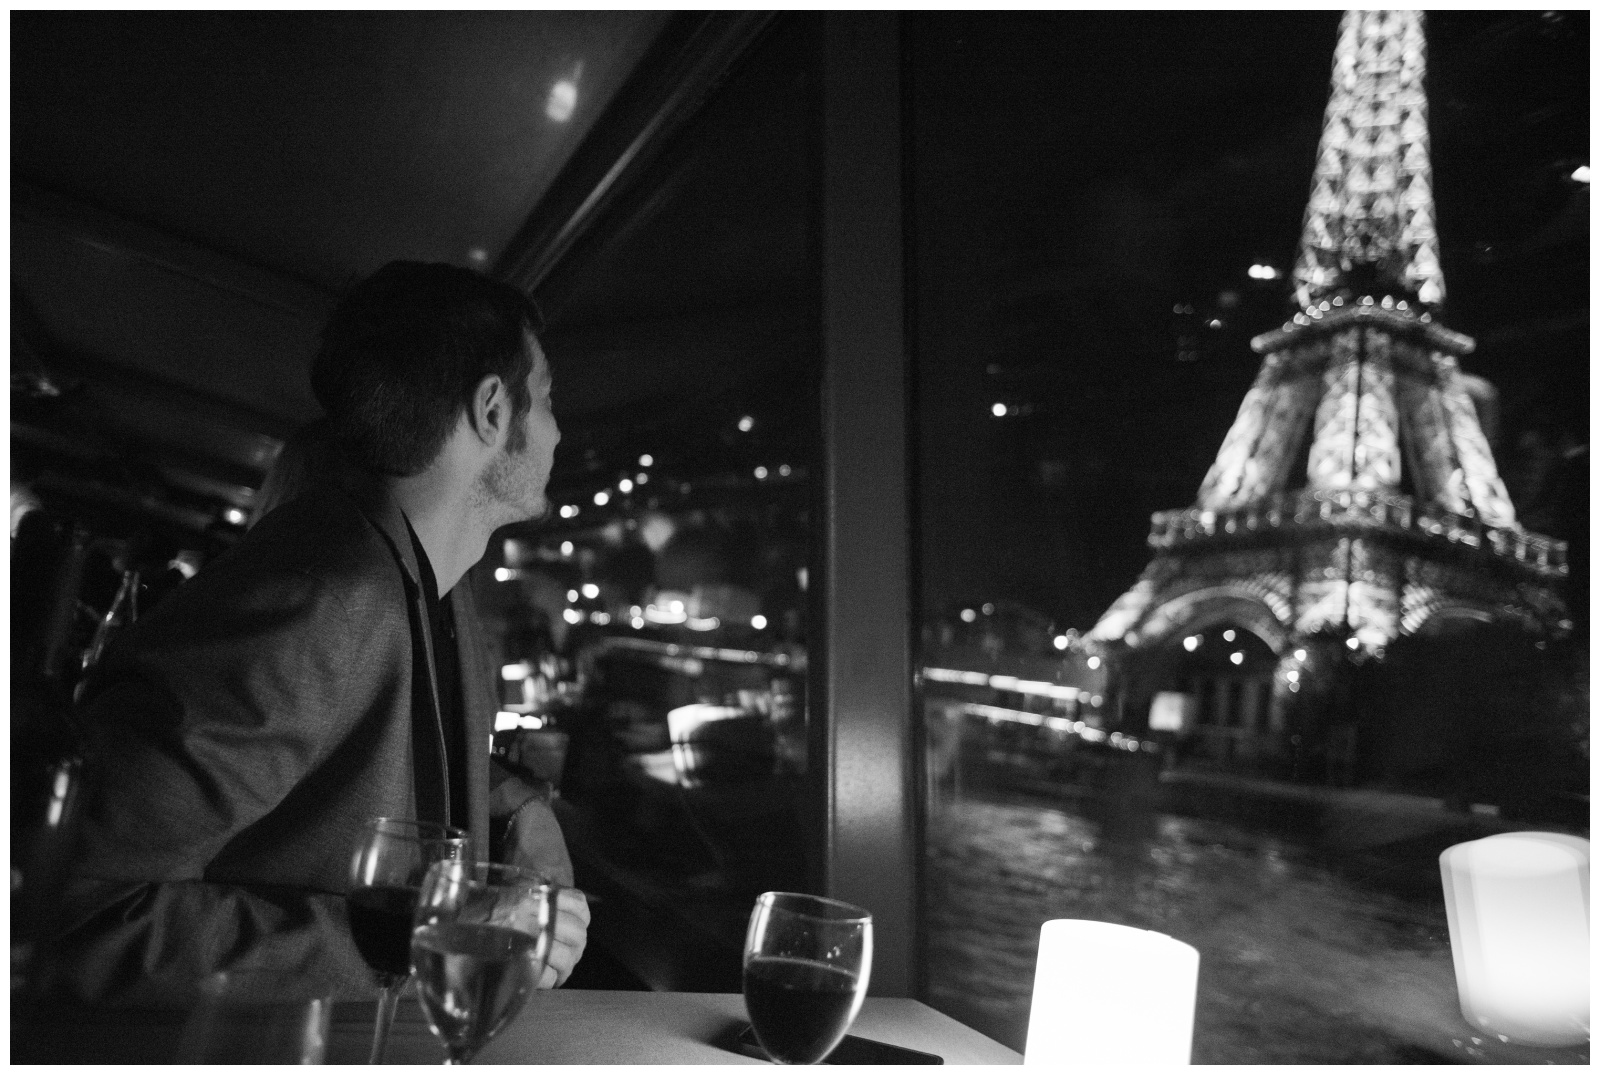
Although it may seem cliche, I highly recommend a dinner cruise on your last night in Paris. It was a very romantic way to cap off our trip, and see Paris from a different POV, especially at night when it was all lit up! I couldn’t believe it would be our first time finally seeing it flicker at night. We were always not within eye’s reach, too tired or cold to walk to it, or were on the other side of town. But we also knew we would see it tonight – so I kind of wanted to leave a little surprise for our final night!
The meal was great, thankfully, since it did cost a bit. It was a full course meal and I loved literally everything. It also came with what seemed like bottomless red and white wine. The live music was a nice touch too and I’m happy we paid extra for the window seat (there are many companies, we decided on Bateux Parisiens and upgraded to the service “privelege” for the window seat.
When we finally got to see the Eiffel Tower light up and dance to the hour, it was everything and more. Like, I’m still getting chills. Call me a sap or romantic, but there is truly just something different in the air in Paris. And I loved seeing it in Alex’s eyes too 🙂
Our dinner wrapped juuuust before the Eiffel Tower would light up again. So we mad dashed off the boat and cut through bushes to get to a clear view of it haha. I did a few twirls and Alex hyped me up for the video clip (you can go back and hear him say, “Sparkle-Sparkle, Meg!!” 🙂 One of my favorite core memories. We were too cold and lazy and tired to walk to the Pont Alexander III bridge to continue the evening, so hitched a taxi back to the hotel. It was 11:11 and Alex made the same wish he always wishes. A beautiful ending to a beautiful, short lived, but SO inspiring and impactful and left us wanting more – trip. We will certainly be back!


FAV MEMORY OVERALL:
fin!
Do you have a favorite street in Paris? Was there a must-do that we missed?! Let us know in the comments below!
May 30, 2025
Where to Stay in Paris With so many incredible neighborhoods and sights to see, it can be overwhelming to narrow in on just one or two locations to unpack your bags and stay a while. If this is your first time in Paris, you’ll likely want to situate yourself close to all the action, or […]
VIEW THE FULL POST
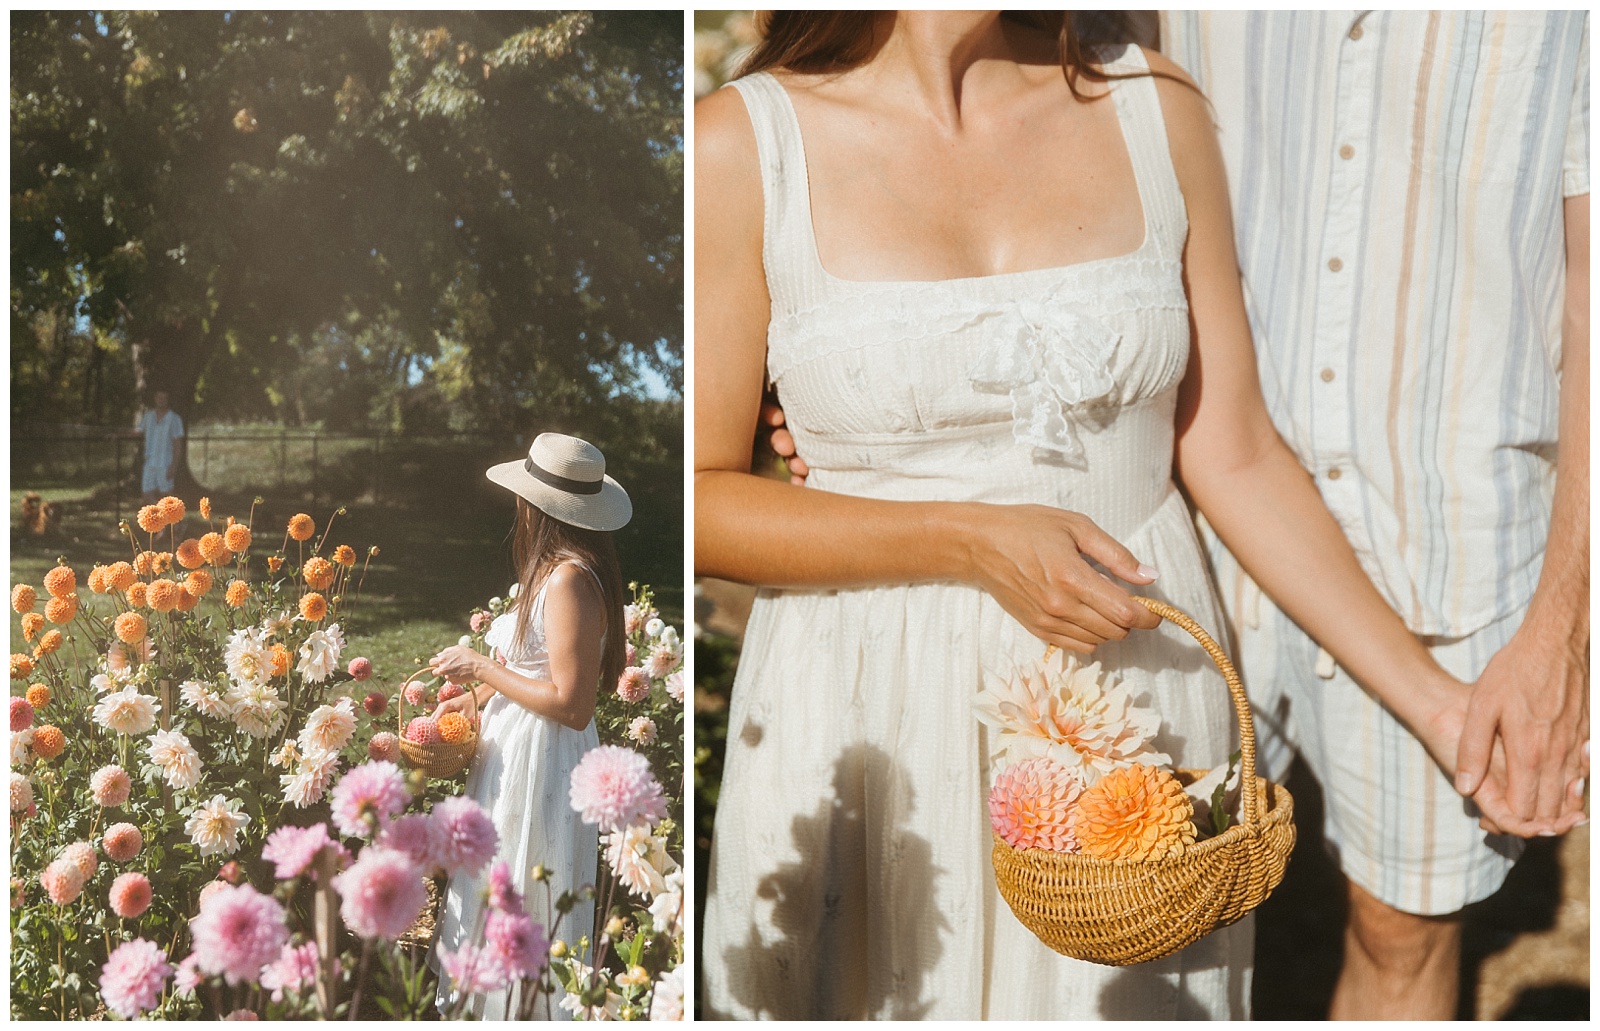
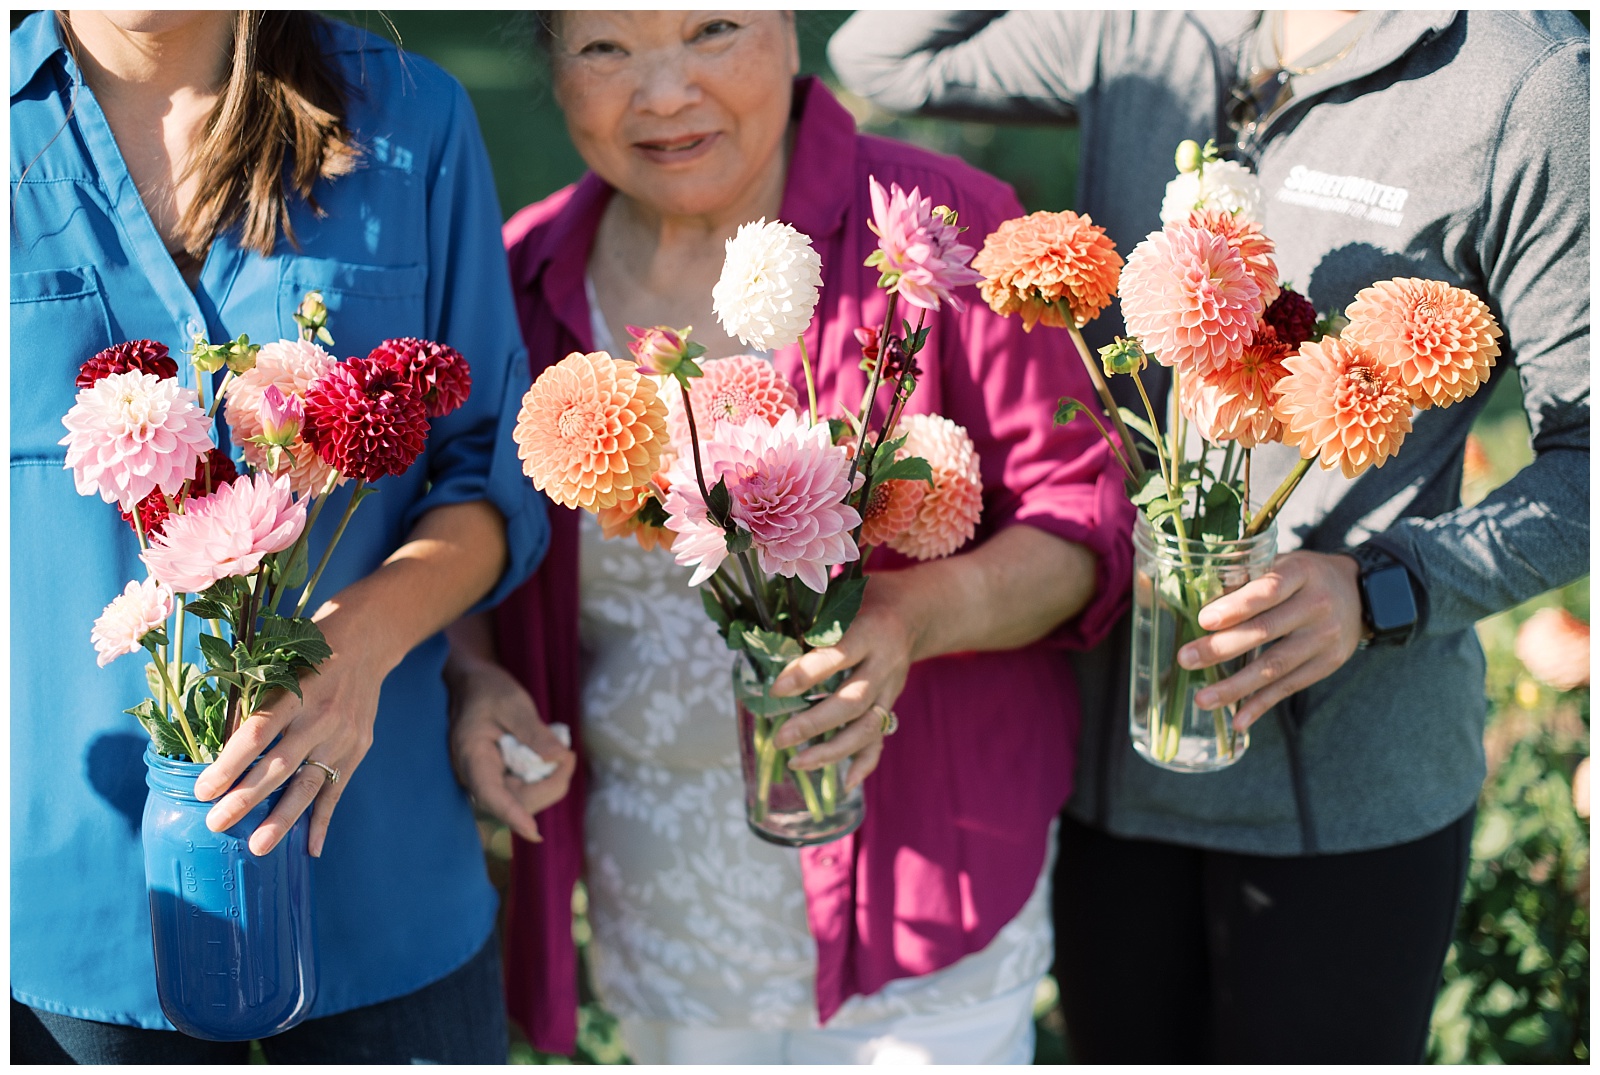
Last summer I grew my first cut flower garden. And I remember thinking, “if I can just grow ONE flower I will view this season as a success.” I had high hopes but was prepared for failure (up to this point I had never grown anything in my LIFE), so you could imagine my excitement and joy when it turned into an abundance of blooms. Too many in fact, that I couldn’t keep up!
My inspiration began from a cut flower book I bought a few years back, featuring a beautiful cover with her dahlia harvest of oranges and pinks thrown over her shoulder in the field. I could have tried growing vegetables for Alex and I to eat – so practical! But I am guilty of first and foremost being a lover of curating beautiful things, and there was something about a cut flower garden and always having a fresh bouquet in the dining table that felt so joyful and romantic🤍

The inspo –> the reality


Little did I know how much I would also come to love the daily ritual and meditation that comes with gardening. It gave me a reason to be outdoors and to tend to something outside of the daily musings of life🌱 There is nothing more grounding than being literally in the dirt!
After the first couple weeks of anticipation post-planting, and worrying that all the heavy rains had killed their chance of survival, I began to see their little green stems emerge🤗 In July my first bloom arrived, “Linda’s Baby,” a peachy pink ball variety which felt very special and karmic to me. My mother’s name is Linda (she loves to garden), and fittingly, I was her first baby! They are my favorite variety to this day.🌸
As more blooms arrived I would bring my camera out, thinking surely this is the most beautiful stage it will be. And then kept being surprised by more and more blooms.
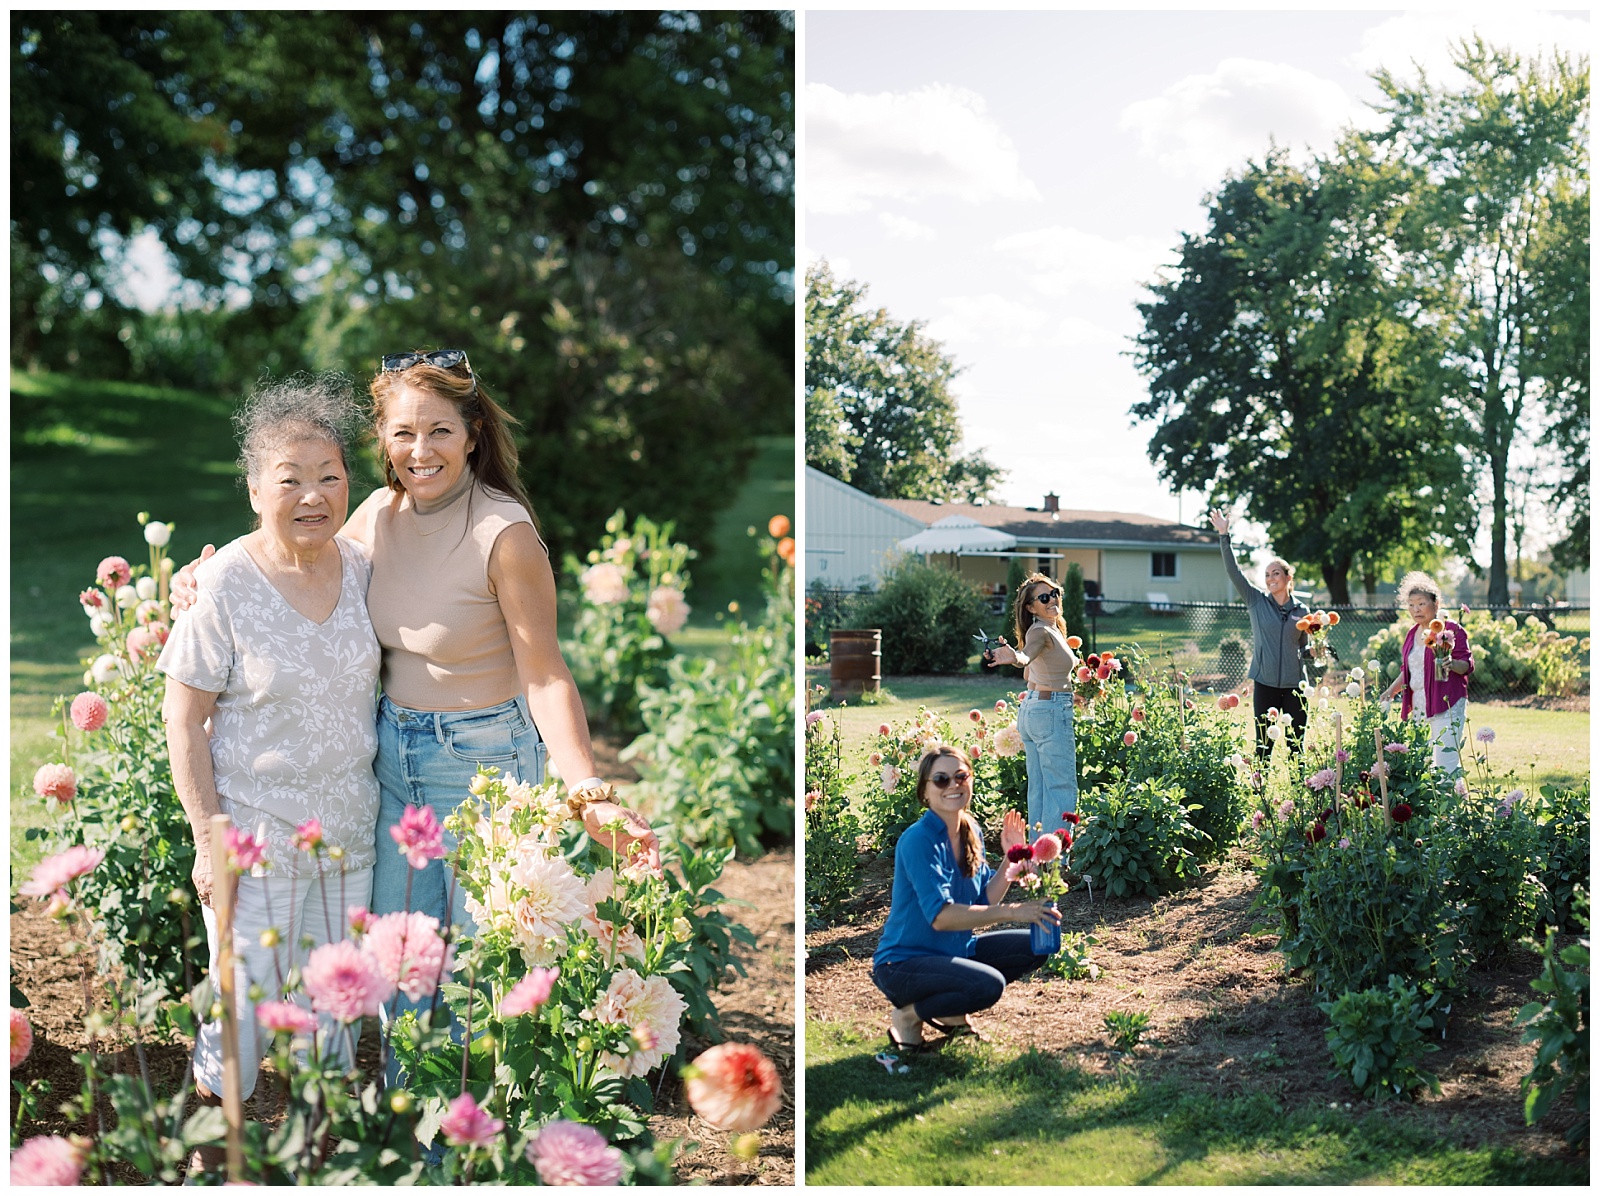
With a full garden, the joy only continued with being able to share it with others. The simple act of grabbing shears, a jar, and handpicking a bouquet for someone before I left for town. Or inviting people over to visit, walk through, and pick their own brought such a sense of connection and happiness to me. Just something small and beautiful I can pass into another human and home.
Looking back a year later, I’ve learned so much along the way! But to be honest, I wasn’t sure if I should even write up something like this for others to follow. I have the experience of just one season to collect and share these tips to you, and I still wonder if it was just first-timers luck! 🙂
However, I do feel like there’s SO much to learn going into your first cut flower garden and it’s easy to forget how much research goes into it all. So I’d love to share some of the information I learned from my first summer of trial/error, including things I would have done a little differently…in hopes to spare you some time and get you the basic tips and confidence to get growing your own dahlia garden, by this spring! 🙂
I’ll cover things like:
- Where I buy (and my favorite varieties)
- The importance of soil testing
- When and how to: plant, water, pinch, stake, cut
- Thoughts on fertilizing, and my “low fuss” gardening philosophy in general
- How to manage pests & disease in an earth-friendly way
- How to dig & store tubers for following year
Remember, everything I share is JUST based off my own experience. And some information I picked up along the way through online blogs or books. We all have different zones, weather, available light in our yards, and let’s not forget the biggest player in the game…soil! Each year will also be a little different in terms of weather, nutrients, etc so it’s important to understand the variables involved and always use your best judgement and apply all the information according to what you feel is best for you and your garden.
First things first, where to buy!?!
Tubers vs seed
There are so many places that sell dahlia tubers online. I started with tubers instead of seed, as this seemed to be what all my favorite dahlia growers did. And so a lot of this blog post is related to growing from tubers. There are many pros to starting with tubers, such as the aesthetic predictability (they will be identical to the specific variety of the parent plant, vs with seeds there’s a chance for diverse varieties and unpredictability), along with faster growth (in just a couple months you’ll have 4 foot tall flowering plants) vs starting from seed it will take a little longer. If you’re not on a tight budget, and want your flower garden to bloom sooner, or want specific look/varieties, then tubers are the way to go!
To be honest, I kind of just googled “dahlia tubers online” and found my favorites (most user-friendly, lots of varieties and helpful information) were Longfield Gardens and Eden’s Brother’s. I didn’t want to put all my eggs in one basket, so I picked about three dozen tubers between both (I also ordered through them again for this spring, along with Columbia River Dahlia which had great reviews but I can’t personally vouch for them quite yet). You definitely do not need this much starting off, really just a little 6×6 plot of 4 tubers would be enough to keep you happy in a small space (more on spacing to come)!
My favorite varieties
The ones that did the best in my garden were the ball and dinnerplate varieties, and it just so happens, these were also my favorite looks-wise!
For Dinnerplate varieties (the largest and fluffiest dahlia variety), I particular love the soft creamy ivory tones of the often sought after “Cafe Au Lait” featuring a rosy center, and conversely, the light rosy pink hues of “Breakout” featuring a yellow center.
But I think I will always have a soft spot for “Linda’s Baby,” a peachy pink Ball variety.

Dinnerplate – “Breakout” (left), and Ball – “Linda’s Baby” (right)
I like to have a variety within a garden of complementary shapes, textures, and colors as I feel it provides movement while staying cohesive – both in the garden and in a bouquet.
Last year I went with a pastel/ sherbet mix (with just a few merlot colored ones thrown in), but this year I’m doubling down on the sherbet look. I just love the pinks and peaches and creams! I’m also adding a few sherbet toned cosmos so we’ll see if those take. As much as I love dahlia and the variety they bring, sometimes you just need a few daintier pieces in a bouquet like cosmos or daisies, or maybe smaller ranunculus. But the dahlia have a way of always stealing the show 🙂
Testing your soil (yes, you should)
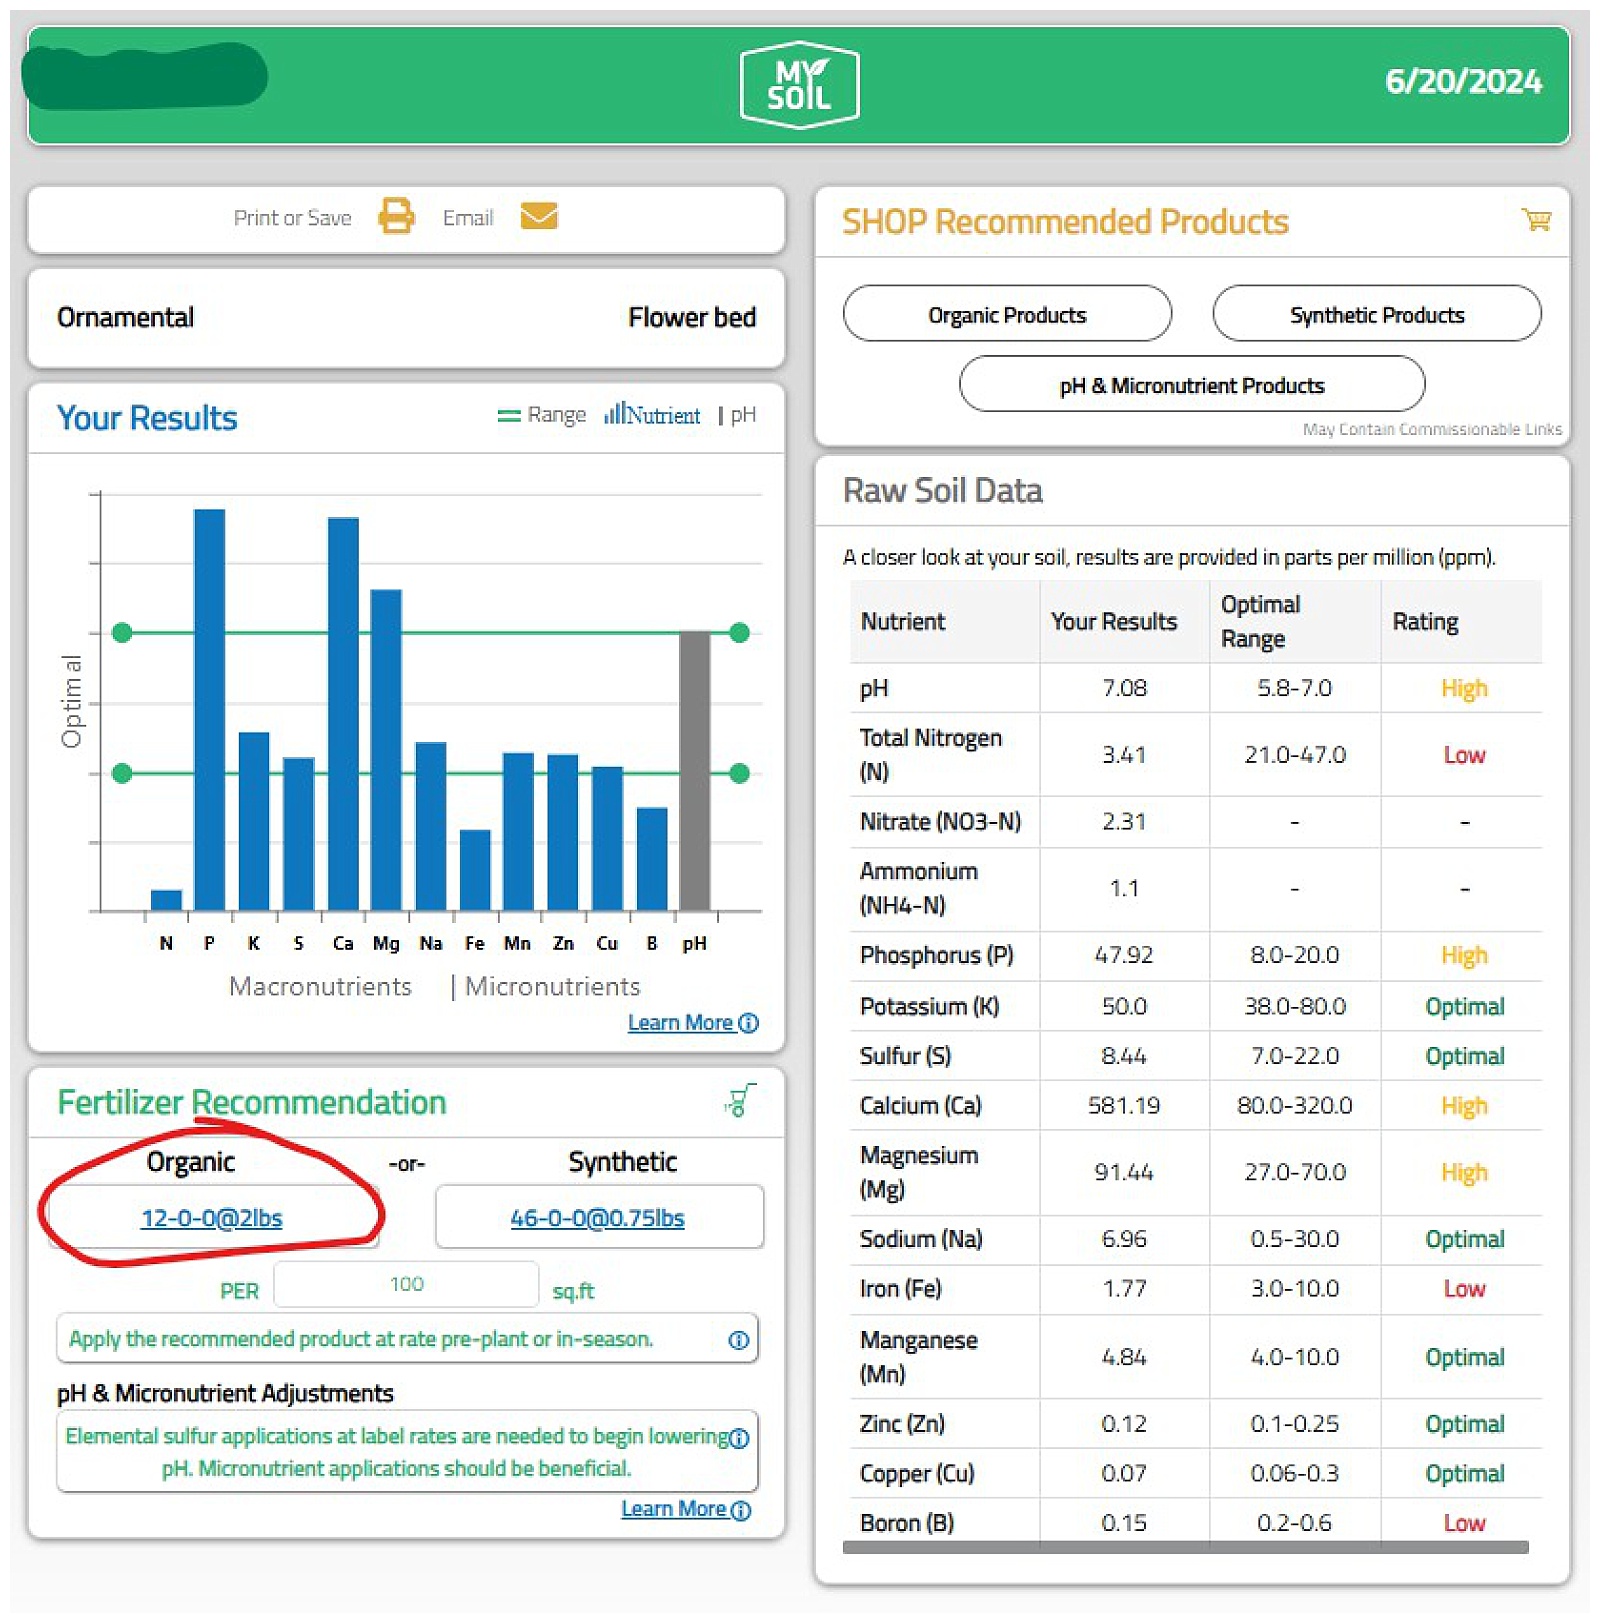
I know it seems like a task you could probably skip, but your garden truly is only as good as its soil. It’s important, especially as a first time grower, to get to know your soil and test what its made of! I bought this soil test on Amazon, and I LOVED how easy it was. Just pull samples from several areas in your garden, mix together to create ONE overall sample. Send it in, get results. And not only a breakdown of your soil, but clickable links to different fertilizers specific to your needs. So so helpful! Here’s a little screenshot of my results. As you can see, I was a little low on one of the 3 big essentials, nitrogen ( the other two being phosphorous and potassium) so adding a little nitrogen fertilizer was going to be super helpful to my dahlia in their initial growing stage (more on fertilization later)!

Dahlia Planting 101
Till the soil
If you don’t already have a garden bed, you’re going to want to dig one up and till (loosen) the soil about a foot down. This will not only make it much easier to plant, but will help with drainage, especially if you have thick clay soil like ours.
You could also use beds, however just be aware you may need to water more often. Since we already had a garden bed outlined from Alex’s grandma’s veggie garden, we decided to use that same plot of land for our dahlia.
Also, dahlia love lots of sun, so try and choose the sunniest spot!

Spacing / layout
At maturity, dahlia can spread to about 3 feet wide, but generally they say you can plant them about 12-18″ apart. Since our summers get humid, I like to give mine ample room to breathe and plant about 2-3 feet apart. Remember that you may also want space to walk through and tend to plants, so don’t be like me and accidentally plant them all over – although it did make for an abundant look! Luckily, a few (okay more like *half* haha) didn’t make it to surface, so I ended up with some unintentional bare spots to be able to still access all the plants within my garden 🙂
When to plant
You should always check the weather before you plant and pick a day where there are some sunny days ahead. A healthy tuber should already have enough moisture to be able to bring the plant to surface. So if a ton of rain is in the forecast, that could overwhelm your tuber and possibly lead to root rot – especially if you have heavier clay soil like me. It is best to avoid wet times during this more vulnerable stage and plant when there’s some sunny days in foreseeable future, or just a lighter rain.
One thing that really saved me last spring, was going out to get an emergency tarp to put over my garden as soon as I heard of heavy rainfall / flash flood warnings during their first two weeks. It kept my flower garden area completely dry and dahlia from being flooded in their early vulnerable stage.
I mentioned only half made it to surface, and majority of these were the ones planted in my first round (middle of May, in zone 5a). After my first round, I realized I still had a lot of room in my garden so I ordered and planted more about two weeks later, but those struggled more to sprout. I’m not sure if it was the batch I bought, or because we had a really rainy June and perhaps my soil was too wet unlike the first round. The ones that did work out from our second round also took FOREVER to catch up to my first round in regards to height/blooms/appearance (for a lot of them, they didn’t peak until late September vs my first round was full the end of August). So this year I intend to put everything in the ground as soon as these conditions are met:
- Safely after the last frost date (forecasted lows don’t dip into 30’s)
- Weather forecast shows a dry span (or just a light rain here/there) *if there’s one off day of heavy rain, consider a tarp to cover
- By Memorial Day weekend, ideally
The window will likely be a little tight, but hopefully this year we can get them all in by middle of May. Remember, the sooner you plant, the longer you’ll have them in your garden to enjoy them :)!

How to plant
Once you have your garden mapped out, it’s time to make some labels. I didn’t have anything fancy so I just used a sharpie marker and some plastic plant markers to stake into the ground. I laid them out in my garden to make sure everything looked good and the colors were arranged how I wanted them before I started to dig. I was going for a mixed color and variety effect. But another good reason to label, is so you know roughly where to expect the plant to emerge (and on the flip side, if it hasn’t emerged and what variety it is – so that you can pay attention to patterns or trends in your garden. For ex: the dinnerplate seemed to take longer to mature than my ball variety).
When you’re ready to dig, you’ll want to make sure there is a large enough hole to fully immerse your tuber, about 6″ deep. The top of the crown (where tuber meets stem) should be covered by no more than an inch of dirt, with the bulbs sitting at the base of the hole (part of my issue may have been that I planted them too deep, with about 1-2″ of dirt above the TOP of crown vs start of crown). There’s usually some excess dirt that comes from the bag it came in, and I like to put that dirt in with it too (I like to think I’m helping it feel more at home, by not completely shocking it with all new dirt and saving a little from their last home :)) I’m not sure if this actually helps but I like to think it does! 🙂


How often you should water
As mentioned, the tubers have all the essentials to get the plant sprouted so you really don’t need to overthink this first phase too much, mainly just look out for heavy rainfall and perhaps protect your garden with a tarp. On the flipside, if experiencing a heavy drought during this period, you may want to give it a little drink.
After they have sprouted, you’ll want to make sure the dahlia are getting roughly an inch of rainfall each week. If not, you’ll want to go out every couple days and give it a good drink, but luckily mother nature seemed to give the perfect amount each week during May-July so my first few months of dahlia growing were relatively simple!
If you have clay soil, I do recommend getting a moisture meter, as it can be hard to tell sometimes what’s happening beneath the first few inches of surface. If you have sand soil, you will likely have to water a little more. When in doubt if you are overwatering, operate with less is more (you can typically tell if your plant needs a drink as their leaves will slightly droop).
When your plant becomes thicker and filled with florals, continue to ensure they are getting an inch of rainfall each week, perhaps more if it’s really hot. It’s best to water in early mornings, since evening waterings could promote fungal disease in more humid weather. Mornings allow time to dry out during the day’s sun and also help provide a cooling effect for your dahlia throughout the hot summer’s day, when the plant is more vulnerable.
The best method would be to have a drip irrigation system so the water can go straight to the base and roots in an efficient way (less runoff and water waste) – but not everyone has the time or patience to put that together! In the later months when it rained less, I used an overhead sprinkler. However it’s hard to know when an inch of water has been applied, so I like to place a flatter dish or bowl out in my garden, even though it’s not 100% accurate it can let you know roughly when an inch has been applied 🙂
Things to watch for as the plant grows (pre-flowers)
After you’ve planted everything, hooray! Welcome to the waiting game. It takes about two weeks until you’ll see the little stems start to emerge. I would avoid pulling any weeds or laying mulch or anything fancy and just let nature do it’s thing. Once you see the dahlia emerge, you’ll get a better idea of its radius, allowing you to continue to till (loosen the soil) around your plant to encourage better water drainage, pull surrounding weeds that may compete for nutrients, or lay mulch around the plant (but personally I held off on mulch until my plants were bigger and summer weeds were more of an ongoing issue).
Weeds (or is it??)
Reminder: the weeds also get the same amount of water each week 🙂 It was hard for me initially to tell what was a weed and what was a dahlia stem (haha, I NOW can easily tell the difference, but I definitely pulled a few ranunculus stems in my initial de-weeding days on accident. Hence why my flower garden became solely a dahlia garden)!
This is also why it’s helpful to put your plant markers close to where you actually planted them (unlike mine that were a foot away at times). It makes a huuuge difference when you’re inspecting 10 different green things emerging not yet knowing what a baby dahlia looks like. I did try iPhone’s image lookup tool straight from my camera roll, which sometimes helped, sometimes confused me more with its results. And to make it more confusing, I also wasn’t sure what was re-growing in the garden from life prior to us, since Alex’s grandma used it as a veggie garden. Luckily, once I identified one dahlia stem, it was super easy for me to identify the rest.
Helpful note: Dahlia stems will be thicker looking, almost like the start of a succulent. It will also be sturdy and hard to pull out like weeds. Here’s an image for reference:

Pinching
Once your main stem reaches 12-18 inches, you’ll want to “pinch it” (aka trimming the main stem). This is to help promote more side growth and multiple strong stems vs one very large tall stem = more stability (also more of a “full” round look). It’s going to feel counterintuitive, because you want your plants to grow! But I promise, that doing so will help the longevity and strength of your plant, and it will still grow very tall (as you’ll see, on average mine grew 3-4 feet tall and about 2-3 feet wide).
Just make sure not to wait TOO long to pinch. They grow really fast at this stage, and their main stem is actually hollow inside (ex: like a penne noodle). So by the time I went to pinch, majority of my main stems now revealed a significant sized hole down the stem, which is fine and mine still went on fine, but will be more susceptible to pest damage as they love to burrow and feed, which is not what we want to attract inside our main stem.
When pinching, you’ll want to count from the base 3-4 sets of stems from the center stem. Then cut the stem above the 3rd or 4th set like below.

When plants get about 12″ it’s time to consider pinching.

Where to pinch (left & center), and after pinching (right)
Your first florals have arrived! Now what!?!
Harvesting
Just like pinching the main stem, it’s going to feel REALLY wrong to cut your first flower. But the amazing thing about Dahlia, is the more you cut, the more they grow which makes them great for season-long summer/fall bouquets. As soon as you see them, you can begin cutting! It promotes more growth as it actually sends a signal to the plant that it needs to now produce more. And wherever you cut, more side growth from that cut location. This is why it’s always good to cut stems as long as you can, so that more side growth is taking place near the base of the plant (keeping it strong and sturdy) and encouraging more long stems in replacement.
I was so impressed by how strong my initial stems were. This is indicative of a healthy plant. You’ll notice that the more into the season and the more you cut, the stems may end up becoming more frail and have less vase-life longevity (more on nutrients and fertilization later).


Staking
We can get some intense winds out in the country, and once my plants were over two feet tall they definitely were more susceptible to wind damage (tall plants = more surface area for wind to have its way with). I did sadly have to lose one of my better plants, and that was a clear sign to me to start staking. I just went to a garden center and got some wood stakes and green ties for the main center stem (nothing overly fancy, more of an “au naturale” simplistic look as opposed to netting or caging that I find kind of takes away from the beauty of a garden). I found one stake per plant was enough to solve the problem. I would not stake TOO early however, because I do think it’s good for the plant to develop some sort of tolerance and resilience to wind (it teaches the plant to become strong for survival). But definitely before they reach 3 feet. Use your best judgement here and if it looks like they’re moving around a little too much out there, play it safe and stake them 🙂


Mulching
As your pretty dahlia come in, you’ll probably decide now is a good time to add a layer of mulch. Not only will it look much nicer, but your weeds are probably getting a little harder to keep up with and a layer of mulch will definitely help tidy things up.
You can also use grass clippings from your yard, just make sure they are dry (best to wait about two weeks before applying to your garden). It’s not the prettiest, but it will help do the job.
We started with grass clippings since we had so much from the grass growth each week at the start of summer, but then as the flowers filled in I wanted something a little nicer looking (plus our grass clippings were starting to decompose a little too much). The mulch I chose was Miracle Gro’s organic which basically means it’s avoiding dyes. Yes the rich brown color will fade, but I was okay with that.

Grass clippings for mulch (left), Organic Miracle Gro (right)

Thoughts on fertilization, my “less is more” approach
Because my soil test results showed I was already really high in phosphorous, I didn’t want to add MORE phosphorous as found in a general 10-10-10 fertilization. If you’re wondering the three numbers in a fertilizer represent the % of nitrogen(N)-phosphorous(P)-potassium(K). My results however, did show I was low on nitrogen, so introducing a slow-release nitrogen fertilizer in the beginning stages was something I thought would be helpful to my plants. I loved that my soil test kit results linked me directly to two recommended fertilizers to help my unique results, a 12-0-0 organic, and a 46-0-0 synthetic. I chose the slow-release organic recommendation, and a little goes a long way! I bought a 20 lb bag (not knowing how much I would use) and still have plentyyyy left for this coming season too 🙂 Probably just start with a 5 pound if it’s available online! If saving for future use, keep in mind granular fertilizers have a longer shelf life than liquid fertilizers and can last many years, but organic fertilizers may have shorter shelf lives. Check for clumping or hardening, or foul odor showing signs of mold growth.
When applying fertilizer, it’s good to do it before planting, otherwise along the perimeter of your plants (throughout growing season to provide a steady release of nitrogen throughout the growing season. For more detailed instructions, follow the directions of your specific fertilizer.
I really only applied fertilizer once, when my plants were large enough to be side dressed (since I didn’t apply the fertilizer in time for pre-planting). I probablyyyy should have applied one more time throughout the year, perhaps that would have prevented some of the malnutrition or fungal disease I was seeing?? (still don’t know for sure). But I felt like I would want to do another soil test rather than just *guessing* at what it needed.
I really like to do use a “less is more” approach, and if the plant is growing well, I guess I just let it go well. My thought process is much more relaxed or going off vibes/intuition. If it’s starting to show signs of malnutrition, then yes perhaps another soil test and fertilizer to see what it needs. I’m not saying this is always how I will do things, perhaps in the future I’ll take more of an active preventive fertilizing approach, but for now, while I’m still learning all the ropes, it seems like the less overwhelming path! And the results were *good enough* for me. I’m not in the floral business…yet 😉 BTW, shoutout to the florists, I now have soooo much extra appreciation for you! <3

How to manage pests & disease in an earth-friendly way
By far the most challenging part about growing a garden, it turns out, has nothing to do with “growing” (turns out when given the basic ingredients, nature likes to naturally do its thing). What is MOST challenging is managing all the pests that now want to feed off what you’re growing. Being a grower does come with some (not so fun) additional responsibility. You are essentially changing the biodiversity of your backyard, introducing new species of plants, and with it, a habitat for potential new species of animals, insects, etc. It’s important to know how to protect your plants, remove unwanted pests, all without harming the overall ecosystem. For information on the science behind gardening, I highly recommend this book!

Common dahlia pests
As soon as my flowers arrived, immediately so did the pests. The colorful flowers are like giant flags signaling them to come on over and check out the new restaurant in town. Japanese beetles (shown below) and Aphids (tiny lime green bugs) are the two most common dahlia pests, at least for my zone 5a.

Because I needed a quick fix (read: went into my backyard and was appalled by a Japanese beetle infestation that ruined all of our raspberry bushes, hostas, apple trees, and now were exploring my dahlia garden), I decided to ask around and got some Sevin’s powder and spray. While it is claims to be safe for pets and won’t harm plants or blooms…I didn’t LOVE the idea of using a harsher chemical in my yard or garden and possibly impacting desired bees/butterflies, etc. The “dust” also does look like dust, and leaves a powdery look over your plants. Not ideal. I also got the spray version that hooks up to a hose, and had to have Alex do it for me because I am very prone to eczema. So also didn’t love the thought of me tending to plants after a round of Sevin’s on them. The pros? It kills the pests on contact, so if you’re having a larger infestation problem…a harsher approach may be necessary at first to get the relief/results you want. And note to self: don’t get too busy during wedding season (or summer season), that you forget to go look and see *up close* what’s going on out there. Things can change within just a few days, as I found out the hard way!
After the initial round of Sevin’s (which did the job thankfully, and removed site of the beetles for the next two weeks), I knew I wanted a more earth-friendly solution moving forward. I was recommended Neem Max (neem oil which is plant-based) for organic gardening, which is a 4-1 insecticide, fungicide, miticide, and nematicide to help control aphids and other adult insects like Japanese Beetles. While it didn’t work as good as the Sevin’s, or perhaps I just didn’t apply well or frequently enough, I’m happy to try it again going into this next season. I think, as long as you catch the problem early before they get too out of hand, and apply more regularly, you’ll be better off than I was being too late to the game and having to resort to Sevin’s.

Things I will do differently for next year regarding pests
Because all the Japanese Beetles were such a nuisance to us this year, I researched a little more and learned that their life cycle actually starts as grubs within the ground which become beetles (blehhhk)! So I will be focusing on prevention, so that the grubs don’t grow in our lawn and BECOME beetles flying around and eating our plants and laying more eggs to repeat the cycle. All these things they don’t tell you when you buy a home and decide to garden, right?! Luckily a preventative earth-friendly solution exists, called Milky Spore. Here is the one I plan to apply to our soil this spring, after last frost, and once the soil is above 65 degrees. The best time to plant this however is fall, when they do most of their feeding. For best results, do two rounds for two years (one in the spring when they emerge and in the fall when they heavily feed, and repeat the following year). Be patient, it may take a couple years to fully cycle through but they should get less and less.
I’m also starting a veggie garden (ahh can’t believe I’m adding more to the mix lol!) And learned about companion plants. Ex: marigold and dill can help deter unwanted bugs, but attract the good ones we want like bees & butterflies – YES YES YES. So I’m thinking I’ll plant these in between the dahlia (also I’m sure helps with weed growth too :)) win win!
I also recommend this handbook, not just for dahlia growing, but any kind of organic gardening. It’s a quick way to look up your specific plant and see what the common pests and diseases are and how to manage them in an earth-friendly way.
Please remember, I am only ONE year into all this…and just sharing what I have learned and my experiences. By all means do your own research and what you are comfortable with in your own garden (and let me know what worked for you!) 🙂


Common dahlia diseases
Leafy gall and crown gall are the most common dahlia diseases. Pests can also spread viruses to your plants, so it’s important to manage pests first, and watch for signs of virus or disease. Leafy gall will distort your leaves and shoots, while crown gall will result in tumors on stems or roots. Viruses caused by pests, or fungal infections may manifest in many ways, but some common things to look out for are yellow spotted leaves or veins, shorter flower stems, and droopiness/stunted growth. Unfortunately these also resemble symptoms of simple weather stress.
The only signs of potential disease I had last year were towards the end of my season (September) after a very humid month. I noticed some plants seemed stunted in growth, their petals would fall apart after being cut, and their stems were weak. I also noticed some yellow spots on their leaves. I wasn’t able to easily determine if it was malnutrition, old age, or a fungal disease without a little trial and error.
In case of virus or spreadable disease, I first clipped the plant so that it wouldn’t touch the others nearby (it’s also important to bleach your shears each time you move to a new plant). But I may have contaminated others because in a couple weeks I noticed it on a few other plants. At this point, I still wasn’t sure if it was disease, or malnutrition because interestingly, all the affected plants were my ball variety, and the nearby Dinnerplate variety seemed unscathed. So perhaps my ball variety were not taking well to the recent humid conditions.
Because it was the end of my planting season and less of a pressing issue, I treated for malnutrition first via Epsom salt in case it was low on magnesium, a common issue. I mixed two tablespoons of Epsom salt per gallon of water into a spray bottle and sprayed directly on the leaves for faster absorption. Epsom salt is great because along with magnesium and Sulphur, it also contains micronutrients and is essential for photosynthesis and absorbing the necessary nutrients. Some people even apply it once a month during growing season as it can help produce larger and more vibrant blooms. I probably could have done another soil test to pinpoint what was lacking in my soil, but it was already late in the season and by the time I would get the results it would not even be worth it. While one application this late into the season didn’t revive my plant, it seemed to keep the plant from further regressing and kept me from having to pull the dead bush.
It is important to say, that had I ruled out malnutrition and noticed that it WAS in fact a fungal disease, that it’s super important to fully and immediately remove the plant so it doesn’t spread to more plants in your garden. Again, because it was the end of my season, and it didn’t seem super obvious that it was a disease, I took a more relaxed approach (also ran out of time to keep my science project going due to our fall trip to Italy). But after the fall season was over, I did dig up and discard into the garbage any plants that were iffy to me, versus storing them for the following year. Which brings me to my last!


End of season & digging/storing tubers
Technically Dahlia are a perennial (meaning they will regrow year after year), however since Wisconsin is a colder climate they do not survive staying in the ground during the winter months. Therefore, if you want to save some money and use your same tubers for next year, you’ll have to dig them out and store them for the winter.
Now, there are a LOT of different ways to do this. And probably each of those ways was better than what I did LOL. To be honest, I was pretty low on time at the end of fall, we were wrapping up our wedding season and I had just come home from two weeks in Italy and was trying to play catch up. The labor of having to pull up all my dahlia out in the cold was…something I wasn’t super eager to do haha! But I would encourage you to do it on a nicer weathered day so you don’t have to rush out in the cold, and so that you have some daylight (sun drying time) left for you to properly wash (if you choose to do so) and let the sun dry them out a little bit.
I waited until last possible moment in November, before first frost, and dug them out trying to beat dusk (it took way longer than I thought and they grew way larger than I thought. I had a struggle even cutting the stems – they were now an inch and a half thick! Insane!!) I simply placed them in plastic grocery bags along with their dirt, not having time to carefully inspect or separate them from dirt and wash them. This kind of goes with my “less is more” approach because to me, it just seemed weird to wash the roots of a plant that is used to being – and thriving – in dirt? To me, as long as the dirt isn’t too soggy where it would cause root rot (like if your basement runs more humid and can’t properly dry out enough), or is too dry (should still try and have a little moisture over the winter)…then I think you’ll be good to go. Typically an old basement like mine is humid enough that it won’t dry them out too much. But if you’re concerned, either mist them once in a while or throw a damp paper towel in with the plant.
I have not checked on mine all winter and I’m kind of scared to…. ha!
I do however plan to wash and inspect them before planting this year. Making sure I’m not planting anything that looks iffy. Since I don’t really know what I’m doing yet, I plan to plant these in the back of my garden (it will be my trial year of storing & replanting), and as backup I did buy a lot of new tubers both old favorites and new varieties to explore for this coming season!
I will likely end up revising this once I go through the actual process, so check back later into the season when you’re ready to dig/store for more updated tips on this from me 🙂
Also at the end of the season, you’re going to want to replenish your soil with as much nutrients as possible, via raw organic matter. We always have tons of fallen leaves in our yard so we like to sprinkle them all over our garden to decompose into our soil over winter.
Fun fact: you can also “split” your tubers. I’m not exactly sure what this all entails (I know you have to look for the “eyes” which for some reason I really hate calling them eyes LOL) I likely won’t have capacity to learn this for this spring, plus I also want a trial run in my garden first to see if last year’s take in my garden this year. But if all goes well on their second season, I do plan to explore this for spring 2026! It’s a nice way to gift your proven winners to others! Family, friends, or maybe you want to run a little side tuber business :)!
Here’s a little glimpse into the end of our season (a mix of some super 8 screenshots + filmy preset iphone pics + some from our backyard shoot with XOME Studio)


-

- So long to a prolific season :’)
-

- These were so hard to cut down! So thick.
-

- To think I originally brought out sandwich baggies 🙂 We needed full grocery bags. (PS don’t love the plastic, but we had a few accumulated from the year & we were in a pinch!)
Final thoughts!
Whew! I know this probably feels like a lot. But I PROMISE taking it step by step and each day as it comes, it will all make sense in no time. And you’ll end the season just as I did, somehow acquiring more garden knowledge in one year than I knew was possible, and perhaps feeling a little bittersweet that the daily ritual has come to a close.
I wish I could express how much this first summer’s garden meant to me. Unlike photos that last generations, flowers of course are fleeting. But in the moment they are lively bursts of color and textures and joy nonetheless. Here’s a few favorites I handpicked and arranged in photo form💐—so I can always remember the joy of my first flower garden🌱 I hope that you will find the same joy, beauty, and passion as I did, and all just a step into your backyard. xoMeghan


Did you find this article helpful, or are you planning on growing dahlia this year? Let me know in the comments, or share some tips of your own! Happy growing season! 🙂
April 3, 2025

Last summer I grew my first cut flower garden. And I remember thinking, “if I can just grow ONE flower I will view this season as a success.” I had high hopes but was prepared for failure (up to this point I had never grown anything in my LIFE), so you could imagine my excitement […]
VIEW THE FULL POST
What’s better than one cocktail hour? Two🥂Rebecca & Theo made being present with their guests a priority, taking advantage of the gorgeous summer day and back patio of their venue – The Carriage House in Oconomowoc. They introduced a new concept of a “welcome hour” and after their first look and group pictures were completed (and with guests soon to arrive), Rebecca switched into her pre-ceremony cocktail dress and together they greeted each guest at the entrance to their special day. Since guests typically arrive within the hour before a ceremony, we loved that they chose to make this hour more intentional and be able to mingle with them versus hide!
The guest experience continued during their ceremony, with cheerful, picnic themed floral baskets of dahlia, zinnia, roses, cosmos and more. They surprised everyone by asking to check under their seats to reveal which lucky two would come up and be their official witnesses. Their pup Willow couldn’t help but hang by mom and dad, choosing to lay on moms skirt. Other personal touches included their welcome table of special mementos of their adventurous tales and travels, setting the tone of their carefree, outdoorsy day (sneak a peek at their adventure themed engagement session featuring a floral adorned canoe)! Such a fun, joy-filled celebration with the kind of couple whose love is so palpable, and we wish them all the best in their Switzerland era!
Venue & Catering: The Carriage House at Lac La Belle @thecarriagehouseatlaclabelle | Wedding Planning: Zing Boom Tararrel Events (Kate) @tararrel_events | Florals: Sage Floral @sagefloralllc | Photography: Meghan Lee Harris @meghanleeharris | Videography: Sydney Fischer @sydneyfischerfilms | Dress Shop: Elissar Bridal @elissarbridal | Bridal Dress: Jenna In White @jennainwhite | Accessories: A. B. Ellie @a.b.ellie | Groom Attire: Men’s Wearhouse @menswearhouse & shirts from Bonobos @bonobos | Groomsmen Attire: Men’s Wearhouse | @menswearhouse | Makeup: Emily Busalacchi @emilybusalacchi_mua | Hair: Lexi Lee Hair @lexileehair | Entertainment: Creative Sounds Entertainment @creativesoundsent | Dance Floor Rental: David Charles Pro @davidcharlespro | Cake & Desserts: Espresso and Rye @espressoandrye_ | Ceremony Guitar/Cello Duo: Moeller Music Events @moellermusicevents | Officiant: Marlon Henriquez @marlonehenriquez


-

- default
-

- default
March 31, 2025

What’s better than one cocktail hour? Two🥂Rebecca & Theo made being present with their guests a priority, taking advantage of the gorgeous summer day and back patio of their venue – The Carriage House in Oconomowoc. They introduced a new concept of a “welcome hour” and after their first look and group pictures were completed […]
VIEW THE FULL POST

Guys. I am FINALLY ready to recap our first *legit* international European trip. I say legit, because can we really count our van trip around Iceland as quintessential “European”?? Haha, just sliiightly different vibes. After getting our feet wet in international travel, choosing our *second* euro destination seemed like a no-brainer. After seeing countless inspiring photos from coasts to mountains and vineyard valleys, and hearing endless hype on the food, culture, architecture, etc, etc.. we were eager to make ITALY next on our list!
Itinerary
We decided (in true Meghan fashion) that we could not just stick to one region, and instead would try to see as much as we *comfortably* could in a 14 day trip (16 if you’re counting travel days, which we did a direct flight round-trip between Chicago & Rome). I understand how privileged we are to take this much time out of work schedules. We booked this trip just a couple months in advance when I realized I had two weekends in a row off weddings (which might have been intentional to save room for such a trip hehe…) and Alex has a flexible work schedule to be able to roll with the punches.
I think after the pandemic, we were running more on a scarcity mindset and feeling like this would be our ONE shot to see it all (in case we can’t travel again). So we wanted to try to see as much as we could in one big trip, versus a few smaller trips over the years. Of course, there is SO much to see in Italy that even spending two weeks there, you’re still never going to see it all. Yes, I am already planning my next trip back lol!
But, for our first trip, we wanted to experience that quintessential Italian culture (with tried and true classic areas like Tuscany where life in the country vineyards is slow paced), mixed with some buzzy hotspot hangouts (like Amalfi Coast and the colorful stacked town of Positano), and lastly, infuse some of our love of the mountains and nature and hiking! So we broke our trip into three different “parts.” All with it’s own Italian personality!
Part 1: Tuscany (5 nights)
1. Pienza / Val d’Orcia (1 night)
2. Siena (2 nights)
3. San Gimignano (1 night)
4. Florence (1 night)
Part 2: Dolomites (5 nights)
1. Alpe di Siusi (1 night)
2. Ortisei (2 nights)
3. Cortina d’Ampezzo (2 nights)
Part 3: Coastal Towns (4 nights)
1. Venice (half day)
2. Cinque Terre (2 nights)
3. Amalfi (1 night)
4. Positano (1 night)
It’s hard to know in advance what a comfortable pace will be. In hindsight, some areas we felt like maybe we could have done with a day or two less (like the Dolomites – I would have done with one less hotel and night), but other parts felt like we definitely needed more time to enjoy (like the Amalfi Coast, definitely need more than 2 nights especially given the journey to get there and back!)
Although it was so exciting to keep seeing new things, in all honesty by day 10 we were starting to feel so exhausted from all the logistics haha. Even if you’re having fun, the logistic stress of it all does creep up on you. And it definitely did end up draining our energy for our final – and MUCH anticipated location – the Amalfi Coast. (Not to be dramatic, but my body ACTUALLY gave out on me and I got physically ill there lol!) So if I were to do this whole trip again I would actually advise to skip Dolomites and save it for a special Lake Como & Dolomites combo trip, separately. Sticking to Tuscany and Amalfi Coast (with still the side stop in Venice) would have certainly still felt like a wonderful tour of Italy. We also would likely only have done 10 days, since that seemed to be the max amount our energy and bodies could take (also when you have doggies at home, you hate leaving them too long!)

Packing List
One thing you should know about me, I love packing LIGHT. Especially in Europe, where you are likely going to have to haul your luggage with you – everywhereee. On the trains, metros/buses, ferries, then walking narrow cobblestone streets (that are located outside the city center) to your hotel room…or up many flights of steps. Traveling lightly turned out to be one of the best decisions. Without it, we would have had to rely on a lot of private transfers, or pay extra baggage fees on public transportation, which adds up on time, money, and is yet ONE more logistic you have to plan for.
I have spoken with quite a few people who have gone to Italy – and they ALL recommend the advice to skip the larger luggage and stick with one carry-on and personal item. (For your personal item – I love this vegan leather anti-theft backpack and carry it with me everywhere I sightsee!)
We went in summer so packing everything into one carry-on each was a lot easier than packing for let’s just say, Iceland.
In my carry-on:
- A white linen dress (I’m laughing cause I ended up wearing this nearly EVERYDAY, it was the only thing that felt breezy and comfortable yet still looked timeless/classy while in the hot sun)
- Four linen shorts
- four tank tops
- a button up top
- A couple gowns for at night – TBH I packed a few colorful frilly dresses that I didn’t end up wearing because it was so stupidly hot & annoying in August. If you do pack evening dresses, choose something breezy and timeless that you’ll actually want to wear in the moment. And maybe stick to just one “for show” dress so they don’t overtake your suitcase!
- Sunglasses
- Born sandals (or any pair of sandals that look nice but can still walk in them all day. The Born sandals I wore were pillows for my feet & so amazing in every way, but sadly aren’t available anymore! These are similar, but I’m also eyeing up these for my next Italy trip this summer?)
- A pair of strappy heels (for fancier dinners – or for the pictures ;))
- Pair of white sneakers (for those heavy walking days)
- Two swimsuits
- Undergarments
- A couple laundry detergent sheets (for when you need a refresh!)
- Curling iron – that I don’t even think I used haha
- Makeup – minimal, small bag of essentials + travel toothbrushes, travel deodorant, body wash & face lotion
- Water bottle
In my personal item (the anti-theft bag linked above):
- Camera gear
- Phone chargers
- Ear plugs for on the plane
- 2 european plug adaptors
- Car charging port (we would be renting a car)
- AAA International License (if you’ll be driving/renting a car)
- Passport
- Travel/Pocket Wifi
Other:
To save room, we did not bring items we could easily purchase there, such as SPF/body lotion. I also did not bring my hairbrush but instead made do with a fold down comb. We used free shampoo/conditioner/soap from hotels (but I recommend having some sani-wipes or hand sanitizer for public transportation). We did also strap a neck pillow to our bag for our overnight flight although it did not help much and we are so terrible at sleeping on planes.

Final Notes before Getting Started
Book Regional Trains & Ferries in advance: While it is totally okay to save the inner-city transportation like buses, taxis, for while you’re actually traveling, it was a huge peace-of-mind having all of our major connecting transports between regions booked in advance. Anything too far to technically “walk it”, we booked in advance. It’s also nice to see what the schedule is before booking your daily activities, as you may only find an afternoon connection available.
- For trains, we mainly used the FRECCE trains through Trenitalia
- For our ferry from Naples to Amalfi Coast, we went through a third-party FerryHopper and boarded an “NLG Jet” (but any of the other main ferry brands will also do). We also booked a ferry between the different Amalfi Coast towns through TraVelMar.
Book Popular Restaurants & Activities in advance as well:
- Restaurants: As you know, Italians love to eat! And tourists also love to eat! Because many restaurants close around 2:30 and don’t open up again until 7:00pm, it’s important to plan your meals and schedules accordingly so you’re not left with “sorry, we have no availability” everywhere.
We found lunch to be the most challenging time of day to find an opening without reservations since the restaurants are only open for a couple hours (and everyone wants to make sure they fill their bellies before having to wait again until 7:00 dinner!). Europeans also have longer lunch breaks, so they are able to sit and relax longer, making table turnover not so great. Always remember that everything is on European time that we Americans are not used to lol! So if you desire to sit down and rest a bit do make reservations each day of your trip for lunch (or, plan on eating plenty of gelato & sandwiches as you walk!) Although you won’t likely make it to all your reservations perfectly according to plan, it’s nice to have an option in place to fall back on once your hunger brain starts to set in. - Tourist Activities: Definitely book popular tourist activities like Sistine Chapel/Vatican, Uffizi Gallery, Accademia Gallery, etc in advance through their actual website, Viator, or GetYourGuide to receive “Skip the Line” priority (unless you want to spend 2-3 hours in line). But do be aware, there is still a tiny bit of a line (due to everyone else also buying “skip the line” tickets haha).
- Excursions or Beach Clubs: One of the best ways to see the coast is on the actual water. If booking a boat trip (or beach day) of any kind, and if you have more than one full day in the area, always book it for the *first* full day of your stay. That way, in case of bad weather, it can be rescheduled (hopefully free of charge) or you can receive a voucher to use within the week. That way you’ll still have time leftover in your stay to actually be able to reschedule it. We made the mistake of booking our private boat on the Amalfi Coast through Viator for our final day and the weather turned out to be really windy and choppy. We would have loved to reschedule, but unfortunately for us we waited until the last day so it was then or never! It was so beautiful the seasickness was still worth it 🙂
Consider the off-season: While we could have waited until the following April, we decided we didn’t want to prolong our travel goals any longer after already having lost some time due to COVID, so we used the only consecutive off-weekends available in August for an end-of-august into September trip. From Aug 22-Sep 6 to be exact.
We knew going in that August would be rough, since this is when Europeans have the entire month off. But we were hoping it would have settled down by end of August as teenagers/young adults/families get back in the School schedule. EEEP! We were still battling so many crowds. Mainly the popular tourist hotspots like Venice and Florence and trending coastal towns (that aren’t meant for big crowds) like Cinque Terre and Amalfi Coast. There is so much room in the hills of Tuscany to spread out, that we didn’t feel the effects there. But definitely prepare yourself if hitting up cities and the coast, and consider waking up early to enjoy the day before the crowds!
This time, we will be going end of September into October, and after speaking with a few family/friends who went this exact time last year, the weather was still very hot (and swimmable) so I’m hoping we’ll get that nice weather with a little less crowds. But when in doubt, end of October-April is always a safe bet!
Whatsapp: I HIGHLY recommend downloading Whatsapp in advance and learn how to use it, as a lot of Italians / Airbnb or excursion hosts use this to communicate. We noticed this especially in the Amalfi Coast.
Cash on hand: While it’s not super necessary to have a TON of cash, it is important to have if staying at places like AIRBNBs that require a tourist tax up front (usually just 5 euro or less per person for the entire stay). It is also nice to have if you want to tip a waitstaff who went above and beyond (although not necessary to tip in Italy), or for a taxi driver, or if someone offers you limoncello shots on a ferry, and you think they are free when in fact they are not. It’s nice to have a little cash!
Language: Because this trip was planned only a couple months in advance, we regretfully didn’t have much time during our busy summer schedules to learn much of the language. I STRONGLY advise learning more of the basics than we did (like mainly restaurant lingo would have come in handy). While we did manage to survive with only knowing the basics like hello (“Buongiorno”), and thank you (“Grazie”), knowing a littttttle more would have made our trip more enjoyable and competent. Lowkey still a little scarred from attempting to order our first meal, coming off of an overnight flight on 27 hours no sleep, in a very local/authentic tiny town of Pienza. Literally just trying to just order a table for two and some water HAHA but instead resorting to a lot of sign language and puzzled looks. This is where our journey begins!
PART 1: Tuscany

PIENZA
After arriving in Rome, we immediately set off in our rental car for our Tuscan Airbnb in Pienza / Val d’Orcia region. Val D’Orcia is likely the area you imagine when you think of Tuscany, with all its picturesque rows of cypress trees, rolling hills, and various wineries and villas perched on the tops of them. We decided to skip Rome, assuming we’d be far too tired after the long overnight flight and no sleep to actually enjoy all that a big city involves. So we planned to hit it at the very end, just before our way home (Spoiler: this never happened, due to getting violently ill. We joke that I may be the only person ever to fly in and out of Rome without actually seeing the Colosseum, or any of it for that matter!)
I’m not sure if starting small –> large was a good or bad decision!?!? Good in the sense that Pienza was a much calmer environment for our tired minds. Bad in the sense that it’s authenticity and small town charm required much more language skills. Turns out our travel WIFI had not yet begun working yet?? Our rental car had some old school navigation system so we were able to find our way in the direction of Pienza. But once in Pienza, we wandered around rather aimlessly, without WIFI to look up information on things like: when the restaurant is open/closed and what kind of food it offers, how do you say “table for two,” and order a glass of water. What does this entire menu mean haha. We couldn’t even look up the directions to our Airbnb – major oops. Luckily, I had the address screenshotted in advance, I recommend saving important addresses somewhere on your phone in case you get disconnected from signal!
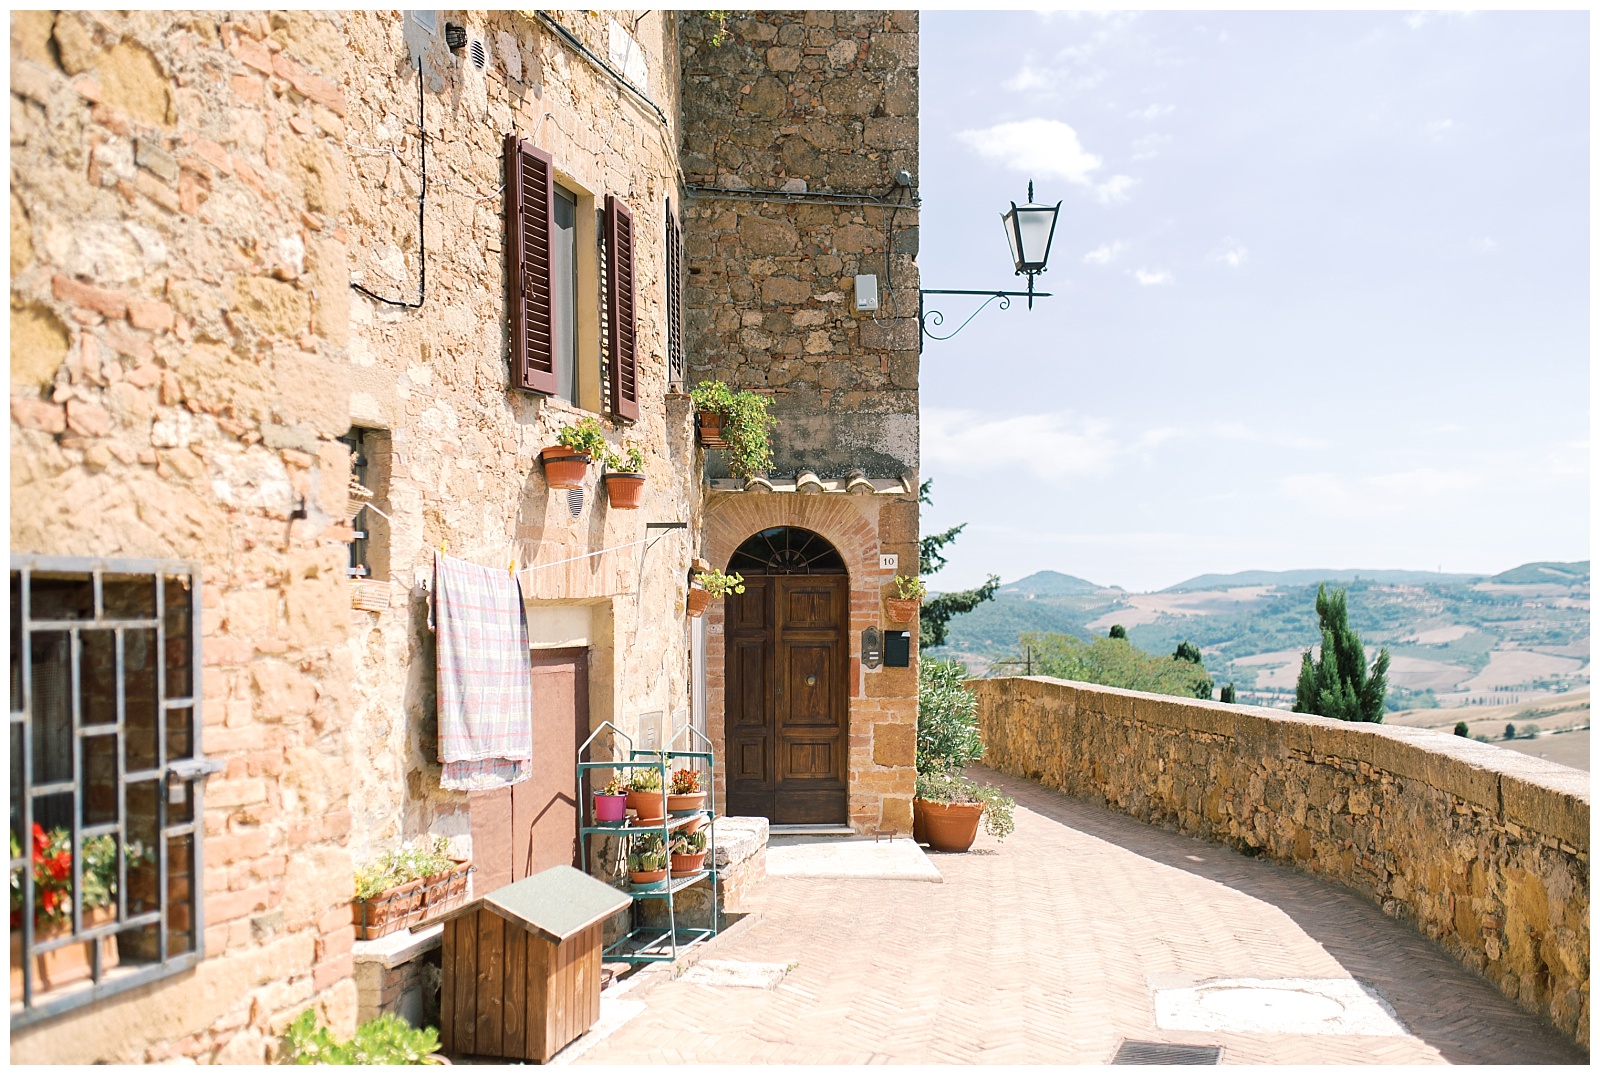


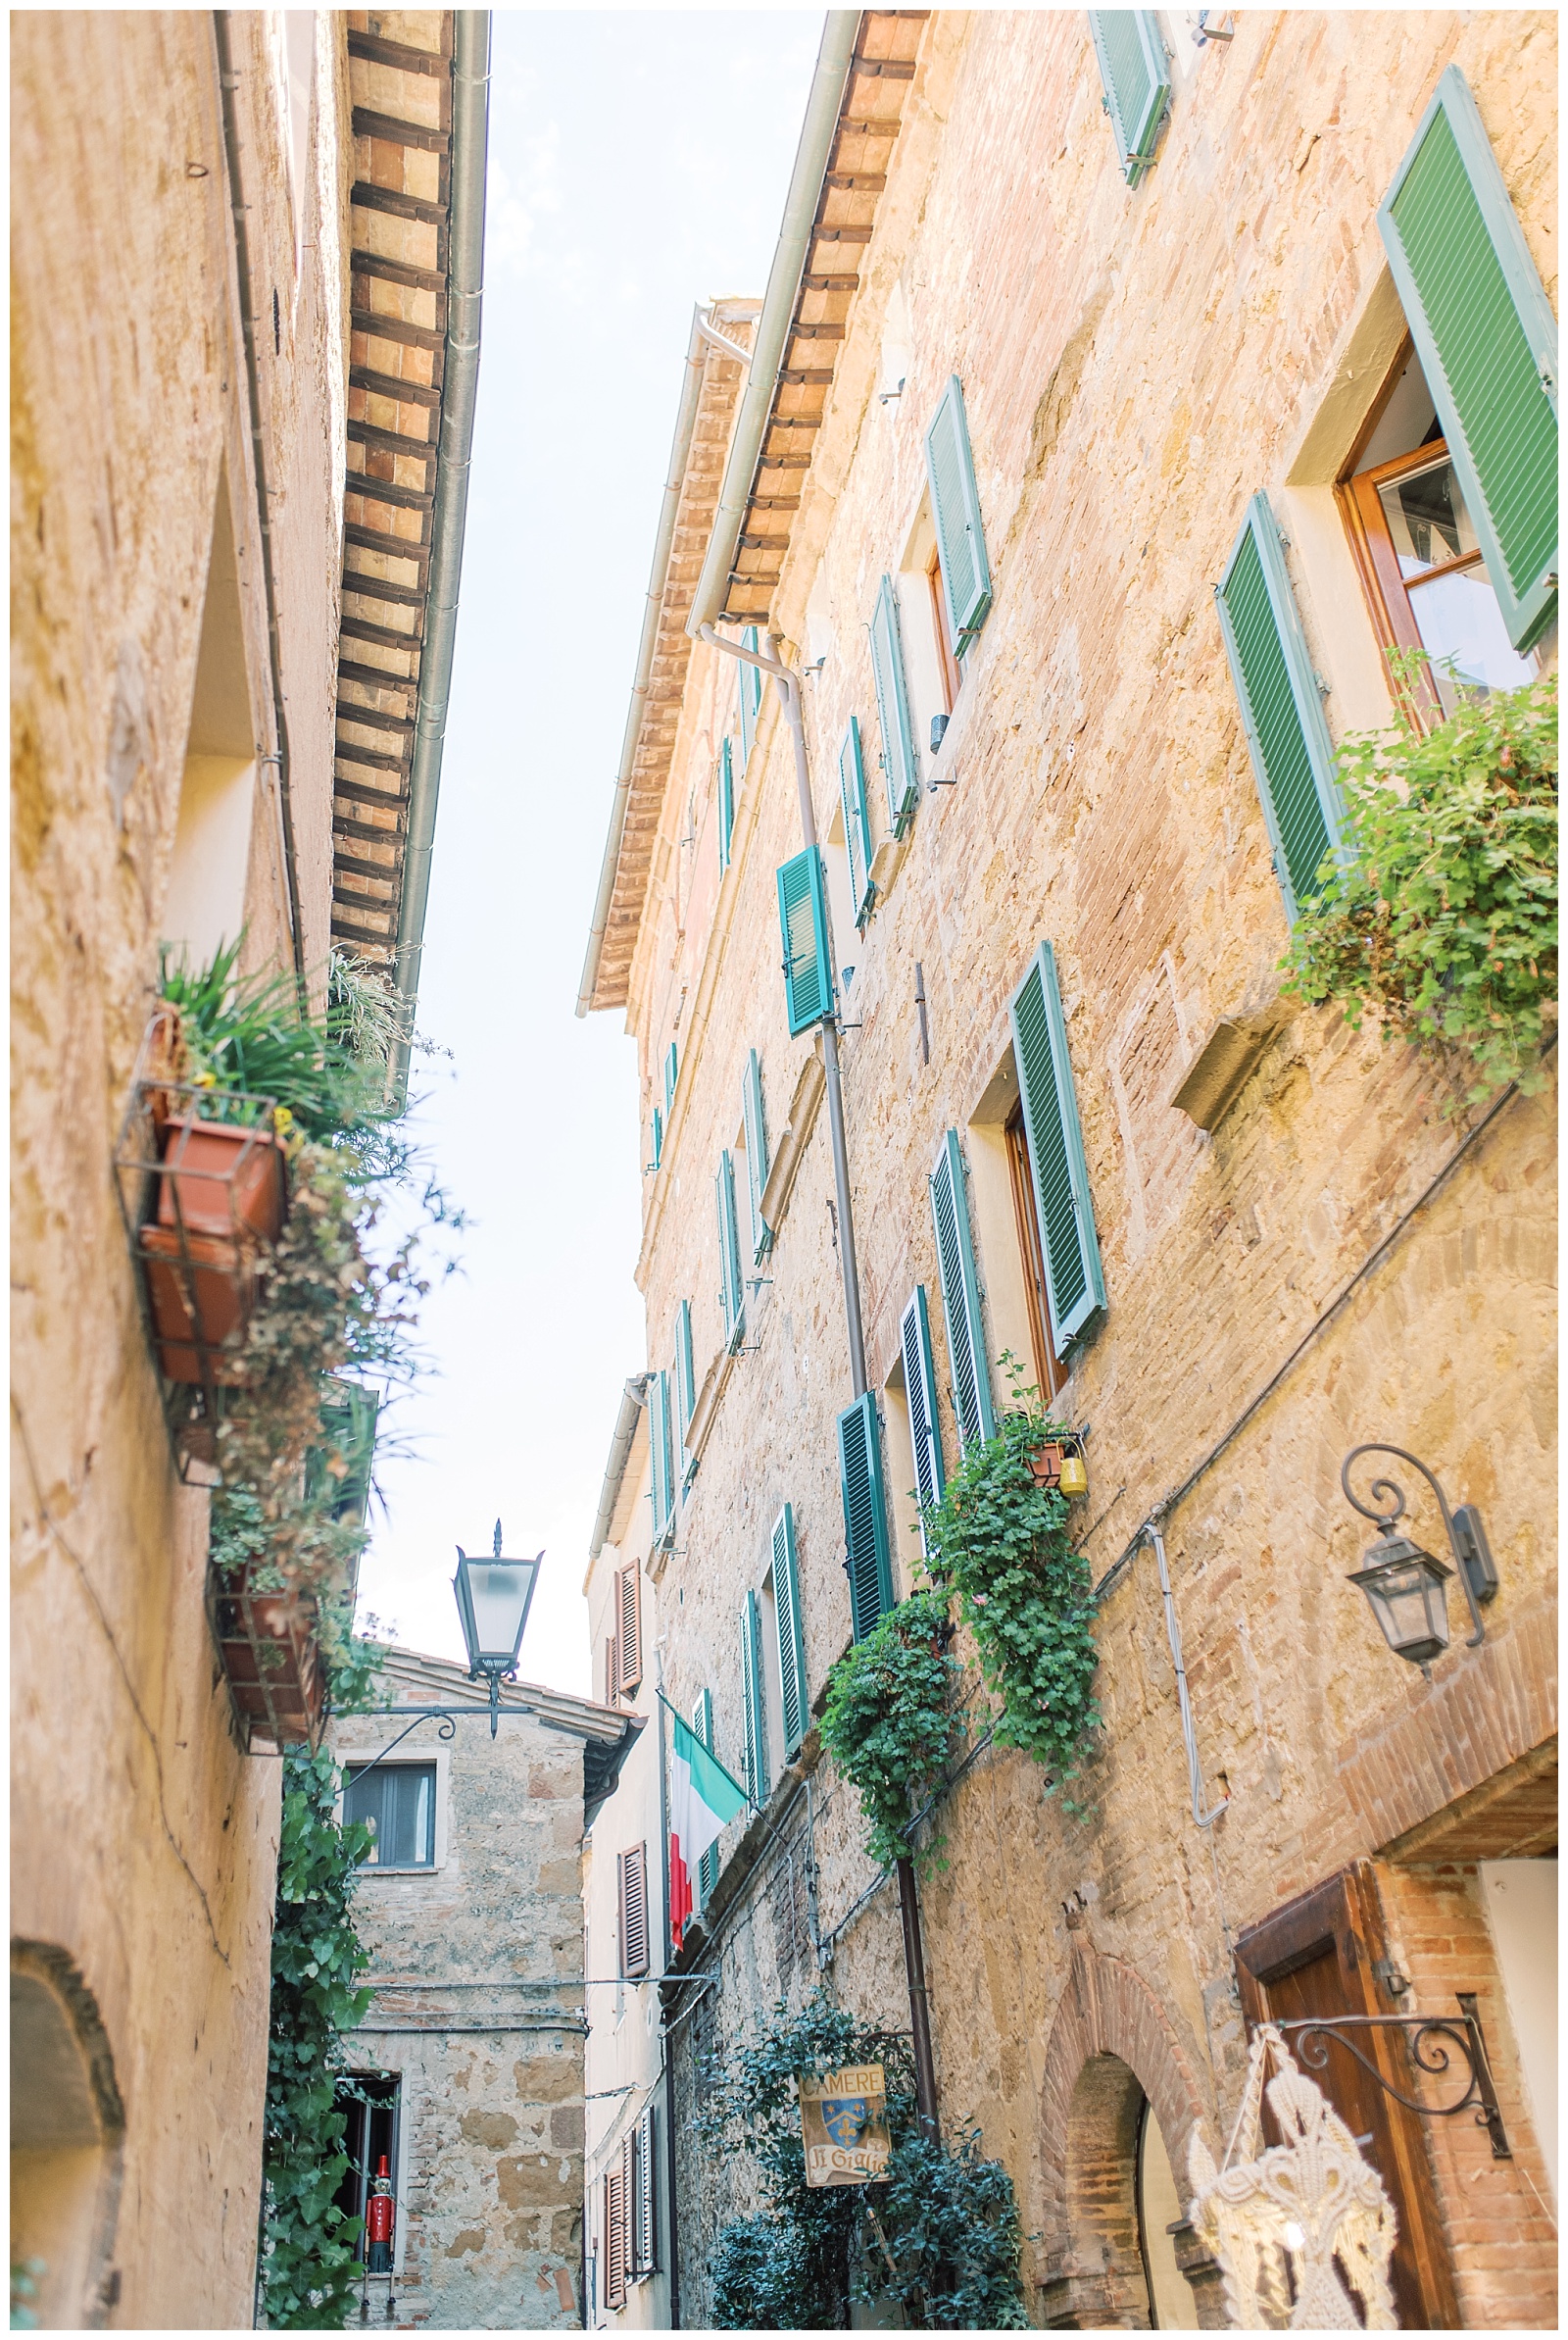


Our favorite memory: waking up at sunrise the next morning to catch this view of Belvedere all to ourselves (photo spot= Belvedere – SP146, bivio Alteta 52, 53027 San Quirico d’Orcia SI, Italy) **Also yes, their addresses are confusingly worded lol but just copy/paste to google maps and it should pull right up 🙂
Other tip: Don’t drive your rental car straight to your Airbnb address (if it’s in the city center LOL). The roads (can I even call it that??) became so narrow I thought our car wouldn’t fit through and our mirrors would hit the sides lol. Definitely park outside the city center, and walk. (Also, to avoid a $65 fine mailed to you several months later 🙂 Memories & laughs were kind of worth it though??) In other words, we did all the typical stupid American tourist mistakes. I am blaming us going on 27 hours no sleep for our carelessness and confusion lol.

SIENA
Situated an hour south of Florence, this medieval town with it’s charming main square is not to be missed! I now think of Siena as a mini version of Florence. Coming from the smaller town of Pienza, and not yet hitting Rome or Florence, this was our first time seeing Italian renaissance art and architecture and it felt like the perfect, approachable Italian town. I’d say if Florence seems a bit too big city, Siena will be much more your pace. It will still give you a similar experience in terms of Italian renaissance art and architecture, and a GORGEOUS square, just without everything that comes with a big city!


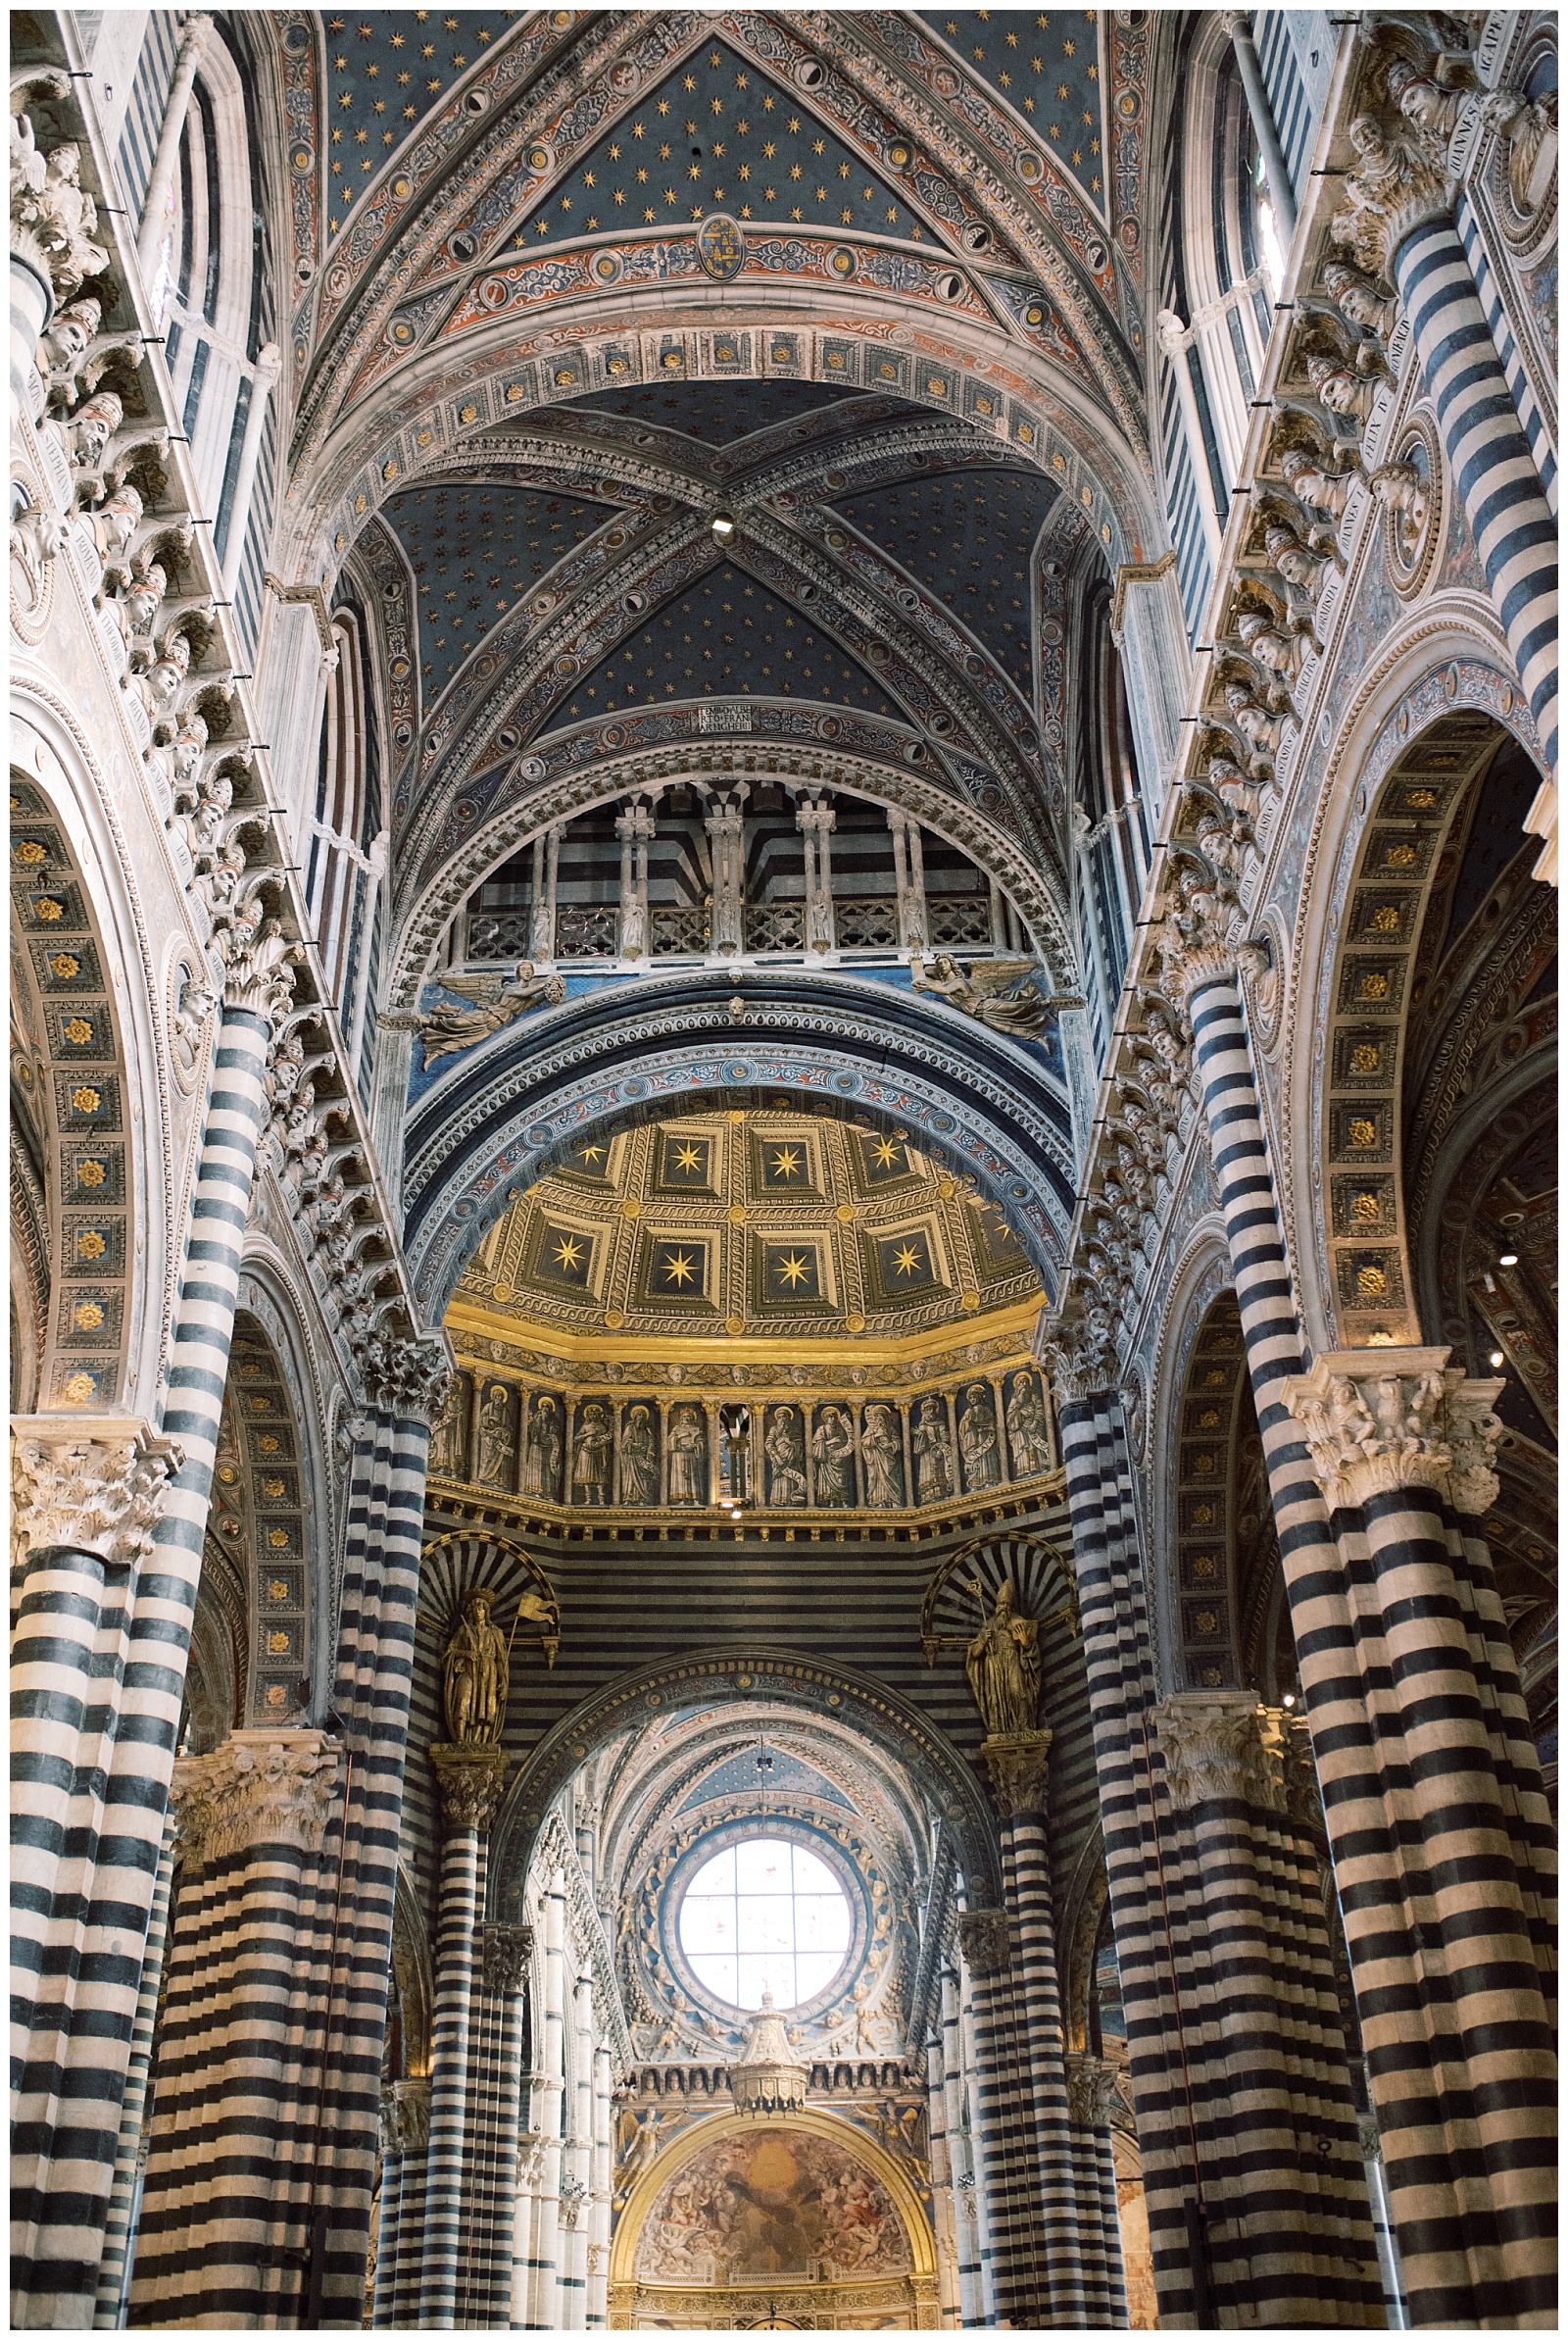


I highly recommend getting to the main square early and going inside the Duomo di Siena and getting access to the museums (do make sure you cover up or you’ll be given a lovely white toilet paper cover up thinger like me haha). Coming from Pienza it was our first actual “city-like” experience, and it was all the more charming because we arrived before 9am and before the world really woke up. We marveled at the duomo exterior before the lines formed, and went inside which was even more fascinating. Perhaps if you went to Florence first, it would be “a lot of the same” but since this was our first ever art/architecture experience we thoroughly enjoyed this experience!
The streets surrounding the main Piazza del Campo became lively as the day went on. Sooo many different shops and restaurants, I would need a week to explore it fully and give actual recommendations! However, the best pasta I had was in Siena, right on the square. Pecorino cheese is local to this region, and if you can find Cacio e Pepe (Pasta, black pepper, and Pecorino Romano) on a menu, definitely try it in this region as it will be the freshest!! PS: they also do a horse race here twice a year so make sure to look into those dates if you want to avoid (or see) that!


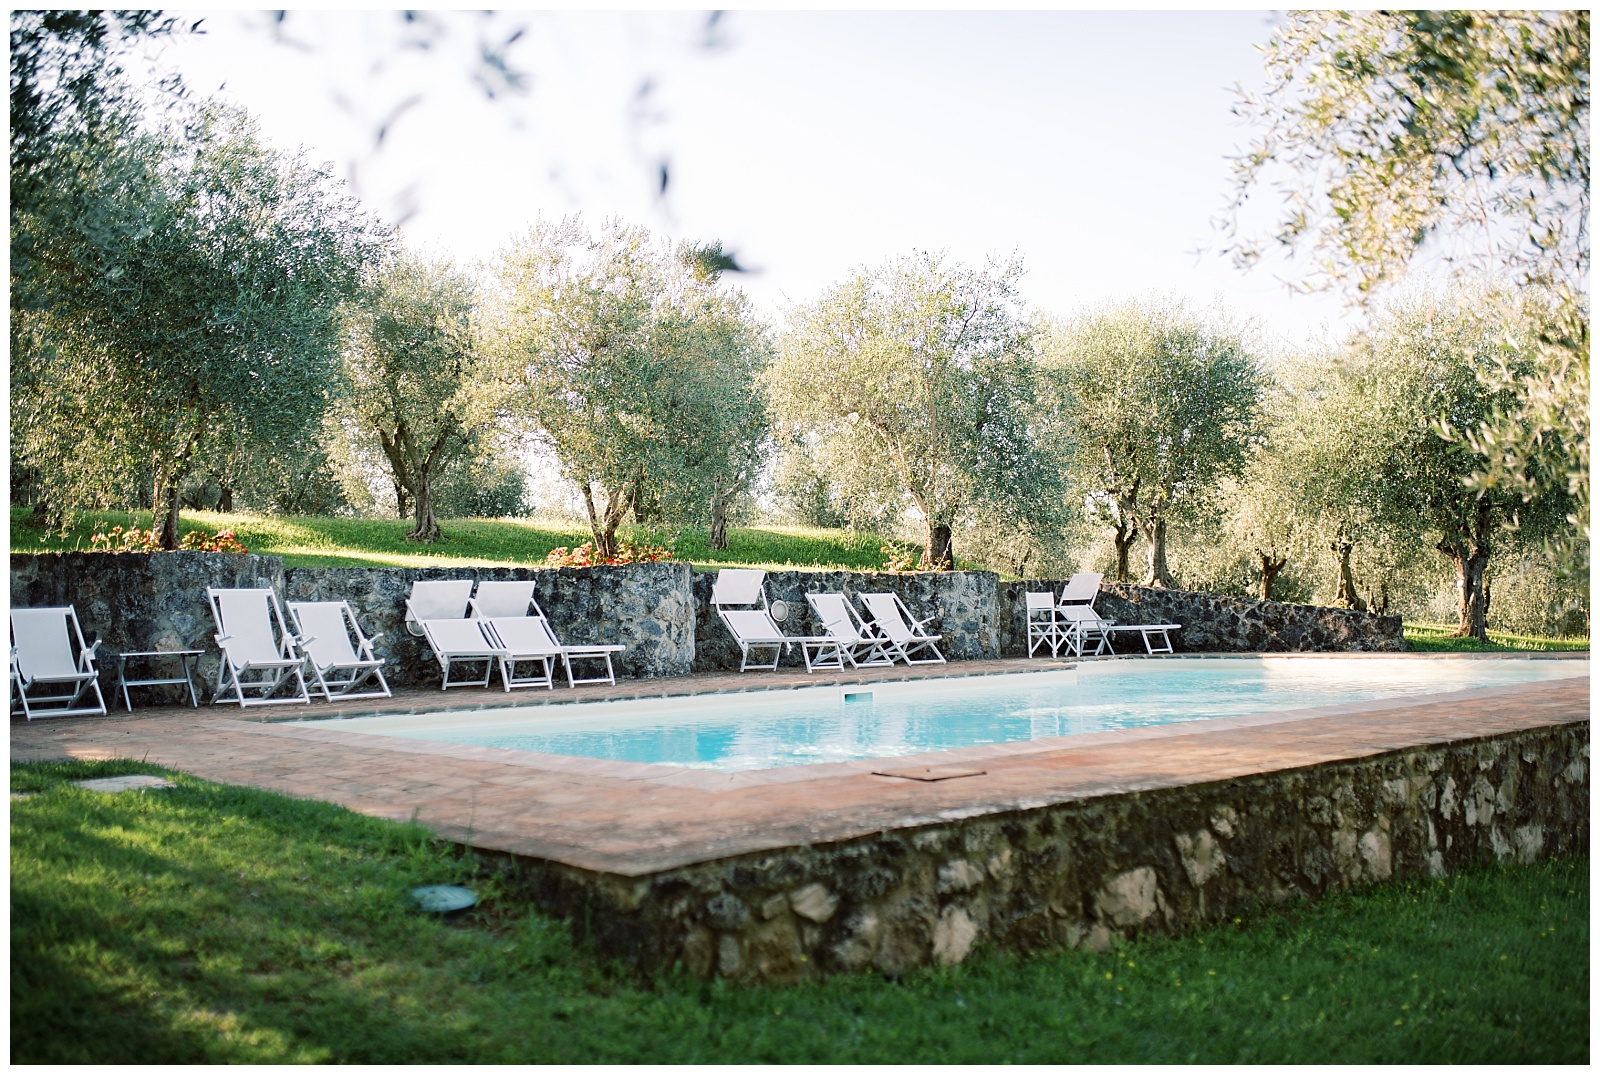


One thing that was high on my list for Tuscany was to find a quiet respite in an olive grove, preferably with a pool to soak in after a hot day of wandering. Luckily, there are TONS of villas/airbnbs to choose from. Seriously. Even with our last minute trip planning, it took many days just to decide on one. I found this Airbnb in the olive groves to be rather charming and so we stationed here for the next two days, while we enjoyed the town of Siena (an absolute favorite!!), and our pasta cooking class which turned out to be so so precious.
Tourist tax: It is normal for airbnb hosts to ask for your passport at check-in. Many times they will also need to take a photo, or have you scan a photo to send them. While it may seem a bit scammy at first (we were very hesitant, until I googled it lol), this is actually totally normal practice for them and has to do with collecting and paying tourist tax, and having to report any and all guests for tax purposes. Each stay also incurs a small tax (typically under 5 euro/pp), so do make sure to have a couple of small bills with you.


Pasta Cooking Class: One of our standout memories in Tuscany was a recommended Pasta cooking class. However this was not just your average cooking class within a back room of a restaurant or kitchen. This was an immersive afternoon experience, taking you into the fields to forage your herbs from the garden set in the beautiful countryside. After gathering the goods, we learned how to roll our own pasta in this authentic 1600s villa, then ate our (delicious) meal together and drank all the prosecco on the patio, cheered to our first limoncello shot, all in the company of a small group.
Together our group covered almost the entire USA, geographically speaking. Mother/daughter. Friends. Couples. Careers ranging from celebrity chefs to plastic surgeons haha. Everyone was so interesting and it was nice to break up our couple’s trip with some other human interaction (in English!) and comparing notes on each of our Italian adventures so far. Highly highly recommend the pasta cooking class by Lucrezia in this 1600’s villa. You can also choose the dinner version that includes an opera singer (say what?) which I will be trying out next time. (Shoutout to my photographer friend Kim for recommending this experience to me!)
SAN GIMIGNANO
Okay, San Gimignano just hits a little different. Highly highly recommend spending at least a half day in this old-world UNESCO World Heritage town perched on a hill of surrounding vineyards with famous gelato. I’ll save you the history lesson (google it – so fascinating!), but glancing up at the different towers you can’t help but imagine life years ago when families would actually compete to build the highest tower. Driving through the hills on a summer day, you’ll see the hazy skyline emerge in the distance and it makes it all the more whimsical knowing they are ancient towers that were built hundreds of years ago, as opposed to your modern-day skyscrapers.


As you walk the streets into the heart of the main piazzas, definitely check out these spots:
- Piazza del Duomo (square with cafes & a historic church)
- We stayed RIGHT on the Piazza, with views looking down at the square. This was probably my favorite airbnb to date. Loved drinking wine in our room at night and glancing down at the terrace dwellers below, the town beginning to glow from street lamps and restaurants. Then walking a few steps down to join them. So romantic. It was so neat in fact, that Alex wouldn’t come to bed, and I have actual video footage him walking around the square at night just taking it all in.
- Piazza della Cisterna (grand square with a historic cistern/fountain)
- Gelateria Dondoli (world renown gelato – a muuuuust)
- This was my FIRST experience with gelato in Italy, and now I’m forever ruined
- I believe I ordered the vanilla with saffron and pine nuts flavor by recommendation
- Gelateria Dondoli (world renown gelato – a muuuuust)
- Via S. Matteo
- This street in particular I remember being a nice nearby market street with different linen shops and galleries and pottery stores, as well as wine and cheese shops and convenient stores if you’re in need of something to stock your nearby hotel room. But I’m sure there’s more streets we didn’t get to!
- Restaurants
- My personal advice for San Gimignano (and Italy in general) would be to either look up an amazing restaurant and make a well-in-advance reservation (if you’re a foodie), orrr if your vibe for the day is more about ambiance and wanting to enjoy the people watching, find a restaurant in one of the piazzas and watch it turn into night.
- Because it is a popular tourist town, it is recommended to make dinner reservations at well sought after spots a month or more in advance (I know, crazy). And definitely within the week for any others. Alex and I were a little more go with the flow this trip on restaurant reservations and planning, so we didn’t have many lined up and probably missed a lot of amazing meals nearby. Buuut, it’s Italy. CAN you *actually* go wrong here haha. When in doubt, pizza.
FLORENCE
Because we (unintentionally) skipped Rome, I am so happy we got to experience at least a day in Florence. I have heard from a lot of people that Rome is a bit overwhelming (in size, layout), and underwhelming (in terms of overall vibe), but Florence is really the gem of the larger Italian cities. I have nothing to compare it to, so I really can’t speak on Rome (and I so so hope it’s not as underwhelming as people say!) But after spending only one night in Florence I can absolutely say I loved this city and can’t wait to go back and experience it more.


I will never forget our first time walking around the area from our hotel, and seeing the massive Cathedral of Santa Maria del Fiore peeping ahead of us on the narrow street. Seeing pictures just isn’t enough, the architecture here was just SO impressive.
We stayed just one night at Grand Hotel Cavour and I highly recommend this 4 star hotel for their rooftop bar views over Florence and the Duomo, clean rooms, a great brunch, in an excellent heart-of-city location. We took one of the nicest (and necessary) naps here upon check-in, also their bathrooms are huuuuge. Elegantly styled and spacious. Will actually be staying here two nights on our next girls trip I loved it so much.
My favorite memory was crossing the bridge over to Piazzale Michelangelo for sunset (get here early to snag a bistro table and chairs up top. Warning it gets VERY VERY crowded with selfie takers lol). Followed by a romantic stroll at dusk through the Piazza della Signoria where we admired the Fountain of Neptune and watched the flag dancers parade to the beat of a brass band ensemble. Lastly, a night cap and aperitivo on our hotel rooftop. Ahh just the loveliest! Are we turning into city people finally?
One regret: We made the mistake of thinking the Statue of David (located inside the Accademia Gallery) was the iconic museum everyone told us we had to see. We were wandering around the David museum wondering where everything else was (LOL oh goodness). Until finally we realized Statue of David is totally separate from the world renown museum, which we learned is called the Uffizi Gallery. Anyways, I recommend doing both Accademia & Uffizi in the same day (Accademia being a quick side stop), and get your tickets well in advance of course 🙂 I will definitely be seeing all that was missed on my September return to Florence!
Part 2: Dolomites
As we said goodbye to the charming hills and towns of Tuscany, I was kind of sad to be leaving it already, but excited to see our long-awaited destination of the Dolomites.
The Dolomites (Italian Alps in northern part of Italy known for its jagged peaks), was actually the reason we put Italy at the top of our travel list. As a photographer, and mountain lover, I just couldn’t not go see this majestic landscape with my own eyes. It was a relatively under-the-radar location, typically you don’t think of this region on your first trip to Italy. But I was determined to make it work in our itinerary, so we carved out time to take a little drive up into the mountains for a few days, exploring various popular hiking towns. Venice was also on this route (just down from the mountains), and so we were able to check off one more bucket-list by venturing out this way.
ALPE DI SIUSI / SEISER ALM


The day of arrival was actually our 7 year Anniversary, and I don’t think I could have picked a more magical (and bougie) mountain setting for us. This entire town felt like it was made for two kinds of people: elite hikers/photographers/travel bloggers – the ones that have all the know on hiking gear and luxury brands. And the elite “non-hikers” lol (people who booked a secluded getaway through a travel advisor that recommended stationing them in this remotely beautiful location and probably arrived via private jet since virtually nothing else is around lol).
It was incredible. It felt….too beautiful to exist. No crowds or sounds of people. Modern fancy hotels and infinity pools dotted the area, but in a way that still blended into the landscape and Austro/Hungarian architecture. Views of mountains everywhere you looked. Italian cows and rolling hills and little shacks in the distance (some of which you can Airbnb). It was just SO DANG PERFECT.
We stayed at Hotel Rosa Eco Alpine Spa and it was hands down my favorite stay while in the Dolomites. That pool, all to ourselves. Just magic. There’s also an indoor pool and many other spa perks that I didn’t get to enjoy do to our limited time there 🙂 Lastly the five course meal (included in hotel room price). Somehow the best meal I may have ever had in Italy despite being nowhere near anything. It was perfection.
The next morning we woke up for sunrise to get some beautiful shots of the surrounding scenery. Just past a very small village called Compaccio (Compatsch), you will start to see the little shack community and this incredible picture-perfect view of various cabins situated in the foreground of the mountains. I do agree with other photo enthusiasts that it is a landscape photographers playground! The road to access this main viewpoint is only open to the public from 5-9 (hence the hiking). If you want to arrive at sunrise, or before 5, you’ll have to park in Compatsch and hike it (or get an expensive fine!) Or rent a hotel in this specific area, as the roads stay open to those that are hotel guests.
When we arrived for sunset, there was only one other photographer doing the same, which in August, I found to be super surprising since we were in one of the most picturesque locations in all the Dolomites! We did have a bit of cloud coverage so perhaps the other photographers slept in – something Alex would have loved to have done! 🙂
ORTISEI


We chose this town next for it’s location to Seceda (the epic location I saw that first brought my attention to the Dolomites, a peak featuring a grassy green plateau that jets out towards the sky (if you’re lucky you will get the perfect amount of cloud immersion so it looks like the “ends of the earth” or heaven, or both)! In order to get to Seceda, you have to take a very vertical gondola up (or hike it, which unless you’re a serious hiker I would not recommend haha). It was a pretty penny to make the round trip up, I want to say $70 for the both of us. And the last trip up departed at 4:00 or so (which I didn’t realize so soon, as I had planned to go up for sunset photos)! It was approaching 4:00, and I saw the weather forecast would be iffy during our entire stay, but it looked like we might get a little break in the sky if we went NOW. So up we went!
By the time we got up there (probably 20 minutes later), the clouds were now way more extreme than they looked down below. I worried we missed our window. Sure enough, nearly a minute later, dense rain clouds came in and we became entirely soaked within seconds and no end in sight. But I – Meghan – crazy photographer – having come all this way to Italy, rented a car up the mountains including this scary cable car just to see this vantage point had to wait it out. So while Alex hung back by the shelter to stay more dry (like a normal person), I like a crazy person ventured out to wait my perfect photo moment. In a white dress. WHY was I wearing this white dress ?? Please someone explain my thought process? I figured I wasn’t doing any hiking so no need to wear workout gear. Instead I’ll look cute for some photos with this **epic** scenery. But DEFINITELY no one else wearing dresses here and I officially felt like those “influencer in the wild” girls we roll our eyes at. EEEP HAHA. I like to think I’m not quite that bad 🙂
A good thirty or so minutes later, I’m still standing out in the rain. Patiently waiting. By myself. Because I am a photographer and we are psycho. I rarely give up, but I became veryyy close. I actually might have cried in the rain now that I remember and I *do NOT cry easily*! I just felt sooo defeated. I wouldn’t have even minded all the rain, had it not taken the ENTIRETY of the view with it. I debated going down and coming back tomorrow, but saw it would be cloudy and rainy too, and I definitely didn’t want to do this scary expensive gondola ride for a second time only to be met with the same cloud immersions. It had to be now!
I looked back a few times at Alex waving at me and shaking his head near the shelter, I decided to wait one more additional 5 minutes :). It seemed like the sky was getting a little lighter, and the rain lighter too. Alex began walking toward me. And in some sort of miracle, the green hills became more and more illuminated, until finally, the sun broke through and we could see the whole mountain range. It was stunning. It wasn’t the experience I had imagined, spending the day walking alongside the cliffs together, getting the perfect photos all the way up until sunset (we were rather unprepared for this journey up the mountain on short notice time and had no food or water). But at least I could say – I SAW IT. We held onto that moment in the sun for as long as we could (somehow became completely dry again, mountain air does wonders) until the adrenaline wore off, and we realized we were really, really tired and hangry haha.
Back down, the town of Ortisei was super cute and charming and walkable. Way more going on here than the previous isolated town with essentially no restaurants or anything besides hotels. But not QUITE as large (or spread out) out as the final town coming up next. Since most of our time was spent in nature, we didn’t do a ton of town exploration besides food so to be honest, all I remember was amazing pizza and limoncello spritz’s. We stayed at Hotel Digon which was lovely, especially the infinity pool and lawn area with a view of the town and like our previous hotel, the course meal was included in the room price. We would consider staying here again if revisiting Ortisei just for that pool view!
CORTINA D’AMPEZZO


Our final town in the Dolomites, and a great “base” location for many nearby scenic attractions and hikes. I’m not sure if it was our Airbnb that weirded me out (haha – I won’t even link it). Or the weather being unpredictable and mostly rainy, or that it was now approaching day 10 of constant travel. But mentally, I think we both hit a snag!
We still had one more big exploration day to check off in this area, and so we picked the sunniest of the two days, said a little weather prayer, and drove a couple hours over to Tre Cime di Lavaredo. This is a very popular hiking area, and I do recommend getting to the parking lot early because there is limited parking! Luckily, we got one of the last remaining spots (and we even arrived around 9:30am!).
Tip: Many will hike the long route around the three peaks of Tre Cime (linking this very extensively written trailhead article on it here), but few know about this back route called “Cadini Di Misurina” (which I find way cooler, and a great option for those shorter on time and energy, as it’s only 2 miles long!)
HIKE TO THE CADINI DI MISURINA VIEWPOINT


Like Tre Cime, this short hike also starts at Rifugio Auronzo (parking lot address= “Localita’ Forcella Longeres, 32041 Auronzo di Cadore BL, Italy”) . It takes about 90 minutes to complete the out and back trail, and takes you along the edge of the mountain to a stunning viewpoint Cadini di Misurina, an expanse of jagged pinnacles that easily separate itself from the rest of the Dolomites, and even inspired Lord of the Ring’s Gates of Mordor. I am surprised not more people know about this trail, as it is honestly the most impressive mountain view I have ever seen both in images and with my own eyes.
Like the following location in Seceda, we were met with cloud immersion right off the bat. I started to understand this is just the name of the game up here in the mountains, so I had a bit more patience. Sure enough, the clouds broke after we waited about 15 minutes and the view that was once entirely opaque grey showed us what it was hiding.
Unbelievable. There was also no one else around which made it even more special , as everyone else had kept following the trail further for the “main viewpoint” but honestly, we didn’t feel we needed to! Definitely our favorite memory in the Dolomites.


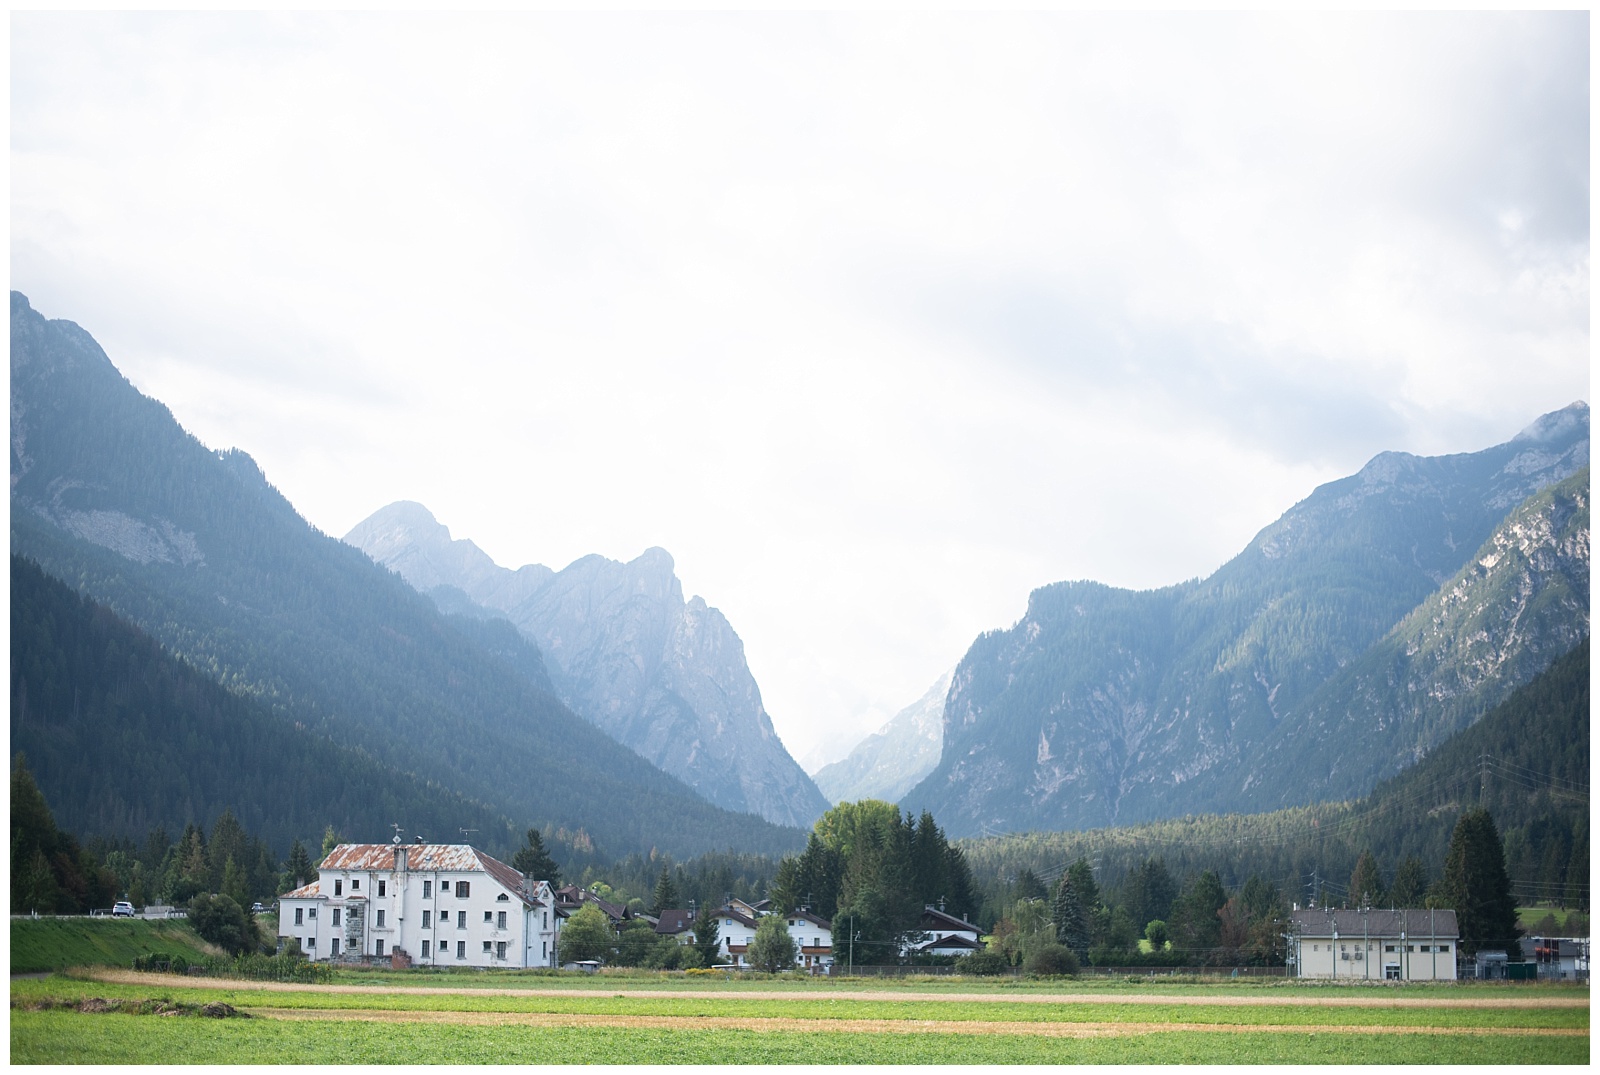
Afterwards, we hit up Lago di Braille which reminded me so much of Banff, Canada with it’s teal waters surrounded by picturesque mountains (again, if you have multiple days, I recommend getting here at sunrise for some clean shots of the lake and the adorable row boats all tied up before the water gets busy). The driving here is very stunning, not scary mountain driving, just nice and peaceful. I loved admiring every windowsill decorated with matching florals and picturing what color I would choose if I lived in such a home!


We had one final day left, so we spent the next rainy day driving around our town looking for some scenic spots, and finding more pizza in town (Alex I swear ate pizza the entire time!)
Our mountain-loving hearts were definitely full, and we were ready to see what was next on our Italian journey!
Part 3: Coastal Towns
Ever since laying my eyes on the colorful stacked hills of the Amalfi Coast, I had only dreamed of one day being able to experience and photograph it. I don’t think you can be a photographer and go to Italy and NOT make your way to the Amalfi Coast. It is just that gorgeous. Even on a cloudy day, it still takes your breath away.
While some say this part has become a little overcrowded with tourists (and it’s definitely true), as someone who finds joy in seeking out the most picturesque of places, to me the crowds just come with the territory and culture! Will you see a few more posing for the gram? Absolutely. But it’s also such a fascinating vibe and you can’t help but wonder, is there a celeb or two at one of those ritzy luxury resorts nearby?
For me, I just felt lucky to have seen and experienced it – and for have taken just a few photos! We decided to add in Cinque Terre as well, as we weren’t really sure which coastal town area we would like better – that or Amalfi Coast. Both offer colorful stacked villages, just on different scales. We figured we would get a small sample of both, and hopefully return again to our favorite of spots.

VENICE
Can you have a first trip to Italy without seeing Venice? We thought not. Luckily it was on the way down the mountains so we decided to drop off our rental car in Venice, give ourselves juuuust enough time to catch a gondola ride, before hitting the train to Cinque Terre. Please don’t come at me, yes I am wearing the white dress again. YES I did wash it… turns out I hated everything else I packed and just really REALLY liked this dress. I was going for daily comfort/looks okay and not thinking how ridiculous this would look as an entire trip portfolio LOLLOL


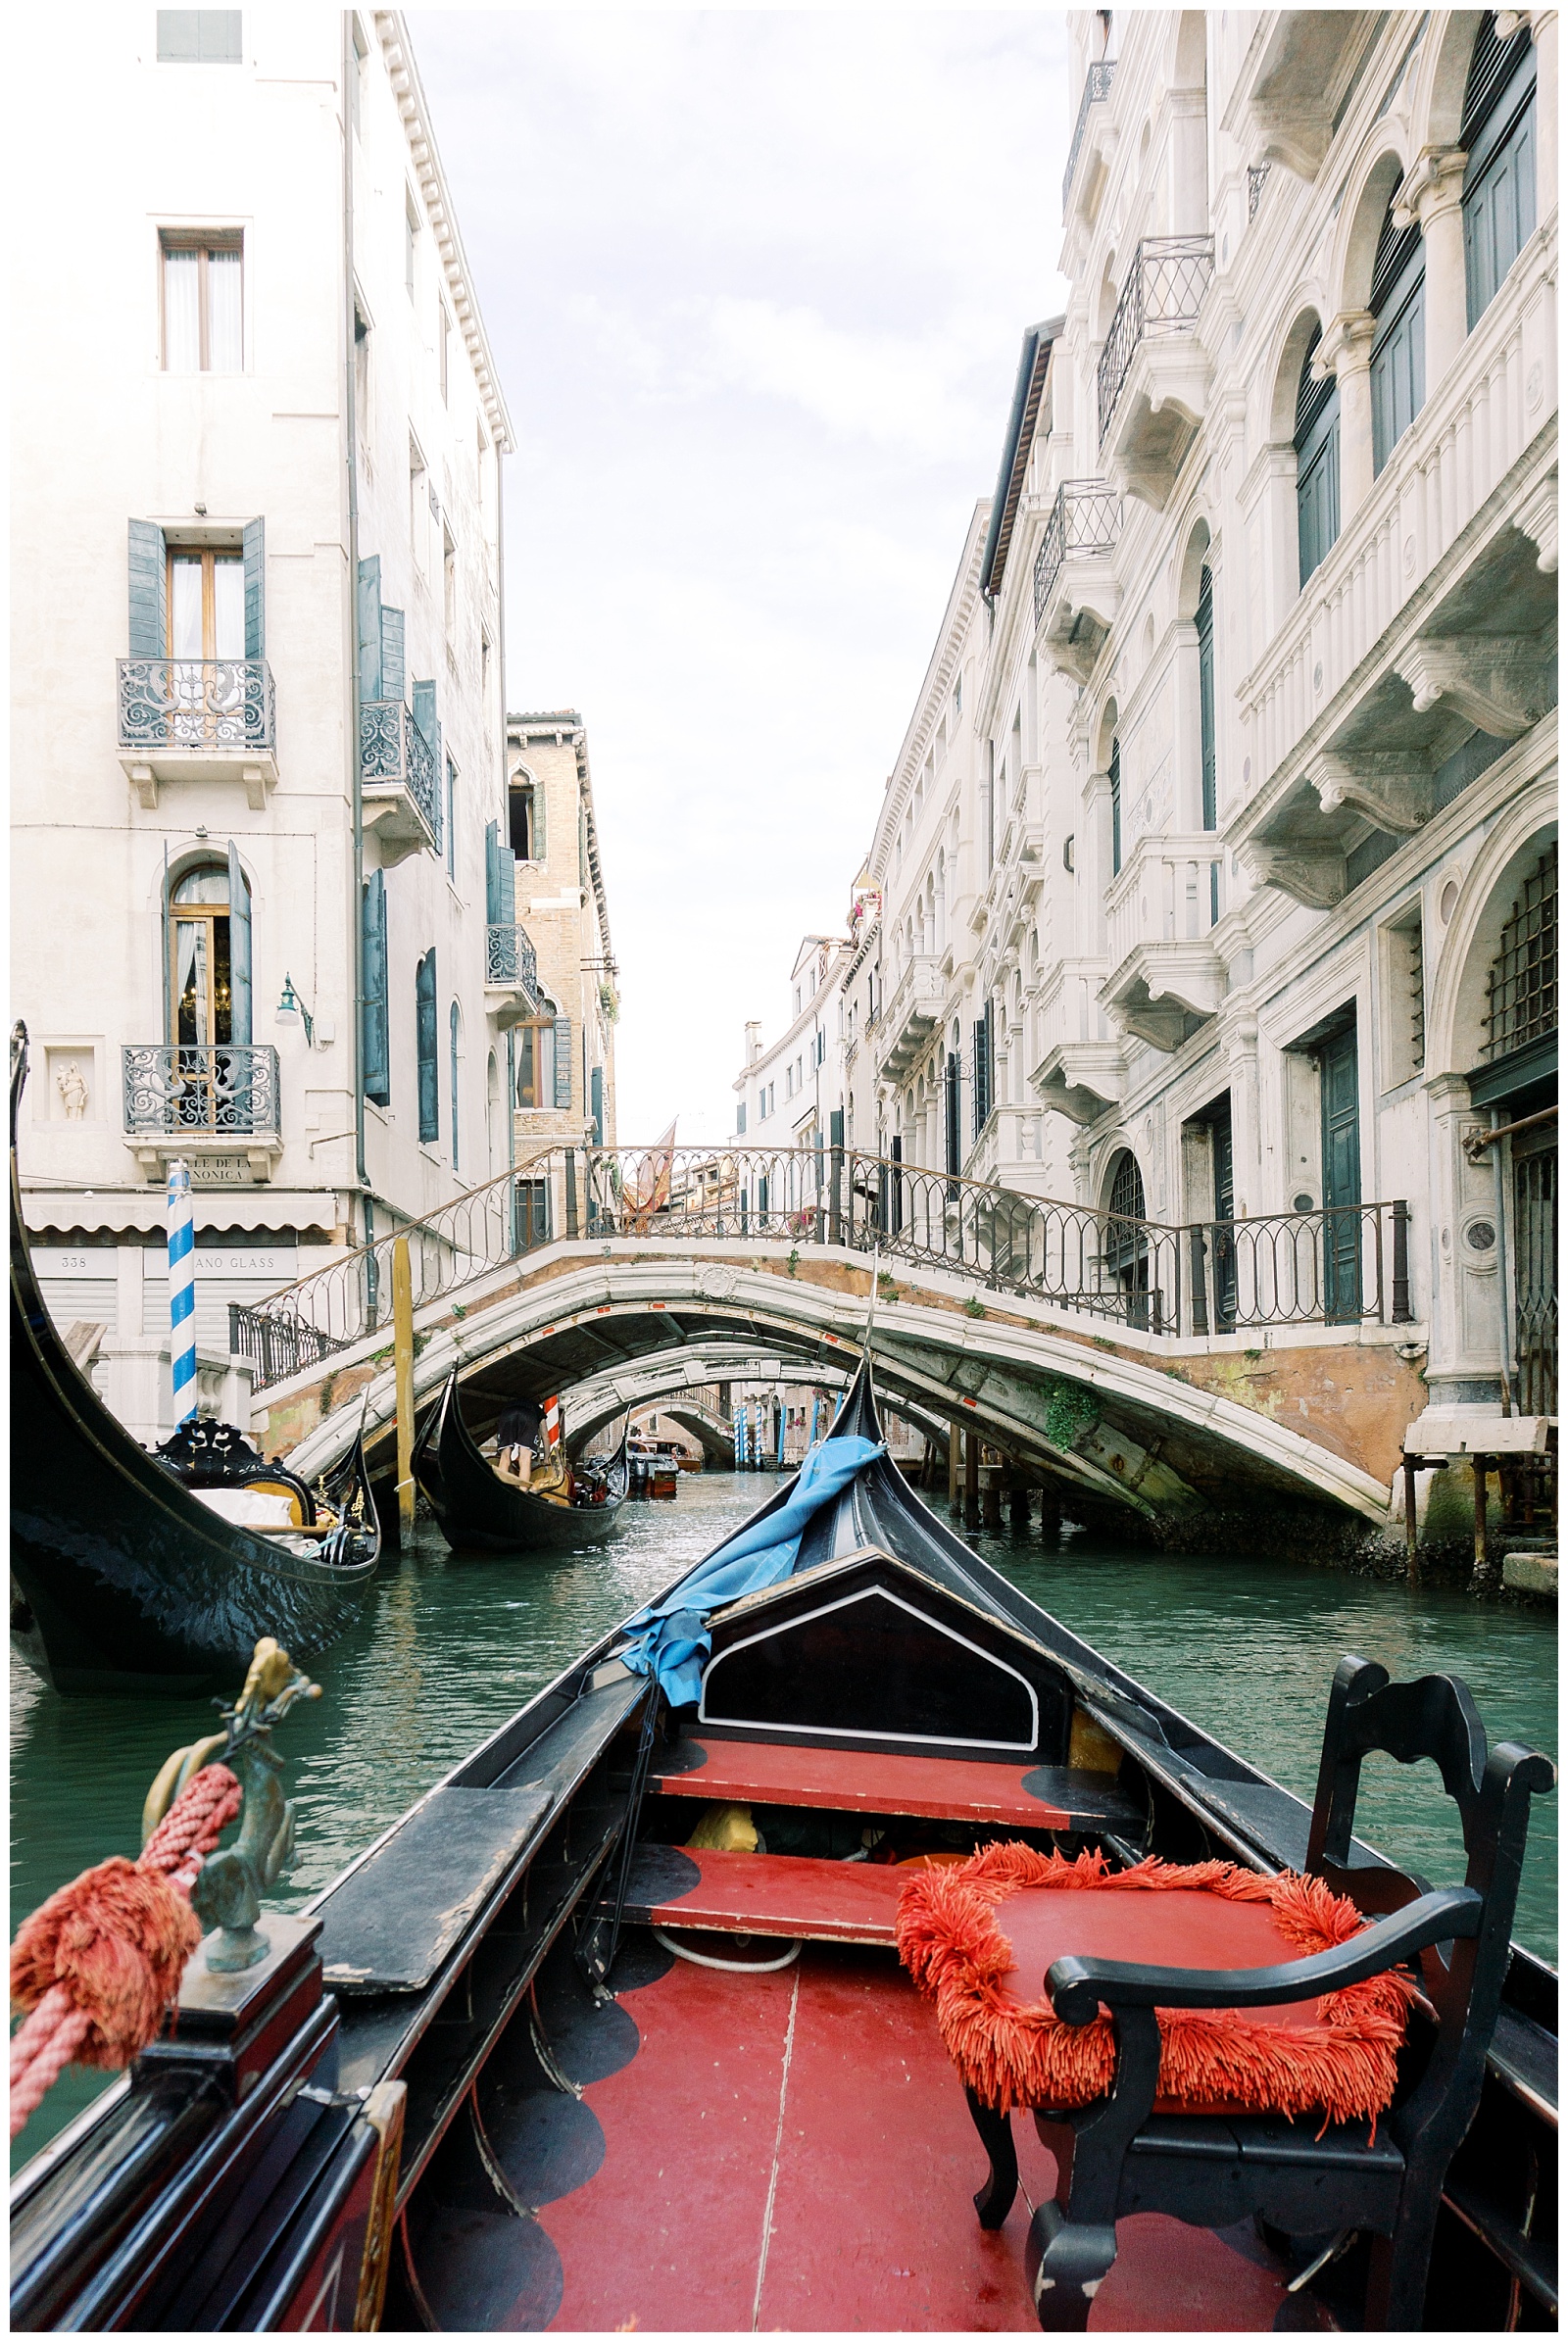


All I remember is weaving our way through the maze of what is Venice, trying to find the quickest way to the gondola port. Taking a quick 30 minute gondola ride through the canals (worth it!), crossing the grand canal and navigating the crazy packed Rialto Bridge area, dodging tourist groups and mazing our way back to the train station. All in 90 minutes time! Whew!
It was a fun little rush, but I definitely wish we had more time to enjoy Venice, in the early mornings or late nights without the crowds (off season would be amazzzzing here). If visiting again, which I hope I do!, I will definitely be looking into a hotel or rental home right on the canals. So dreamy.
CINQUE TERRE

I was very very excited about Cinque Terre. I have heard it’s more off-the beaten path compared to Amalfi Coast, and we always tend to prefer those areas best. In hindsight, I think it’s safe to say the secret is now out, as we saw giant ships dropping off massive loads of people by the hour. Making it sliiiightly more difficult to enjoy the small town vibes and very few available restaurants!
Cinque Terre consists of 5 towns, and from La Spezia you can get on a smaller train that will connect between all towns: Riomaggiore, Manarola, Corniglia, Vernazza, and Monterosso. There is also a hiking trail that connects the towns from above, which we so so wanted to do had it not been so dang hot (and our feet already so exhausted)!
MANAROLA
We chose to stay in Manarola, as I thought it had the prettiest viewpoint and was more of a quieter, family town. Versus the buzzier town of Vernazza, which also grabbed my attention due to it’s picturesque views. Of course our airbnb was all the way at the top, but luckily there was an amazing restaurant nearby for when we didn’t want to make the trek down.
In Manarola, I highly recommend putting in your name at Nessan Dorma, a seaside restaurant along the cliff with the best restaurant view I have ever experienced from the terrace looking over the town and water. We waited nearly two hours in the heat, all for some meat & cheese platters and drinks (get the delicious pink self-titled “Nessan Dorma” drinks which consists of Vodka, Batida de coco, Watermelon puree. smashed lime and brown sugar, Fresh mint. It absolutely hit the spot after a long hot wait). We luckily got a table right at the edge and it was entirely worth sweating it out for.


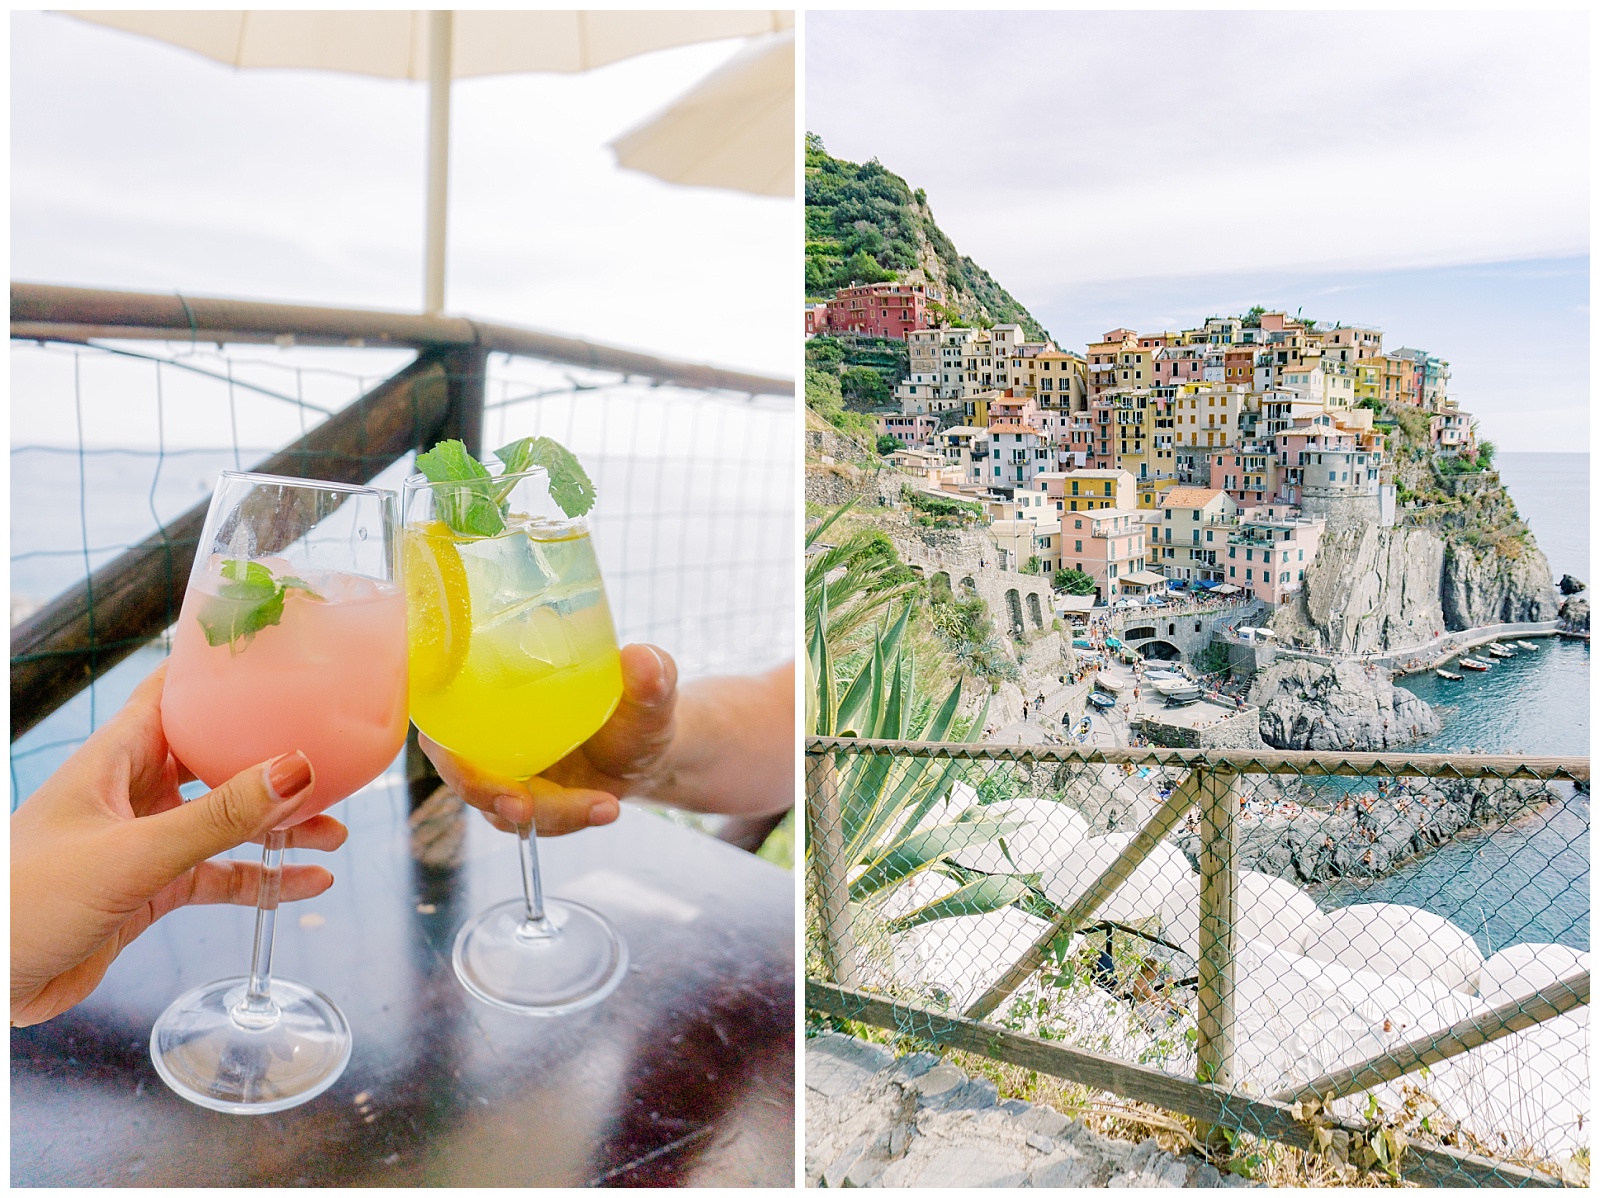


MONTEROSSO
The following day we attempted to do the hiking trail (short lived due to heat), and decided instead to take the town train over to the last town, Monterosso, to enjoy ourselves a gorgeous beach day at Monterosso Al Mare. I absolutely LOVED the orange and green striped umbrellas of this beach club, can you tell? You have to pay a little fee for a “lido” (umbrella + chairs) I want to say $30 euro and then it’s yours for the day. To me, it was worth it!


AMALFI
Okay, I know I keep saying “I couldn’t go to Italy without seeing….” but as I mentioned, Amalfi Coast is really one of those top top, WOW, hard-to-believe-is-real locations that I absolutely wanted to experience. Should we have given ourselves more time to do so? Yes. But my optimistic self thought that 2 days would be better than 0 days 🙂 We decided on 1 night in the town of Amalfi, and the last night in the very epic Positano.
SOOO we took the long train day down to Naples. And a taxi to the port (so short on time and almost missed the ferry. DO give yourself time in Naples, it is a big city!) Then the ferry to the town of Amalfi, and at last, our Airbnb fam greeted us to take us up to the home.


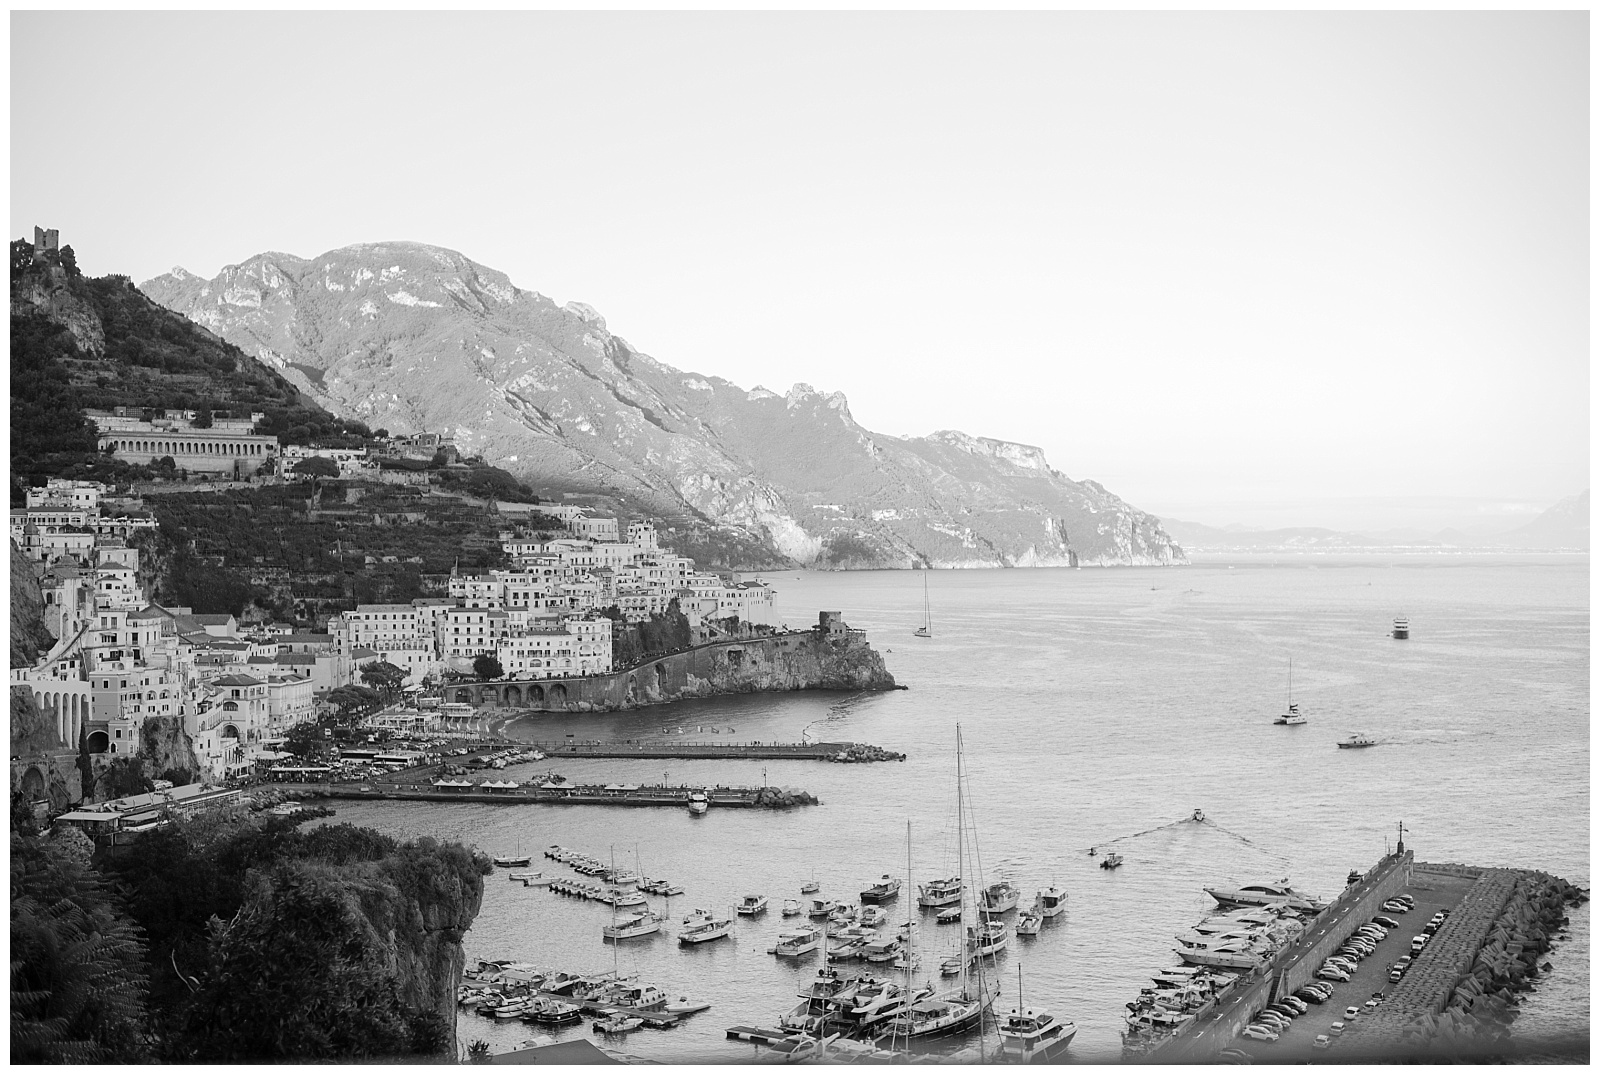

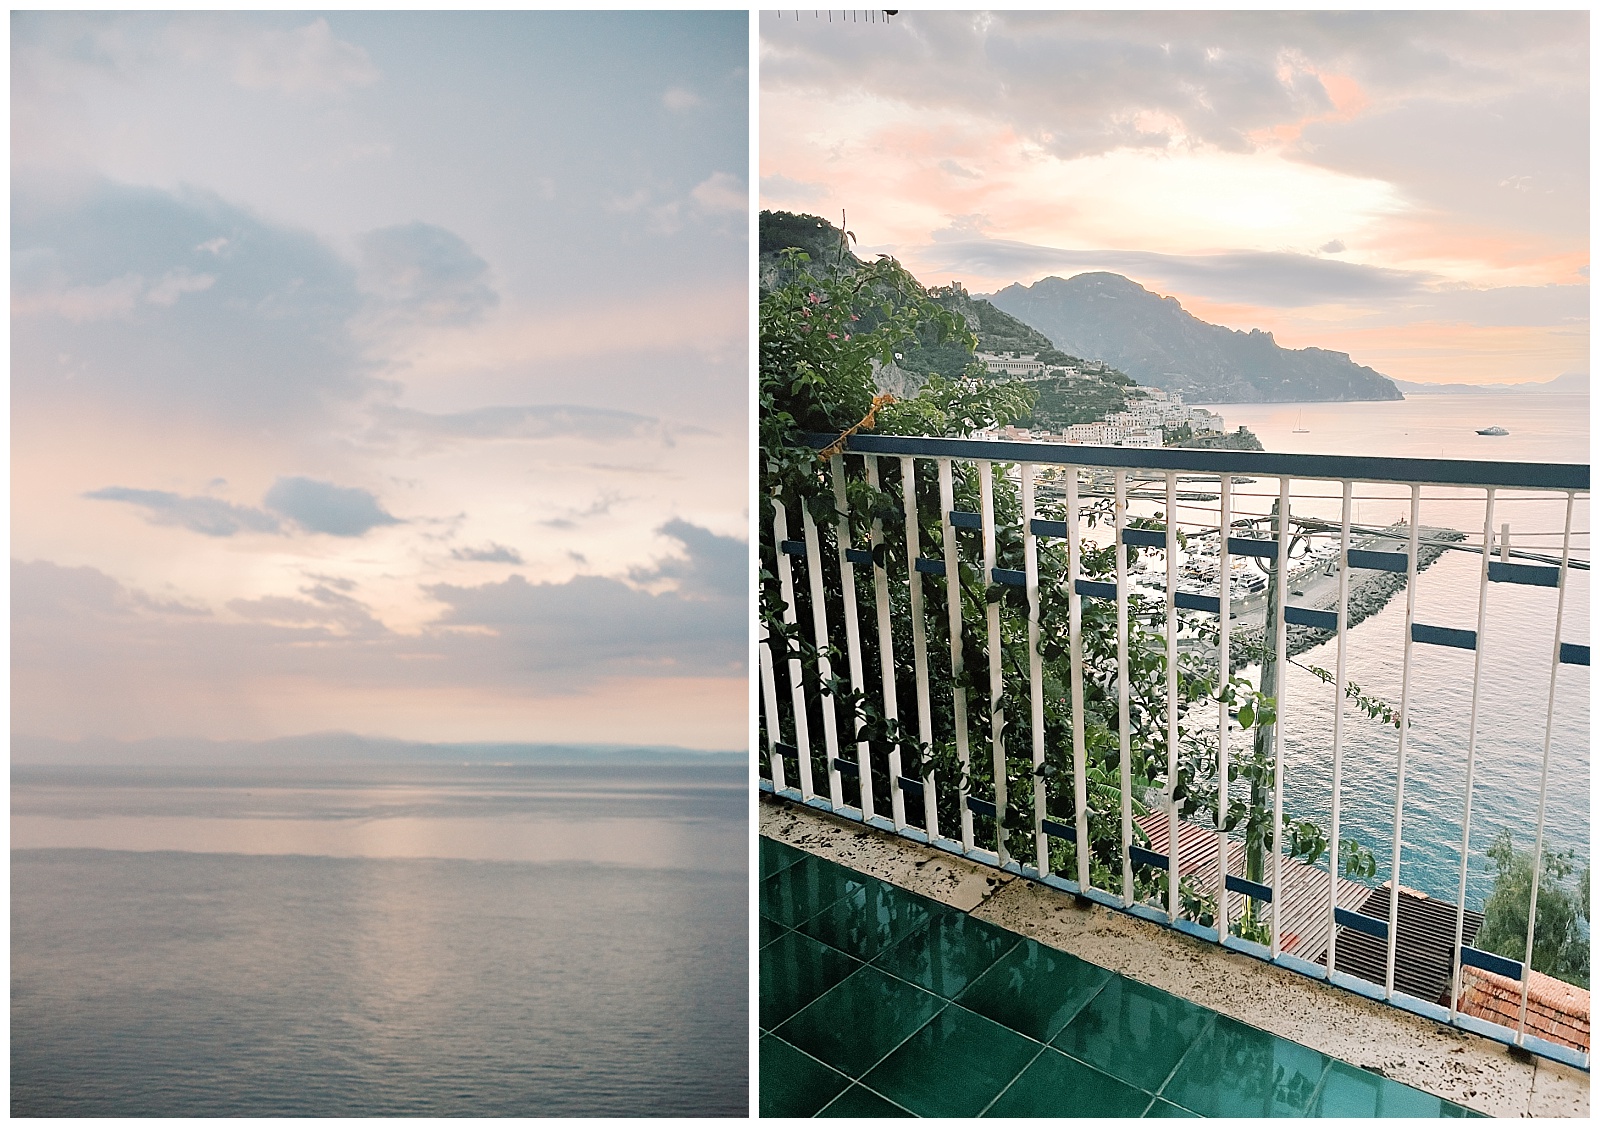


Our first night we were pretty exhausted from the day’s travels so just quietly enjoyed the view from our balcony. Eventually walked to the restaurant just below and had such a lovely dish of lemon pasta (highly recommend Lemon pasta in this area, as it is known for all its lemon groves!) Then went back up and watched some fireworks display, and listened to the distant sounds of the piano player from the restaurant. Ahhh….la dolce vita.
The next morning, I an early riser, enjoyed the little magazines and local books on the balcony, as I waited for Alex to wake up so we could begin our boat day!
POSITANO

Ahh Positano. It’s origin is lost between myth and history. The name “Positano” is said to mean Neptune, and linked to the legend of fugitive sailors that heard a voice saying “posa posa (put down put down” and they interpreted those words as being the will of the Virgin Mary to land. Now, it is a famous tourist resort town, where people from all over the world come to spend time at luxury hotels on the colorful cliff, relax on the many beach clubs, and be seen.
“Positano bites deep. It is a dream place that isn’t quite real when you are there and becomes beckoningly real after you have gone.” – John Steinbeck
On our train ride to Amalfi Coast, I read the fittingly titled book “One Italian Summer.” An adorable mother/daughter-themed novel of grief, but finding oneself again (and finding her late mom in her youth) in Positano. The book romantically described the history of the town and all her mom’s favorite locals (which are actual places!): Hotel Poseidon, Chez Black, the Path of God’s, taking a boat ride to Capri. I just couldn’t wait to experience this much-anticipated, fancy colorfully stacked resort destination that inspired so many artists and film makers before me! PS: fast forward to this coming September, where I will make a return trip with my own mother (who equally enjoyed the book), and sister. I have never traveled with anyone on such a trip, other than my husband. So I am so excited for what our girls adventure will be like, and to experience such a place with them.
Anyways, I heard the best way to experience the beauty of Positano is from the water. So, since our check in wasn’t until 3pm and we had some time to kill, we decided to have ourselves a little boat day on the sparkling teal Mediterranean waters (jk, it was sooooo windy and cold and choppy, we almost cancelled!) Alex – not a big ocean guy – braved it out and piloted his first boat ever using this rental boat – along the Amalfi coast!! I mean….what a first of firsts to be had.


I’ll never forget the excitement staring along the coastline, wondering “is this it?” …”maybe just around this corner.” Admiring the grand hotels perched along the cliffs and other vertical communities along the way. I couldn’t fathom people actually live up there. My fear of heights could never allow!
At last, in the distance, it seemed like it could possibly be Positano? I told Alex to head inward, and the closer we got, the closer I realized…omg we actually made it. We are here. Positano!
We got as close as we could (Alex not the most comfortable navigator in choppy waters was worried he wouldn’t be able to meander through the boats!) and we just laid there on the front of the boat. Admiring the view. Admiring the other boats. Until the sea sickness started coming in. Believe it or not I never even dipped into the Mediterranean water – just too cold and windy to cross my mind.
With more clouds rolling in, we decided to cut our boat day short. Definitely would not be making it to Capri. But we were happy for the unique vantage point of Positano, in a way that I will surely remember forever.
We dropped off our boat back in Amalfi, grabbed our stored luggage, and took the Ferry back to Positano. Somehow it became so so sunny just in time for us to climb the 100 or so sets of stairs. I swear to god, they never ended. I am a patient, strong-willed person, and even I about 1/3 way through thought how ridiculous this was, and who would set up a town like this!
By the time we got to the top we were so exhausted, sweaty, we couldn’t even think straight. Then, after checking into our Airbnb (yes another one at the very top of town – turns out views come with a price), I frustratingly reread the directions from our host which said to **take the bus up**. LOL this is what travel brain does to you. I swear I can be so proactively detailed in planning, but lose half my IQ points while actually there in the moment. TIP: hire or have your hotel arrange a luggage porter on your arrival from the port. Note: there are no roads directly to the port so you can’t immediately get a taxi, you have to walk yourself up the beach and to the closest road (about 5-10 minutes past a lot of shops). By that point, you can take the bus up, or continue to walk the main roads up (gradual climb). But whatever you do, do NOT take the google maps walking directions up especially if on Hotel Poseidon level or above (google maps makes it look like just a road or two up from the beach – but there are many many steps up and levels in between these roads lol! You’ve been warned).
The view was definitely gorgeous from our hotel balcony. However, I was a little overwhelmed thinking about how hungry we are and now having to navigate all the steps…back down and around to the other side of town where we had our reservations (again, google maps make it all feel so close – my suggestion is to book restaurants closer to your hotel for ease of logistics, ie: left side vs right side)
The walk back up to our hotel suddenly didn’t seem so bad though m with a little alcohol in our system (and without the heat scorching our backs) and was so romantic seeing some of the boutiques and other restaurants all lit up at dusk. While trying very hard not to get hit by any cars on the narrow windy (and now dark) streets.
We made it. Our final night. And we were exhaaaausted. I wish I could say I slept well, but I woke up in the middle of the night with terrible stomach cramps. I’ll save the details, but let’s just say…spending the last 24 hours of our trip with a heavy travel day, while battling potential sun or food poisoning / exhaustion and dehydration / AND that time of month, in a foreign country and nonstop modes of public transportation. Luckily I kept things inside me the entire steps back down with our luggage, our ferry trips back to Naples, including an unexpected layover in Capri that added an extra hour waiting in line in a hot unforgiving sun, then the taxi ride to the train station, the train ride back to Rome, and finally, the taxi to our hotel.


BACK TO ROME
While in Rome, we spent the next 16 or so hours crammed in our tiny hotel room, located near the airport and not anything cool to walk to (so sorry to Alex). While I was in a delirious blur in between sleep and running to the bathroom, Alex making me eat bananas to help regain strength and retain water. Then, finally, the next morning, and last home stretch – waiting at the airport before our 9 hour flight home and 4 hour drive back to Appleton. I made it again without any embarrassing public incidences. WHEW. I now swear on bananas.
It honestly took me three weeks to fully recover from our two weeks in Italy. But I would do it again in a heartbeat.
I still truly wonder if I am the only person in the world who traveled to Italy, for multiple days vacation, who flew in and out of Rome, and never saw the Colosseum.
~~~~~~~
If you have made it this far, I hope you have enjoyed our little tour of Italy! And I hope my advice and lessons learned saves you from making similar silly mistakes – hehe! That is the best part of travel, it comes with good, bad, sometimes ugly. But it is the gained experience and lifelong memories that make it alllll invaluable.
FINE (“THE END”)
May 8, 2024

Guys. I am FINALLY ready to recap our first *legit* international European trip. I say legit, because can we really count our van trip around Iceland as quintessential “European”?? Haha, just sliiightly different vibes. After getting our feet wet in international travel, choosing our *second* euro destination seemed like a no-brainer. After seeing countless […]
VIEW THE FULL POST
thank you!
I have received your inquiry. Please allow 1-2 business days for me to be in touch with you.
xo Meghan
I have received your inquiry. Please allow 1-2 business days for me to be in touch with you.
